FORUM CTRLX AUTOMATION
ctrlX World Partner Apps for ctrlX AUTOMATION
Dear Community User! We have started the migration process.
This community is now in READ ONLY mode.
Read more: Important
information on the platform change.
- ctrlX AUTOMATION Community
- Forum ctrlX AUTOMATION
- ctrlX PLC
- Re: How to start PLC Method by DataLayer or OPC UA
How to start PLC Method by DataLayer or OPC UA
- Subscribe to RSS Feed
- Mark Topic as New
- Mark Topic as Read
- Float this Topic for Current User
- Bookmark
- Subscribe
- Mute
- Printer Friendly Page
- Mark as New
- Bookmark
- Subscribe
- Mute
- Subscribe to RSS Feed
- Permalink
- Report Inappropriate Content
06-10-2022 01:47 PM
Hi,
Is it possible to start PLC Function, Method, FB or somthing different by DataLayer or OPC UA and wait for response?
In IndraWorks I used SymbolConfiguration option "Support calls to Function, FB..."

But I can't find it in PLC Engineering

What is the best way to achieve this?
Best regards,
Andrey
Solved! Go to Solution.
- Mark as New
- Bookmark
- Subscribe
- Mute
- Subscribe to RSS Feed
- Permalink
- Report Inappropriate Content
06-14-2022
02:36 PM
- last edited on
11-21-2022
09:59 AM
by
TheCodeCaptain
![]()
Hello Andrey
With the V1.14 we have FBs (CXA_OpcUAClient) that can start methodes at our servers (like XM, MLC, ...)
But our ctrlX CORE OPCserver doesn't support methodes within the PLC (Symbol-Configuration). This will come end of this year.
Regards
Jochen
- Mark as New
- Bookmark
- Subscribe
- Mute
- Subscribe to RSS Feed
- Permalink
- Report Inappropriate Content
06-15-2022 01:32 PM
Hello Jochen
And what about DataLayer, is it possible to start PLC method from C++?
I'm working on C++ app and want to process some task on the PLC side and wait for result of this task. To do this I need a way to run Method or Function in the PLC.
Best regards,
Andrey
- Mark as New
- Bookmark
- Subscribe
- Mute
- Subscribe to RSS Feed
- Permalink
- Report Inappropriate Content
06-20-2022 07:28 AM
One easy way would be to define an interface like PLCopen. Add start and finish Booleans and an input and output variable to the Data Layer.
- Mark as New
- Bookmark
- Subscribe
- Mute
- Subscribe to RSS Feed
- Permalink
- Report Inappropriate Content
06-21-2022 08:36 AM
Hi CodeShepherd
Thanks, I'll try.
- Mark as New
- Bookmark
- Subscribe
- Mute
- Subscribe to RSS Feed
- Permalink
- Report Inappropriate Content
11-11-2022 04:03 PM - edited 09-29-2023 04:42 PM
Call PLC methods via Opc UA
Introduction
When you want to call a method of a PLC FB via Opc UA, there are some restrictions:
- ctrlX Engineering 1.16.0 (RM 22.07.0) or newer
- Input/Output parameters of method are limited:
- 1 input parameter of basic data type (eg. INT, REAL, BOOL) no STRUCT, no ARRAYS
- 1 output parameter of basic data type (eg. INT, REAL, BOOL) no STRUCT, no ARRAYS
- Correct setup of “Symbol Configuration”
Basic example for FB
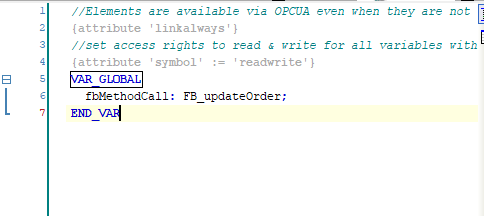
create object GVL
//Elements are available via OPCUA even when they are not used in program
{attribute 'linkalways'}
//set access rights to read & write for all variables within VAR_GLOBAL
{attribute 'symbol' := 'readwrite'}
VAR_GLOBAL
  fbMethodCall: FB_METHOD;
END_VAR
create object Function Block
FUNCTION_BLOCK FB_METHOD
VAR
  ///counts the number of calls
  uliCntMethodCall: ULINT;
END_VAR
Add method to Function Block
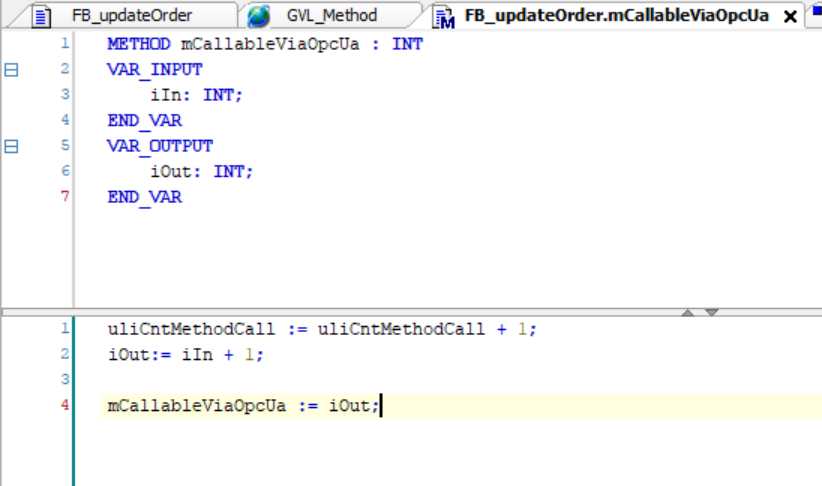
METHOD mCallableViaOpcUa : INT
VAR_INPUT
    iIn:   INT;  // currently only 1 input param supported
END_VAR
VAR_OUTPUT
	iOut: INT; // currently only 1 output param supported
END_VAR

// Implementation
// counts the number of method call
uliCntMethodCall  := uliCntMethodCall + 1;
iOut              := iIn + 1;              // increase input by 1
mCallableViaOpcUa := iOut;                 // return iOut
Setup of “Symbol Configuration”
Press “Build” to update the “Symbol Configuration”, than activate the options:
- “Support OPC UA features”
- “Support calls to Functions, FBs, Methods and Programs”
- When this option is not available, check version of PLC
- Remove and reinsert “Symbol Configuration”

Activate execution rights for method mCallableViaOpcUa().
Meaning of access icons:

|
Read only |

|
Read & execute |

|
Write only |

|
Write & execute |

|
Read and write |

|
Read, write and execute |

|
Execute |
|
|
Set access rights (1) for parent fbMethodCall element: “read & write” 

Click on “…” to open window, for setting access rights of child element method “mCallableViaOpcUa” to “execute”


Click “Online> Login” to PLC with a download. You might have to do a “Build> Clean” before.
Test method call with “UA Expert”
Ua Expert is a well-known OpcUA test client. It can be used to verify if the method is correctly written into the symbol configuration. See “chapter Install & Start UaExpert” for installation and first start documenatation.
- Install & start Ua Expert
- Configure it, as describe below
- Define connection to the ctrlX CORE.
- Browse symbol configuration
- Right click mCallableViaOpcUa & selet “Call…”

- When it fails:
- Check the settings of the access rights
- Check if you have max. only 1 input and 1 output parameter of a base data type
- In Plc Engineering: Execute “Build> Clear” or “Build> Clean all”
- Download and start the project
Install & Start UaExpert
Ua Expert is a well-known OpcUa testclient. You can download it from: https://www.unified-automation.com/downloads.html
Start the installation program; use the default settings on every page select next installation page until installation is finished.
First Start of UaExpert
Starting the UaExpert the first time, a message is shown that a certificate must be created.

Insert your organization in the yellow marked field, keep the other defaults and press “OK”.

Setup communication
Click on Server>Add to open window “Add Server”

- Provide “CtrlX” as configuration name (red mark)
- <“Double click to Add server…> in branch “Custom Discovery” (yellow mark)
- Provide URL: opc.tcp://192.168.1.2:4840 (green mark). Replace the IP address by the IP address of your control.
- When the communication to the server can be established, the branches are shown (see cyan mark) otherwise the communication is not established. => Verify IP-address and OpcUa server is running.

- Click “OK”. Now (at first connection) the certificates between CtrlX and UaExpert are exchanged. The certificate of CtrlX is displayed and you have to click on button “Trust Server Certificate” and button “Continue”.

HINT: The UA Expert sometimes replaces the IP address with the name of ctrlX, then the communication sometimes could not be established. To check this, right click the server item and select “Properties…”

Replace the name in the Endpoint Url with your IP-address. opc.tcp://192.168.1.1:4840. Press “OK” to close the window. To connect or disconnect select in menu: Server/Connect or Server/Disconnect.

Trust UaExpert certificate on CtrlX CORE (1.16.0)
Start ctrlX CORE web page. Login
- Default user: boschrexroth
- Default password: boschrexroth
Goto “Settings/Certificates & Keys/OPC UA Server”. Click on “…” and “Trust” the certificate.

Quit UaExpert (File>Quit) and restart it.
Select “Server>Start”
Select the connection previously defined.
When the connection is successfully established the available OpcUa nodes are displayed in the window “Address Slave”. The screen shoot below shows the location of the PLC symbols. “Root>Objects>datalayer>plc>app>Application>sym”

- Mark as New
- Bookmark
- Subscribe
- Mute
- Subscribe to RSS Feed
- Permalink
- Report Inappropriate Content
09-26-2023 01:41 PM
Hello @HmiGuide ,
thank you for the great documentation on how to call PLC methods via OPC UA.
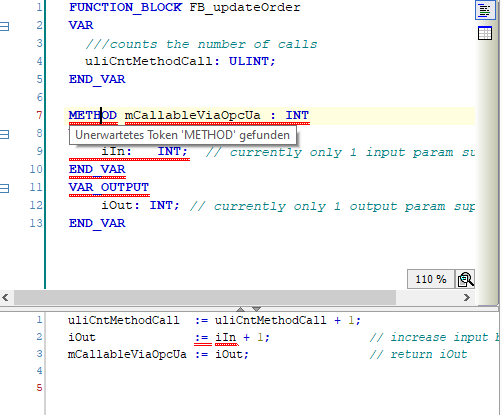
I created the exact same example as you show us above to see if it´s working. I copied the same FB but the PLC-Programm identify the token METHOD as unexpectedly (see screenshot) which causes errors.
Futhermore (without Method and errors) I can´t find the FB in the symbol configuration. I set the settings as you mentioned and pressed build. I also tried to remove the symnol configuration and insert it new. Unfortunately it didn´t work. Do you have a documentation how to set up a FB with a Method correctly?
I use the CtrlX WORKS Version 1.20.4.
I hope that you have a solution for my problem. Thanks in advance.
- Mark as New
- Bookmark
- Subscribe
- Mute
- Subscribe to RSS Feed
- Permalink
- Report Inappropriate Content
09-26-2023 10:11 PM
I'm currently on a buisiness trip and not able to check your problem. As I not really use the feature daily it will take me some time, to get familiar with it and verify your problem.
- Mark as New
- Bookmark
- Subscribe
- Mute
- Subscribe to RSS Feed
- Permalink
- Report Inappropriate Content
09-27-2023 11:31 AM
Ok, do you know a contact person who is familiar with this feature? This topic is really important for us right know. Thank you!
- Mark as New
- Bookmark
- Subscribe
- Mute
- Subscribe to RSS Feed
- Permalink
- Report Inappropriate Content
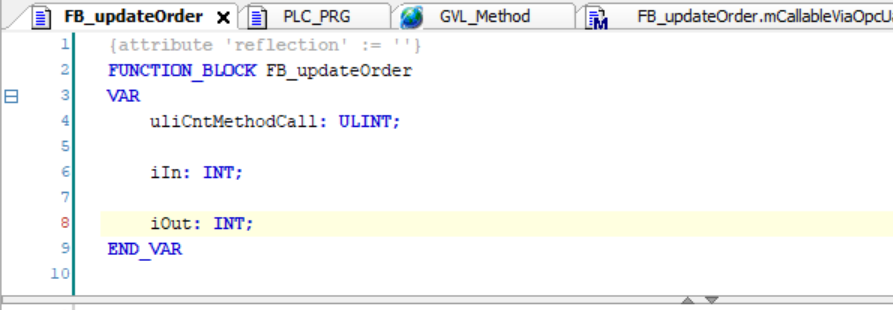
09-28-2023 07:21 PM - edited 09-28-2023 07:24 PM
Hello,
I tried to reproduce your method on my 1.20 system.
At first I created a new FB called "FB_updateOrder" with an input and output variable.

and added a method named "mCallableViaOpcUa" and impelementet the "output = input +1" logic.

I created a new GVL named "GVL_MethodTest"

and configured the symbol configuration.

After a download I connected to via UA Expert and I was able to call the function/method.

best regards
Christian
- Mark as New
- Bookmark
- Subscribe
- Mute
- Subscribe to RSS Feed
- Permalink
- Report Inappropriate Content
09-28-2023 10:34 PM
Hello@E_Stapel
there is a basic misunderstanding from your side. You can't just copy the method code into the declaration part of the FB.
To create a method within a FB right click the FB, "Add object"> "Method."

After adding the method it is visable in the tree (see picture below)

- Mark as New
- Bookmark
- Subscribe
- Mute
- Subscribe to RSS Feed
- Permalink
- Report Inappropriate Content
09-29-2023 04:44 PM
Hello @NoRisk4Project and @HmiGuide ,
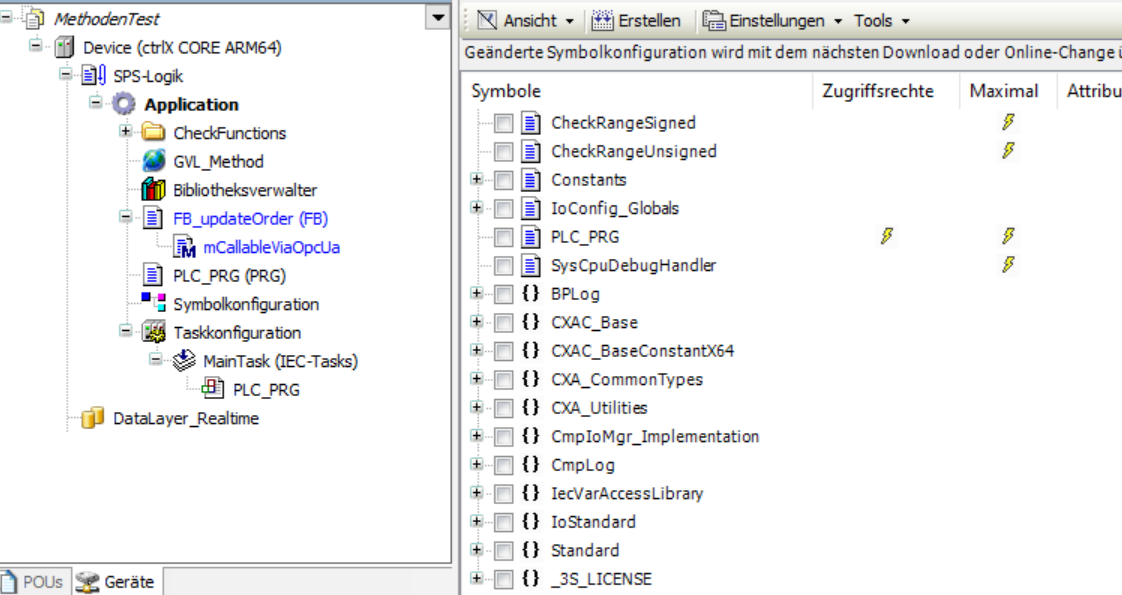
thank you for the great help. In the past I tried already the Method Object in the same way you did it but I couldn´t find the Method in the symbol configuration. Now, I reproduced your example method in the exactly same way. Unfortunately I still can´t find the Method / GVL in the Symbol Configuration (See attachment). I hope you can help me. Thank you so much!
- Mark as New
- Bookmark
- Subscribe
- Mute
- Subscribe to RSS Feed
- Permalink
- Report Inappropriate Content
09-29-2023 04:58 PM
CoDeSys has changed the display of variable lists in the symbol configuration at some point. In the past everything was always displayed. Meanwhile the GVL's are hidden, which contain the pragma "attribute symbol".
- Mark as New
- Bookmark
- Subscribe
- Mute
- Subscribe to RSS Feed
- Permalink
- Report Inappropriate Content
09-29-2023 05:31 PM - edited 09-29-2023 05:32 PM
Hello,
please clean your application by selecting "Build" and "Clean all". If this is done, rebuild your application with "Generate Code".
Please check the symbol configuration after this sequence again ...
- Mark as New
- Bookmark
- Subscribe
- Mute
- Subscribe to RSS Feed
- Permalink
- Report Inappropriate Content
10-02-2023 06:53 AM - edited 10-02-2023 06:54 AM
@E_Stapel: As an addition to my colleagues, you have to switch on the view "Symbols exported via Attribute". Afterwards for all variables added via pragma the check boxes in the symbol configuration are still not ticked but you can see that the attribute is set correctly:

- Mark as New
- Bookmark
- Subscribe
- Mute
- Subscribe to RSS Feed
- Permalink
- Report Inappropriate Content
10-09-2023 11:07 AM
Hello everyone,
is it also possible to implement the OPC UA Methods via NodeRed?
In my UseCase I need more input variables and that is impossible with the PLC Method. Or is it planned to unlimit the restriction of using only one input parameter?
Thanks so much for your great help!
- Mark as New
- Bookmark
- Subscribe
- Mute
- Subscribe to RSS Feed
- Permalink
- Report Inappropriate Content
10-09-2023 01:32 PM
Hello,
how many input and output parameters do you need?
With 1.20 the default is 8 input and output variables for PLC methods. But this is only a default value and can be changed.
- Mark as New
- Bookmark
- Subscribe
- Mute
- Subscribe to RSS Feed
- Permalink
- Report Inappropriate Content
10-09-2023 02:00 PM
In Node-RED you will have to implement an OPC UA server independent of the ctrlX OPC UA Server to provide own OPC UA variables.
But like @NoRisk4Project says it is possible to add up to 8 variables in the PLC and you should also consider to simply use double words and use each bit as a variable to be transmitted. So you can already have a very big amount of transmittable booleans.
- Mark as New
- Bookmark
- Subscribe
- Mute
- Subscribe to RSS Feed
- Permalink
- Report Inappropriate Content
10-11-2023 11:04 PM
I have another question due to the OPC UA Method. I successfully created the same test method in the plc as you did and I can see the method on the UA Expert.
The problem is that I can´t see the Method on other systems like a MES. I think the problem is the fbMethodCall because I have errors on the UA Expert on this "Node" and I even can´t see this Node on other systems.

The Method "mCallableViaOpcUA" is a part of the node "fbMethodCall" and because of that not visable on other systems. In the following I will show you the messages of the UA Expert

To open the Method on the MES via the Node-ID went also wrong. Error message: "Object reference not set to an Instance of an object."
Did you test your Method on a third system? Is it possible to change the setting of the node "fbMethodCall" that there are no errors anymore? We can also clarify this in an appointment.
Thank you in advance!
- Mark as New
- Bookmark
- Subscribe
- Mute
- Subscribe to RSS Feed
- Permalink
- Report Inappropriate Content
10-12-2023 08:59 AM
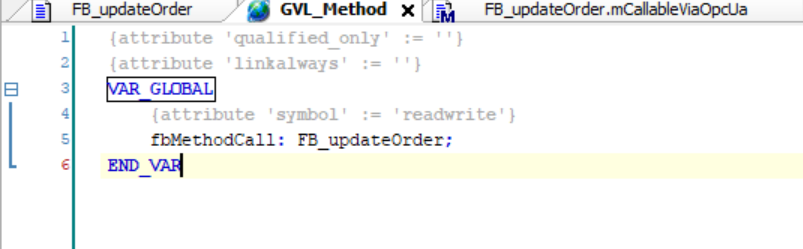
Hello everyone,
one addition to the post of @E_Stapel (we work on the same project):
- We realized that the OPC/UA tag "fbMethodCall" does not have a data type causing the error message in UAExpert when browsing the tag.
- When browsing with our 3rd party system we can not view this tag and we assume it has to do with the missing type.
- The OPC/UA tag "fbMethodCall" is defined as in the screenshot below:

Is it possible to add some sort of type to this tag to make it browsable from a 3rd party system or remove it entirely and put the OPC/UA method "mCallableViaOpcUa" directly under the directory "GVL_Methoden"?
Thanks in advance for a reply and any help.
Constantin