FORUM CTRLX AUTOMATION
ctrlX World Partner Apps for ctrlX AUTOMATION
Dear Community User! We have started the migration process.
This community is now in READ ONLY mode.
Read more: Important
information on the platform change.
- ctrlX AUTOMATION Community
- Forum ctrlX AUTOMATION
- ctrlX CORE
- Re: Sample Node Red Dashboards
Sample Node Red Dashboards
- Subscribe to RSS Feed
- Mark Topic as New
- Mark Topic as Read
- Float this Topic for Current User
- Bookmark
- Subscribe
- Mute
- Printer Friendly Page
- Mark as New
- Bookmark
- Subscribe
- Mute
- Subscribe to RSS Feed
- Permalink
- Report Inappropriate Content
10-05-2020 11:49 PM
Hello,
I was able to install the NodeRed snap on my CtrlX promoter demo by downloading the snap file from Snapcraft. I was then able to add the CtrlX Datalayer node that is on Github to my install of Node Red. I've working on building a dashboard to go with my demo so I have web HMI / Dashboard for controlling the demo. I can read values from the CtrlX core including PLC variables and drive status but am having trouble figuring out how command/control/write to the core. Does anyone have a sample Node Red Flow or JSON file they could share that I could take a look at?
Solved! Go to Solution.
- Mark as New
- Bookmark
- Subscribe
- Mute
- Subscribe to RSS Feed
- Permalink
- Report Inappropriate Content
10-06-2020 09:39 AM - edited 10-06-2020 09:54 AM
First of all please have a look to the post "How-to use the REST API" for more information. Please also check the notes at the bottom of the post.
For further questions please get in touch with the Sales Technical Support STS.
- Mark as New
- Bookmark
- Subscribe
- Mute
- Subscribe to RSS Feed
- Permalink
- Report Inappropriate Content
10-08-2020 05:17 PM
- Mark as New
- Bookmark
- Subscribe
- Mute
- Subscribe to RSS Feed
- Permalink
- Report Inappropriate Content
10-27-2020 06:09 PM
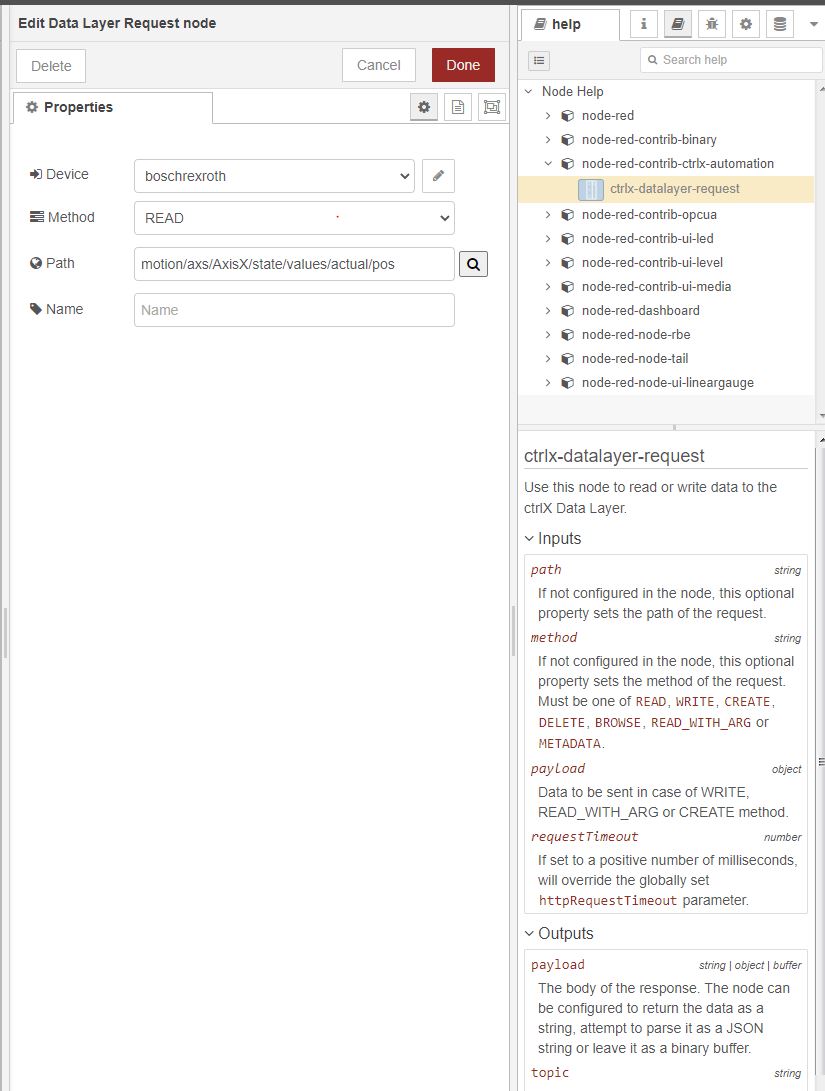
The REST API info was sort of helpful. The only real helpful thing there was to use the Developer Tools while using the CtrlX web interface to see how pushing buttons send commands to the CtrlX Core. My Bosch Rexroth local support sent me some screenshots of using HTTP requests (which use the REST API directly) to request data and command the drive. However, none of that worked. I did end up adding the CtrlX Node to the Node Red pallete in my implementation available on Github. Using the CtrlX node I was able to get all communication working. I believe this node sets up some of the base functions needed to communicate to the core with the REST API. It wasn't easy but I learned a lot along the way. The only issue I'm still having is with regards to the output of the CtrlX node. The help for the node shown in Node Red states that the node can be configured to return the data as a string, attempt to parse it as a JSON string or leave it as a binary buffer. However, the node does not show anyway to configure the output. Has anyone been able to configure the output of the CtrlX Node?
- Mark as New
- Bookmark
- Subscribe
- Mute
- Subscribe to RSS Feed
- Permalink
- Report Inappropriate Content
10-28-2020 01:00 PM
Sorry for the confusion. Configuration of the output format is a planned feature, but not yet part of this releases. Looks like the documentation was faster than the implementation.
For the moment, the data is always returned as a json object. For simple data types this consists of type and value. For complex types, the data object is returned directly as json.
For the planned feature we will make it configurable to return JSON (with type info), value only (as string), binary format (with type info, probably encoded as flatbuffer).
- Mark as New
- Bookmark
- Subscribe
- Mute
- Subscribe to RSS Feed
- Permalink
- Report Inappropriate Content
11-09-2020 06:57 PM
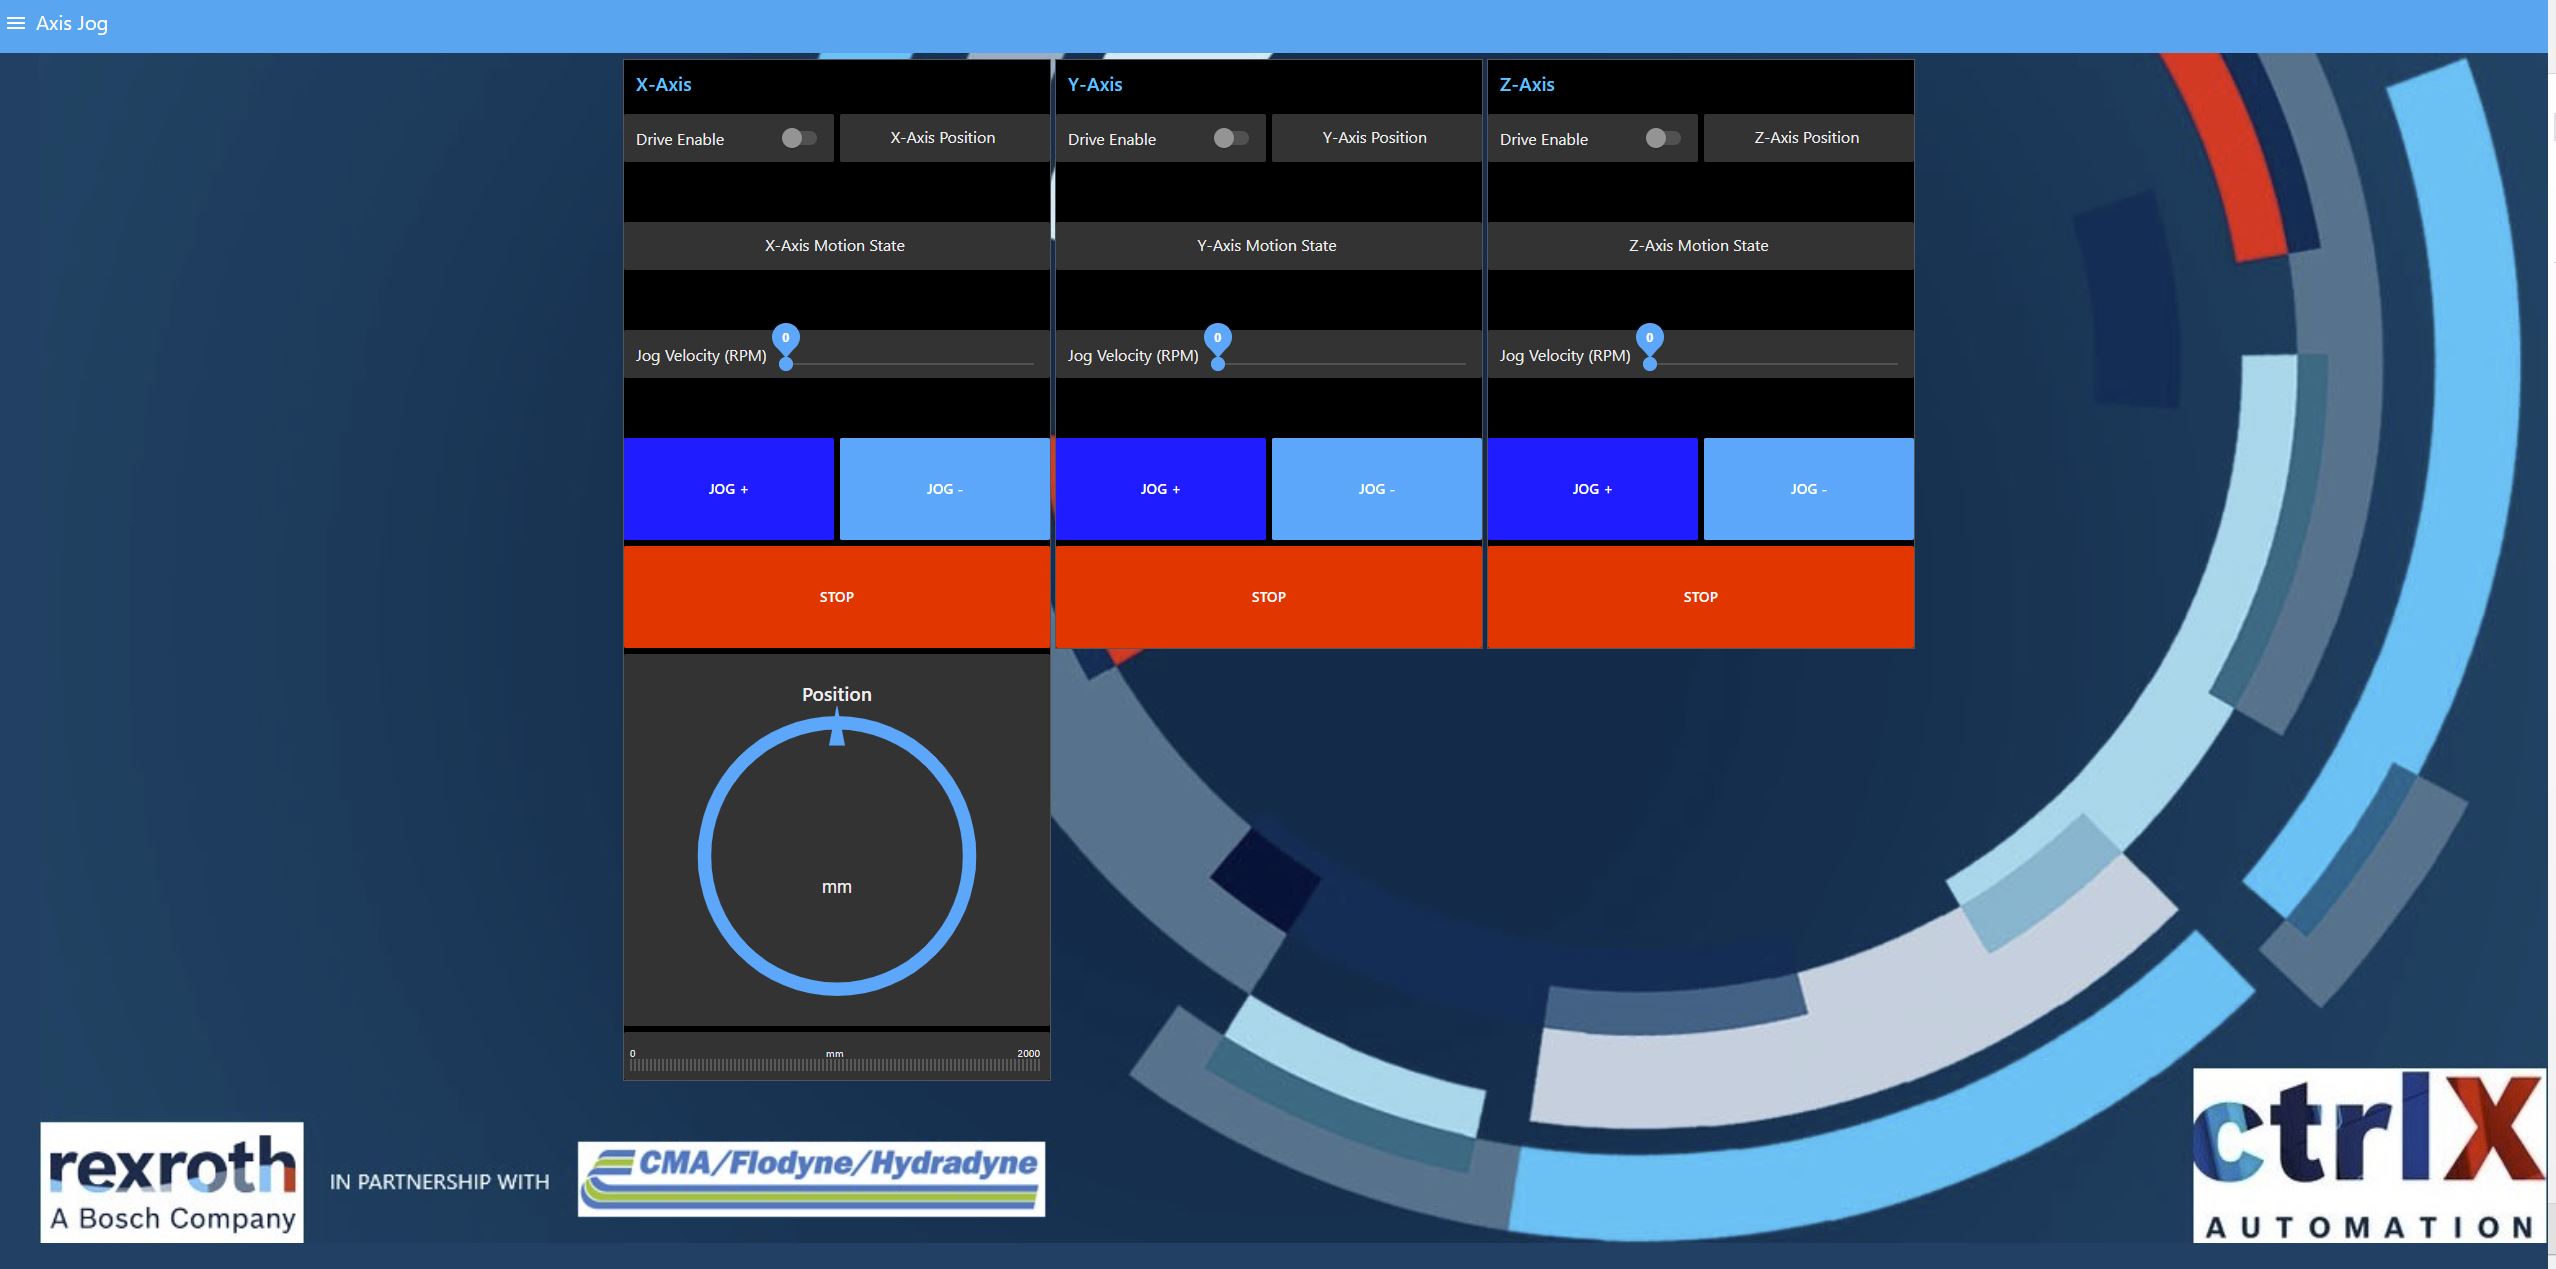
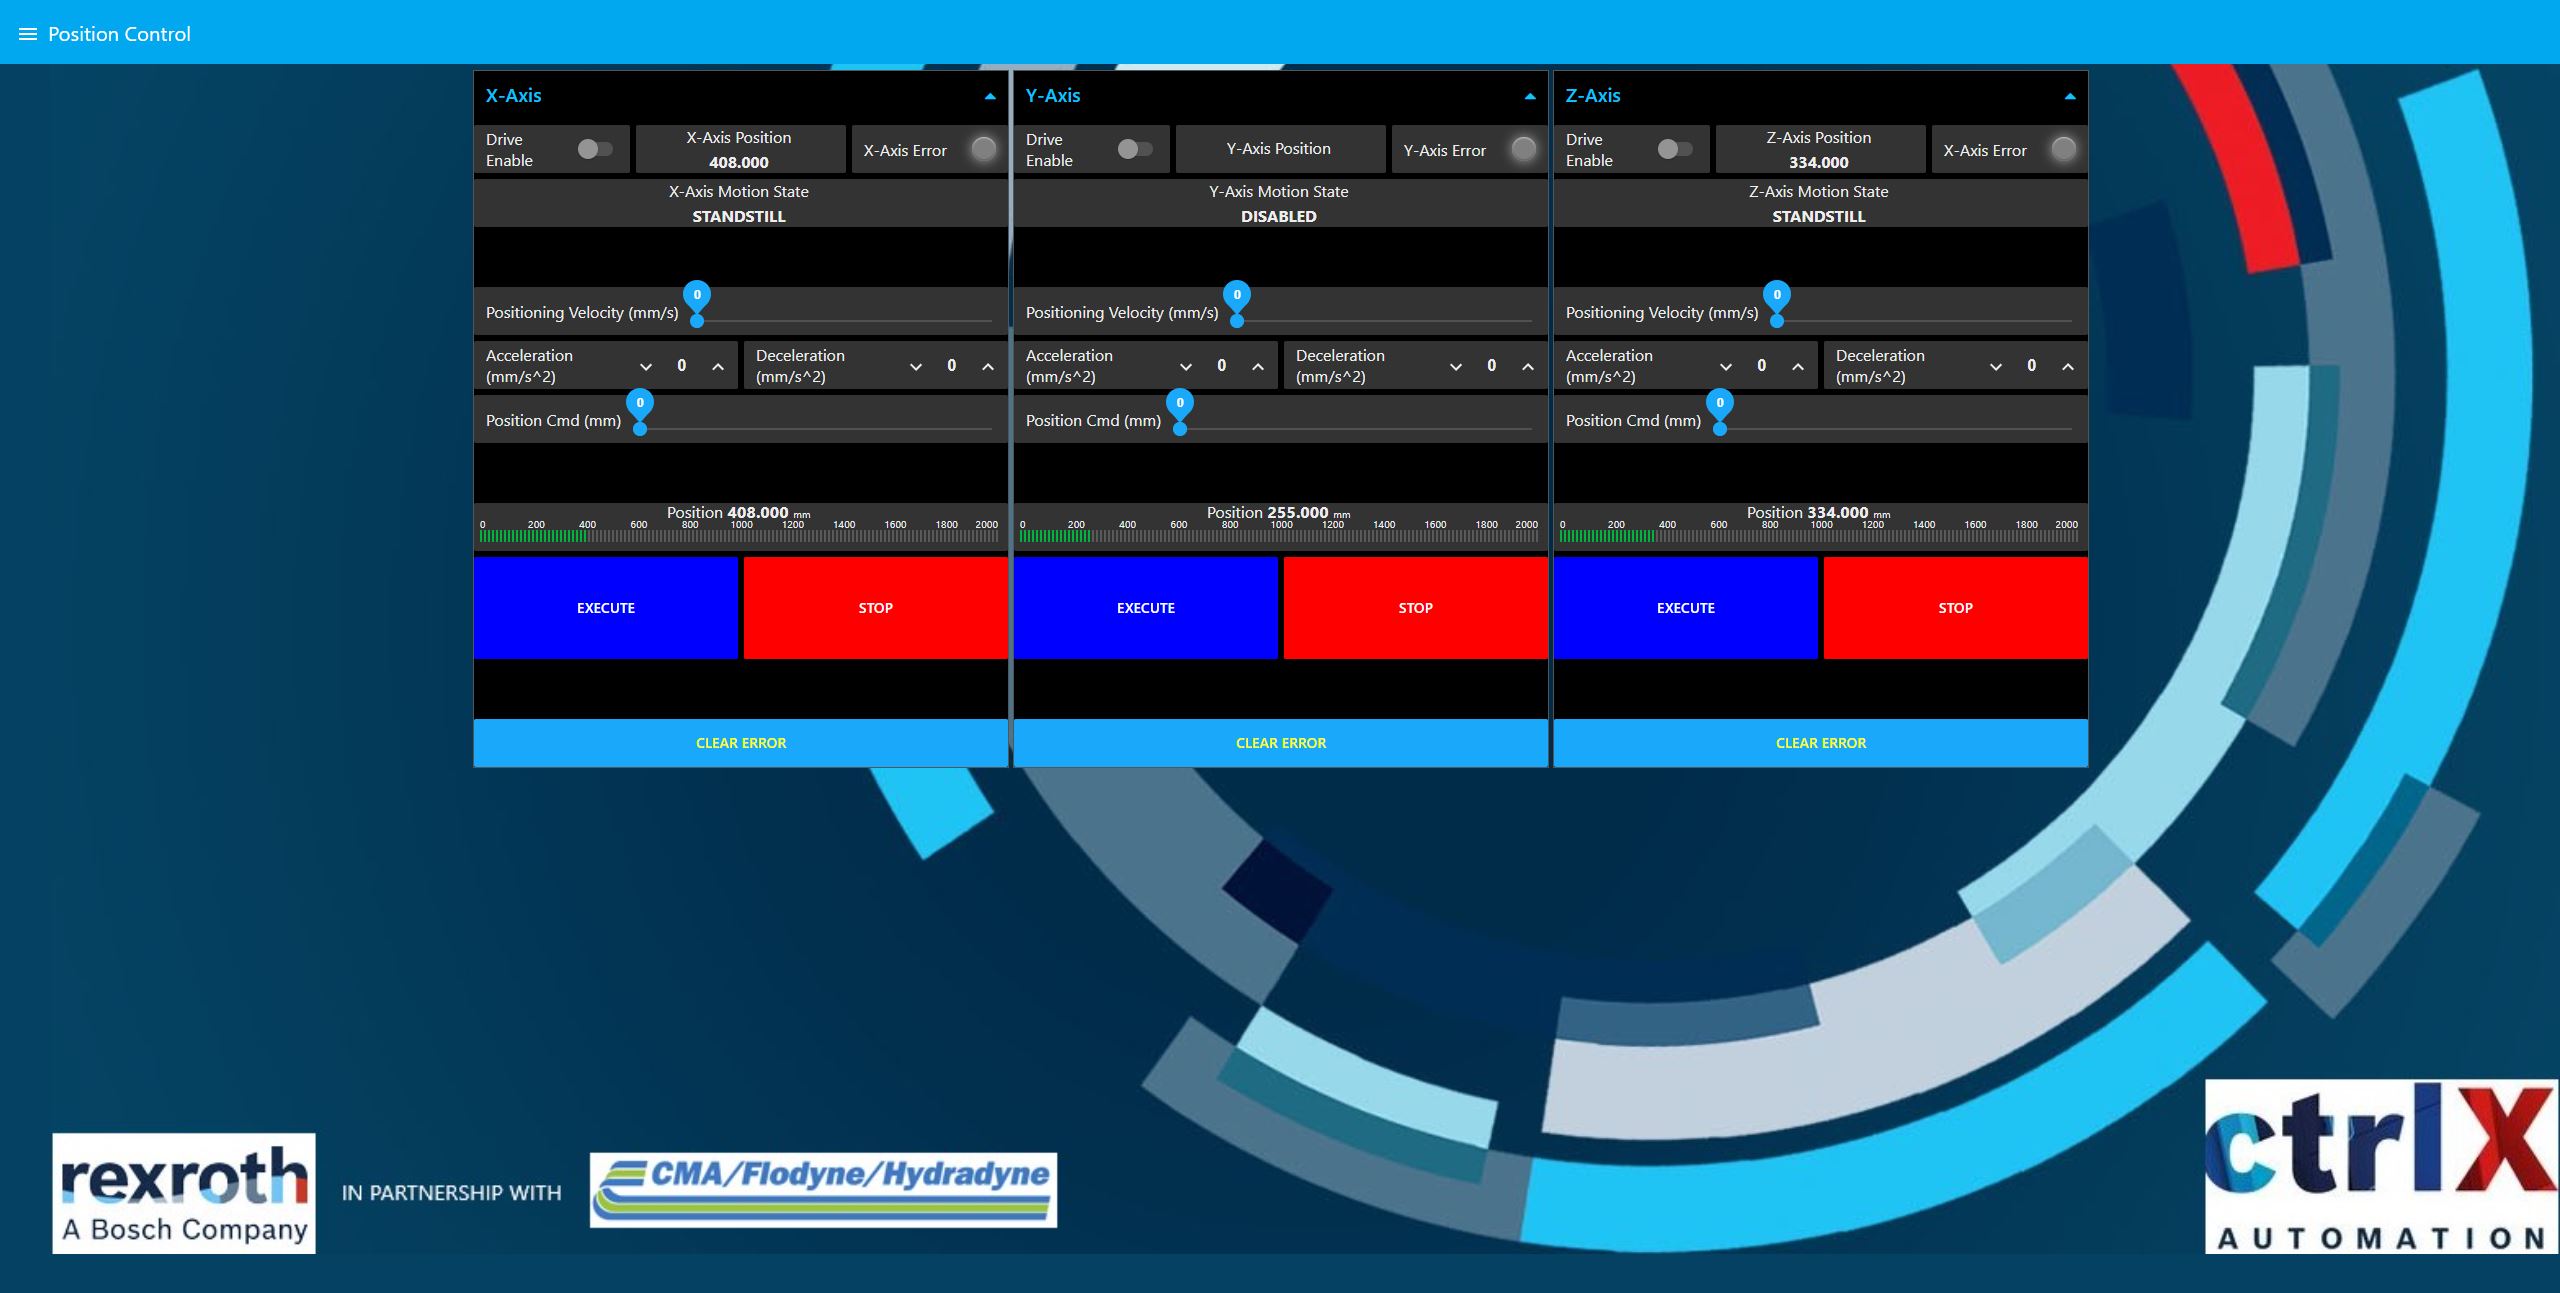
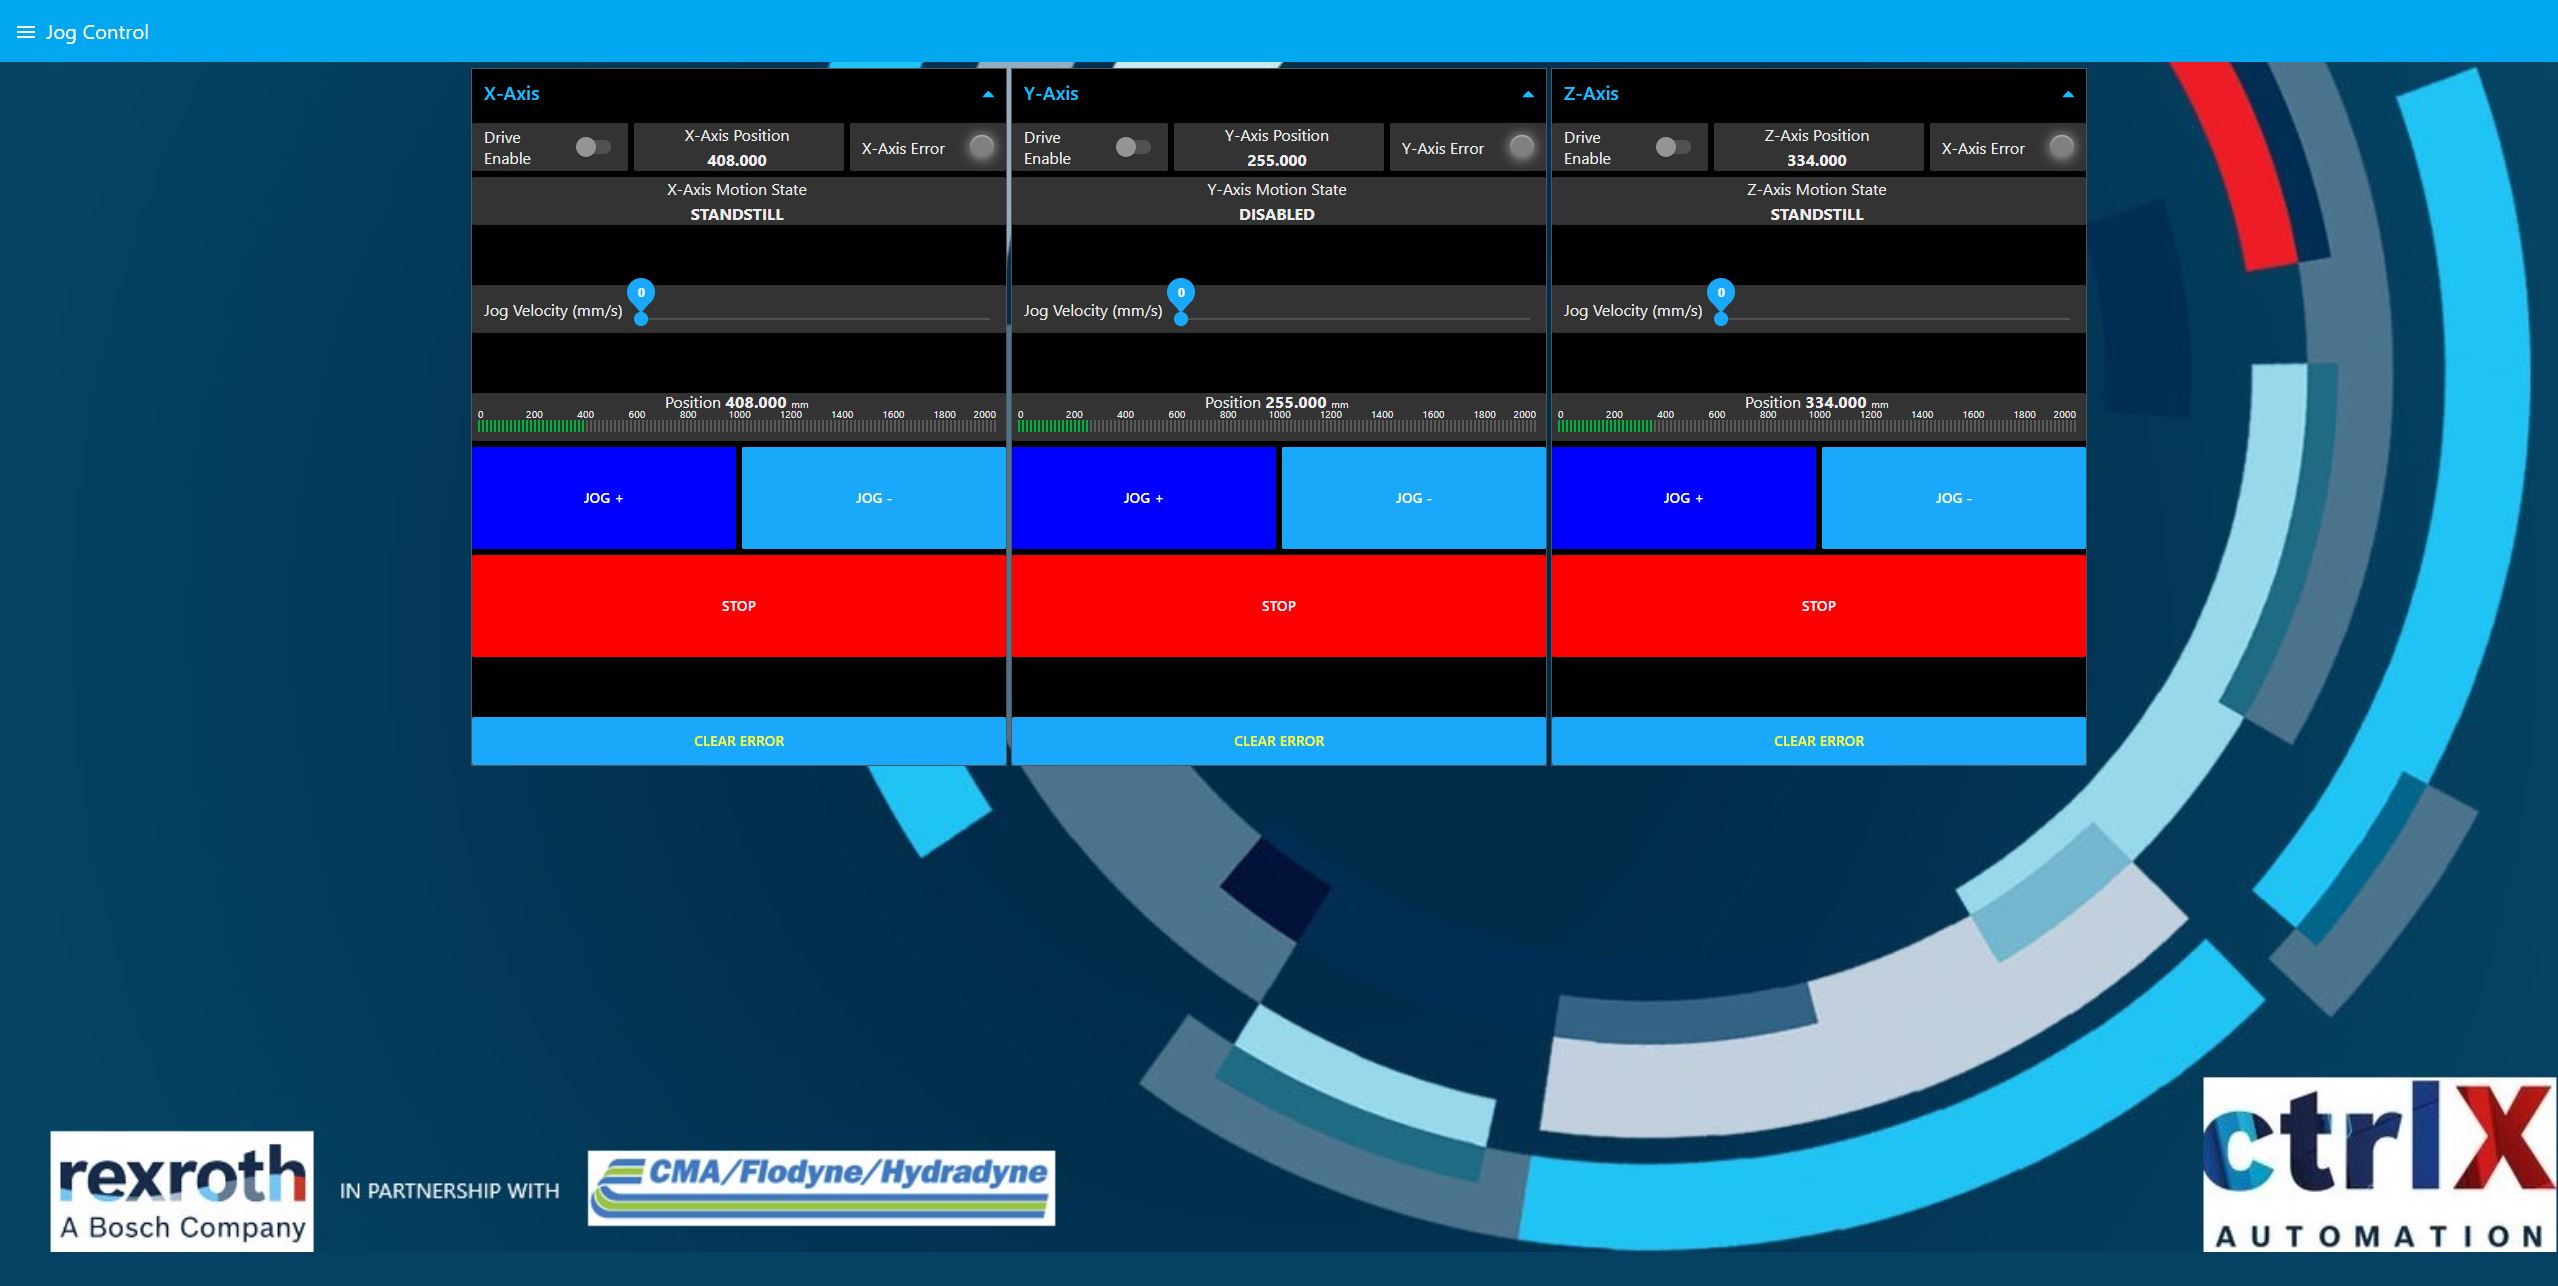
I'd like to share my Node Red project for CtrlX. I created two dashboards that allow you to jog a real axis and two virtual axes. I also have a dashboard for position control of those axes. You'll also see a dashboard for controlling a Balluff IO-Link master and the IO-Link devices attached to it in my JSON file. I plan to do more with Node Red and CtrlX development but thought this would be a good point to share so others do not spend as much time as I did getting this all working. I went into this with minimal knowledge of Node Red and learned a ton along the way. The internet is a helpful place and there's lots of good info out there on Node Red. I should note that you'll need to install the node-red-contrib-ctrlx-automation node, the node-red-contrib-ui-led node, and the node-red-contrib-ui-level to your Node Red palette. Please install those nodes before importing the JSON file contained below. I should also note that to change the background image of the dashboard you'll need to copy and paste the provided settings.js file and the pic.jpg file to your .node-red file. For me that folder was located in C:\Users\<your user name>\.node-red. Please reach out with any questions.
- Mark as New
- Bookmark
- Subscribe
- Mute
- Subscribe to RSS Feed
- Permalink
- Report Inappropriate Content
03-04-2021 06:21 AM - edited 03-04-2021 06:22 AM
Thank you for your post.
I have tried to install the node-red-contrib-ctrlx-automation node from the pallette on my CtrlX Demo unit, but it fails, I also cannot update any of the existing nodes, everytime, I get the below error log. I am running NodeRed 1.0.3.
Any help would be appreciated.
2021-03-04T05:19:50.550Z Install : node-red-dashboard 2.28.1
2021-03-04T05:20:13.816Z npm install --no-audit --no-update-notifier --save --save-prefix="~" --production node-red-dashboard@2.28.1
2021-03-04T05:20:17.929Z [err] npm
2021-03-04T05:20:17.931Z [err] ERR! code EAI_AGAIN
2021-03-04T05:20:17.931Z [err] npm
2021-03-04T05:20:17.931Z [err] ERR! errno EAI_AGAIN
2021-03-04T05:20:17.935Z [err] npm
2021-03-04T05:20:17.936Z [err] ERR! request to https://registry.npmjs.org/node-red-dashboard failed, reason: getaddrinfo EAI_AGAIN registry.npmjs.org registry.npmjs.org:443
2021-03-04T05:20:17.958Z [err]
2021-03-04T05:20:17.959Z [err] npm ERR! A complete log of this run can be found in:
2021-03-04T05:20:17.959Z [err] npm ERR! /root/snap/rexroth-node-red/x1/.npm/_logs/2021-03-04T05_20_17_942Z-debug.log
2021-03-04T05:20:17.989Z rc=1
- Mark as New
- Bookmark
- Subscribe
- Mute
- Subscribe to RSS Feed
- Permalink
- Report Inappropriate Content
03-04-2021 08:16 AM - edited 03-04-2021 12:39 PM
Please beware that your ctrlX CORE has to be connected to an open internet to be able to download extensions or updates inside of Node-Red.
- Mark as New
- Bookmark
- Subscribe
- Mute
- Subscribe to RSS Feed
- Permalink
- Report Inappropriate Content
03-04-2021 11:37 PM
The notebook that I was working form had open internet access, but I am not sure if I need to connect the CtrlX directly to the router? If so, do I need to change port XF10 to DHCP enabled?
- Mark as New
- Bookmark
- Subscribe
- Mute
- Subscribe to RSS Feed
- Permalink
- Report Inappropriate Content
03-05-2021 02:40 AM - edited 03-05-2021 02:42 AM
Hello,
Yes the ctrlX CORE needs to be connected to the router. It doesn't have to be DHCP enabled, you could have a static IP and set the Gateway = IP address of your router which provides internet access.
Brian
- Mark as New
- Bookmark
- Subscribe
- Mute
- Subscribe to RSS Feed
- Permalink
- Report Inappropriate Content
03-05-2021 10:48 AM
Your engineering PC as well as the ctrlX CORE (in standard XF10) have to be connected to the internet. The IP can be static but mus fit to your local subnet of your router or like descriped above a gateway could be used.
- Mark as New
- Bookmark
- Subscribe
- Mute
- Subscribe to RSS Feed
- Permalink
- Report Inappropriate Content
08-26-2021 04:18 PM - edited 02-22-2022 11:57 AM
A lot of Node-RED examples are released on GitHub and will be part of the next version (1.8.9) of the ctrlX Data Layer nodes for NodeRed.
- Mark as New
- Bookmark
- Subscribe
- Mute
- Subscribe to RSS Feed
- Permalink
- Report Inappropriate Content
09-22-2021 11:19 AM
Hello Jimi,
Could you explain how to insert background pictures in the dashboard?
Thanks for your help.
- Mark as New
- Bookmark
- Subscribe
- Mute
- Subscribe to RSS Feed
- Permalink
- Report Inappropriate Content
10-29-2021 05:03 PM
Hello Pedro,
So I had the background image working when I had Node Red running on my computer and had it talking to the datalayer to control the CtrlX Core. I had to use a UI-Template node and then had a setting file and the image I used in a specific folder on my computer. Now we have the Node Red app that we can install on the CtrlX Core I've lost the ability to drop the settings and image file onto the CtrlX Core in the correct folder. I used to be able to SFTP into the CtrlX Core but that functionality seems to be locked down now.
If you run Node Red on your computer instead of the CtrlX Core have a look at the below link on how to setup the background picture.
https://discourse.nodered.org/t/gui-background-image/30588
I'll let you know if I figure out how to add a background image to the CtrlX Core based Node Red application.