
- Subscribe to RSS Feed
- Mark as New
- Mark as Read
- Bookmark
- Subscribe
- Printer Friendly Page
- Report Inappropriate Content
In the following we show to you how to use Serial Setup at ctrlX DRIVE.
Versions used
All the functions and screen shots are based on:
- ctrlX DRIVE Engineering version 01V20.2
- Runtime / Firmware version of drive AXS-V0308.03
Prerequisites
A connection to the ctrlX DRIVE has been successfully established, the device is correctly wired and 24 V are successfully put on. As well the engineering tool ctrlX DRIVE Engineering has been started.
1. Description of the function
ctrlX DRIVE Serial Setup is a serial commissioning tool for drives available in two variants.
If using ctrlX DRIVE Serial Setup with user interface you are able to create a project from a sample machine and use this to start up identical machines.
The ctrlX DRIVE Serial Setup comand prompt tool IWDC.exe allows an automized commissioning of a single axis. This is done by the windows command prompt or batch file.

Drive Version: Use firmware/runtime version AXS-V-0308 (or higher)
License
In order to use the Serial Setup tool and develop your own procedure for a serial start-up of drives of your machine you need to have a license key for the software.
In the following we are using a ctrlX DRIVE XMD for this HowTo.
2. Start Serial Setup with user interface (in ctrlX DRIVE Engineering)

Start screen

The activation of the software is done by a license key.
Call up in main menu “Tools -> Options”!

Check if the license is activated (if you don’t have a license key please contact your responsible sales contact)!

Establish the connection to the drive(s) via:
- Panel (connection to only one drive possible)
- EtherNet to more than one drive

Start creating a new project
Create a new project!

Add drive(s) to the project with the + button (highlighted on the right side)
 to Project")


Search for drives with the button on the right side!


By double click with left mouse on window “Device: File:” a new tab will open to configure and select the firmware to be downloaded, if needed.

- Here you can choose a firmware file you want to download for Serial Setup.
Note: The “Reboot” command is only available with AXS-V-0308 or higher!

Be sure you select the proper fwa extension!

- Select a parameter file for download to the axis, by clicking on the marked window in the screenshot.


Setting the Setup mode by clicking in the window marked in the screenshot

- “Load only” downloads only selected parameter file(s)
- “Standard” executes a Load defaults procedure without SMO parameters
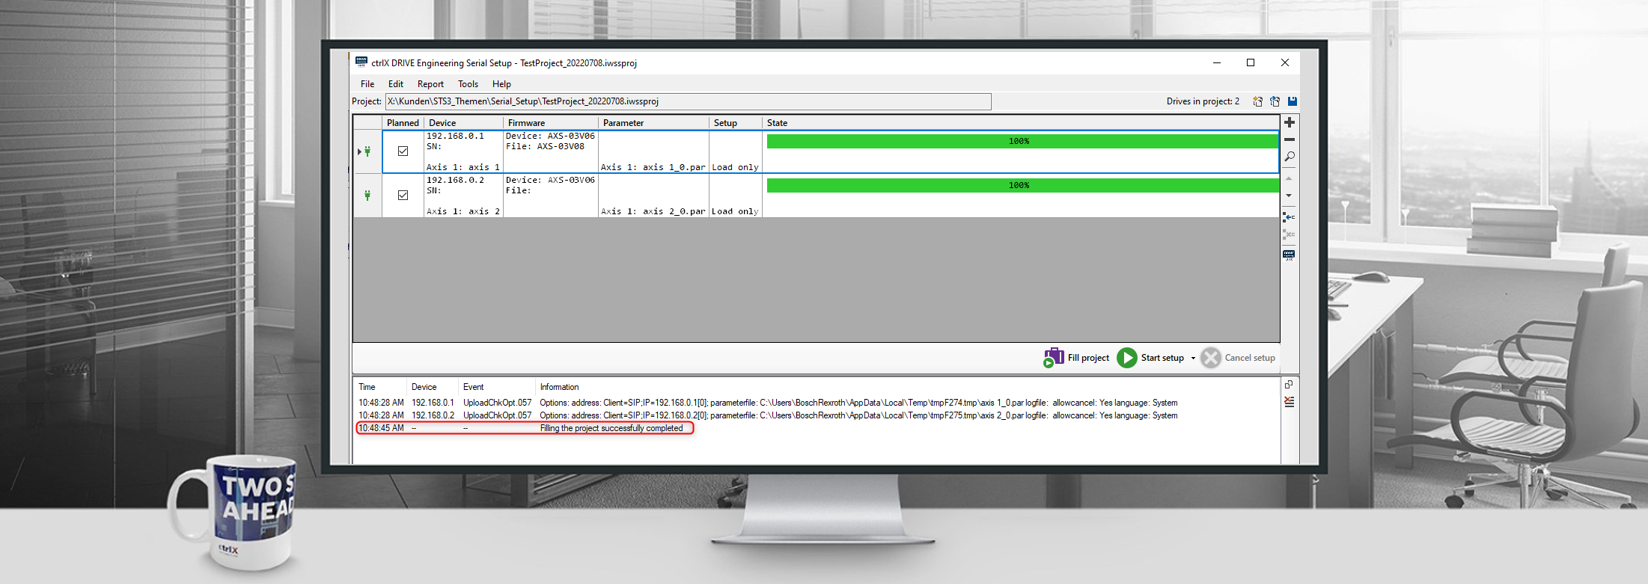
Generate the project with the button “Fill project”!

- This will start an automatic procedure (saving the actual parameter files from the connected drives) for generating an project that can be executed for start up of drives

- You can skip this step if you already have stored and selected parameter files for the axes in the project.


- You are now ready to duplicate your machine!
Use the created project for a Serial Setup procedure (including firmware update and parameter file download):
- Using a before generated project file

Select the function to “skip firmware download if firmware is identical” by clicking on the small black arrow and start the Setup by clicking on the green button “Start setup”!

- Running firmware update

- Be patient and wait for the rebooting of the drive(s)

- Parameter file download started
Hints:
If you are using EoE as engineering connection do not use the separator for executing the operation in parallel (e.g. Firmware download). The bandwith is limited.
In the screenshot the operation between the green lines (separator) will be executed in parallel.

3. Start Serial Setup with Command Prompt Tool
Command Prompt Tool IWDC.exe

Execute the programm with Windows command prompt:
- Open Windows command prompt with admin rights
- Change to the correct folder by using command cd followed by the correct folder of iwdc.exe
- In a standard installation the following folder is used: C:\Program Files (x86)\Rexroth\ctrlX DRIVE Engineering\iwdc.exe - Open/start IWDC.exe
- The screen then looks like the following

Type in help to get more information about the available commands
To us the function correctly follows the steps in the given order as following:
1. Firmware download (--firmwarefile
Is only possible with communication via IP (S/IP) oder TwinCAT ADS
2. Reboot (--fwreboot)
Available with AXS03V08 or higher
3. Load default parameter (--loaddefault)
4. Load parameter file to drive (--parameterfile)
5. Generate SMO report (if necessary) (--smoreport)
6. Reboot (--fwreboot)
Working with a Batch file
1. Generate a Batch file with your needs. Following an example for performing a firmware update and parameter download to an double axis:
C:\"Program Files (x86)"\"Rexroth"\"ctrlX DRIVE Engineering(3)"\iwdc.exe setup
--addresses Client=SIP;IP=192.168.0.3 Client=SIP;IP=192.168.0.4
--firmwarefile C:\abc\Bird\ctrlX\DRIVE\Firmware\AXS03\FWA-XD1-AXS-V-0314N-NN-00.fwa
--fwreboot safe
--loaddefault Standard
--parameters Standard
--parameterfile C:\abc\Kunden\STS3_Themen\Serial_Setup\axis_1_add_3_v2.par --reboot Unsafe --logfile c:\Logfiles\iwdclog1.log
Pause
2. Explanation of single steps
a. Calling the iwdc.exe (check your installation path)
C:\"Program Files (x86)"\"Rexroth"\"ctrlX DRIVE Engineering(3)"\iwdc.exe setup
b. Addressing the correct drive. In this example a double axis drive is used
--addresses Client=SIP;IP=192.168.0.3 Client=SIP;IP=192.168.0.4
c. Naming the path for the firmwarefile
--firmwarefile C:\abc\Bird\ctrlX\DRIVE\Firmware\AXS03\FWA-XD1-AXS-V-0314N-NN-00.fwa
d. Starting the reboot
--fwreboot safe
e. Initiate a base parameter load
--loaddefault Standard (all standard parameters without SMO, FKM, engineering)
--loaddefault SMO (only SMO parameter)
--loaddefailt All (without FKM and Engineering)
f. Declare which parameters from the parameterfile should be loaded
--parameters Standard (download parameters to be stored without SMO parameters)
--parameters All (downlod all parameters)
--parameters SMO (only SMO image)
g. Download the prepared parameter file for the axis
--parameterfile C:\abc\Kunden\STS3_Themen\Serial_Setup\axis_1_add_3_v2.par
h. Initiate the reboot of the drive
--reboot Unsafe
i. Name the filename and path for the logfile
--logfile c:\Logfiles\iwdclog1.log. This is generated automatically and gives you some information if the batch file was executed correct.
Upload Parameters from a drive
With the command word upload you are able to upload parameters from a drive and store them in a file on your computer.
Example for a single axis
C:\"Program Files (x86)"\"Rexroth"\"ctrlX DRIVE Engineering(3)"\iwdc.exe upload
--address Client=SIP;IP=192.168.72.5
--parameterfile c:\ParFiles\Achse1.par
--idnfile c:\projekt\ioconfigidns.txt
--logfile c:\Logfiles\iwdclog2.log
--allowcancel No
Explanation of single steps
1. Calling the iwdc.exe (check your installation path)
C:\"Program Files (x86)"\"Rexroth"\"ctrlX DRIVE Engineering(3)"\iwdc.exe setup
2. Addressing the correct drive. In this example a single axis drive is used
--addresses Client=SIP;IP=192.168.72.5
3. Naming the path for the parameter file
--parameterfile c:\ParFiles\Achse1.par
4. Configure wich parameters should be saved or use command --idnfile
--idns All
* All: All parameters of an axis (S-0-0017)
* Application: List oft the parameters to be saved (S-0-0192)
* A list of ident numbers, separated by semicolon
5. Option if you want to store individual parameters mentioned in the text file ioconfigidns.txt
--idnfile c:\projekt\ioconfigidns.txt
In the file all parameters must be mentioned, separated by a semicolon.
6. Naming the file for logfile
--logfile c:\Logfiles\iwdclog2.log
Documentation:


You must be a registered user to add a comment. If you've already registered, sign in. Otherwise, register and sign in.