
- Subscribe to RSS Feed
- Mark as New
- Mark as Read
- Bookmark
- Subscribe
- Printer Friendly Page
- Report Inappropriate Content
Overview
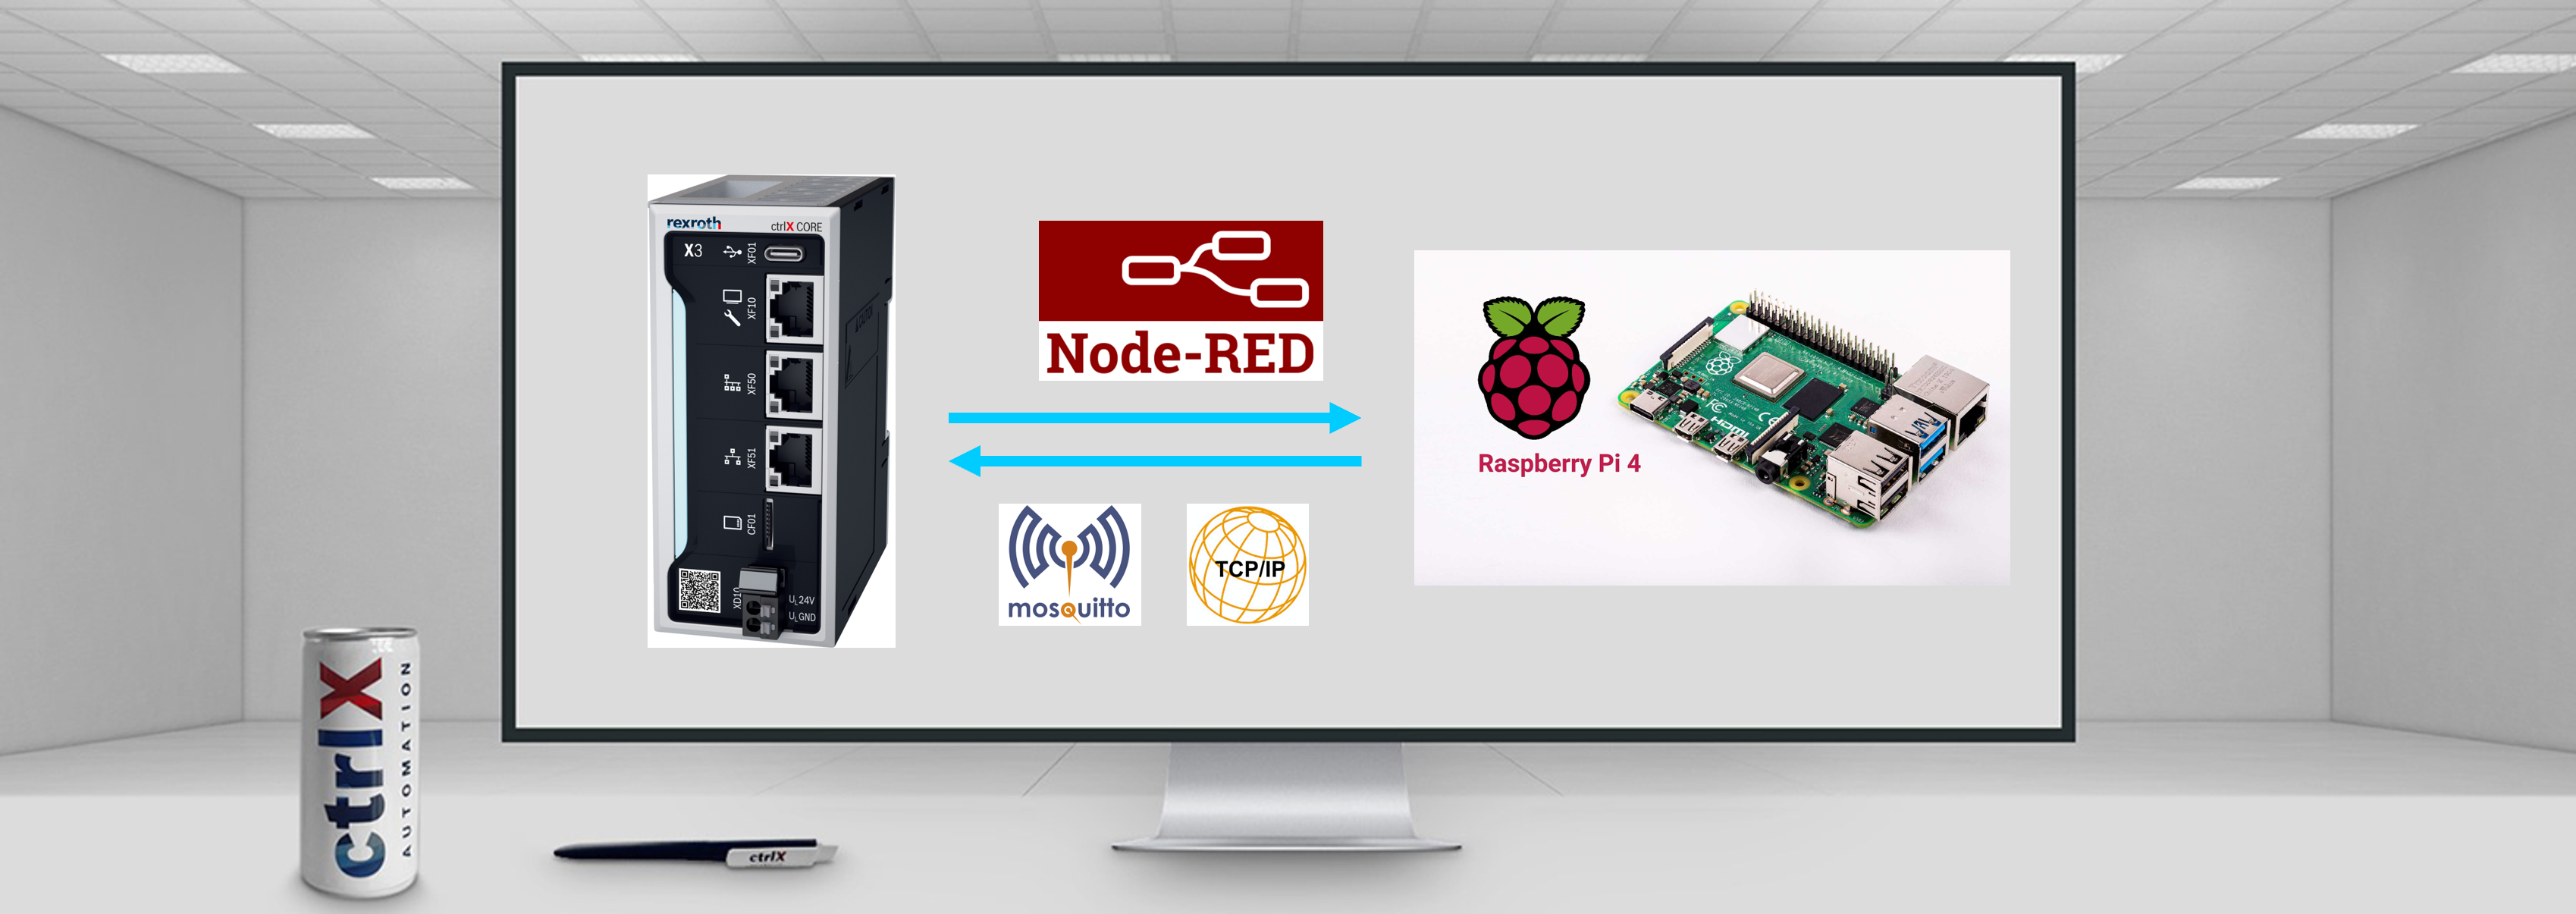
In this article, it will be shown how to send data from the Raspberry Pi to the ctrlX CORE with the use of Node-RED. Random data will be generated in the Raspberry Pi with a “random” node and it will be named as “Temperature”. This data will be send with one communication protocol and read from the ctrlX CORE. In this tutorial, two ways will be shown: With MQTT broker or TCP.
The Node-RED app will be used to simplify the communication and data acquisition between both devices, and in the case the user wants to make more complex uses, it is a very convenient platform.
On the other hand, the Mosquitto MQTT Broker acts like an intermediate between devices that send and collect data. Devices that send data are called “Publishers” and devices that collect and read the data are called “Subscribers”. Subscribers can decide which data they want to read in the case there are many publishers. In this case the ctrlX CORE will act as a Subscriber and the Raspberry Pi as a Publisher.

Finally, TCP (Transmission Control Protocol) is the worldwide most used protocol and establishes the communication between a client and a server. It is used for reliable and accurate communication purposes, but it is slower than other protocols such as MQTT. Basically, it breaks the message in packets to avoid resending the entire message again in case of transmission failure and in destination the packets are reassembled. In this case, the Raspberry Pi will act as client and the ctrlX CORE as server.
Prerequisites
MQTT Broker connection
The MQTT broker has the advantage to be faster and more reliable, but it is required to have a license to be able to install it in the ctrlX CORE and the configuration process is longer.

Step 1: ctrlX CORE configuration
1. First, ctrlX CORE will be connected to the Engineering computer and the ctrlX WORKS program will be started.
2. Now, the Node-RED and the Mosquitto apps will be installed. Firstly, it is required to download both apps from the ctrlX Store.
- To perform these steps, it is recommended to follow the instructions shown in this article.
3. The apps are installed. In the ctrlX CORE web interface the “Settings” menu es clicked -> Access “Apps” -> Change to “Service mode” because otherwise, it will not be possible to install the apps, and the “Install from file” button is clicked. A new window will be opened where the previously downloaded files are selected.

Once installed, the apps will be visible as shown in the previous figure.
4. Mosquitto app configuration
- Access the ctrlX CORE homepage, select "Mosquitto" and press "Management Center"

- In the new window, press over the "Clients"

- Create new clients. In this part, the clients that will be connected to the broker are defined. A MQTT client is any device that runs a MQTT library and connects to an MQTT broker over a network. In this case, the MQTT Broker is the Mosquitto MQTT Broker App installed in the ctrlX CORE. On the other hand, the clients will be the Raspberry Pi where the MQTT libraries will also be installed, and the ctrlX CORE where with Node-RED another client will be defined.
First, the Raspberry Pi client will be defined with the following configuration:
- Username: tutorialmqtt
- Password: tutorialmqtt
- Client ID: tutorialmqtt
- Text name: tutorialmqtt

- Once the client is defined, it is required to define a role. In this case, a “client” role will be used.

Second, the Node-RED client that will later be defined in the ctrlX CORE is also defined:
- Username: nodered
- Password: nodered
- Client ID: nodered
- Text name: nodered

- As done for the Rapsberry Pi client, a "client" role is defined
- The clients window should look as follows:

NOTE: In the Roles section it is possible to read the roles description.

- When the clients are connected, in the main section it will be possible to see if they are connected or not. Once everything is configured, an example will be shown.

Step 2: Raspberry Pi configuration
Once everything has been configured from the ctrlX CORE side, the Raspberry Pi needs to also be configured.
1. Install the Node-RED app in Raspberry Pi. To perform this step, it is possible to follow the guidelines of the Official Node-RED webpage
- First, make sure that the system is updated
sudo apt update && sudo apt upgrade
- To download and install the app, write the following command, and follow all the steps:
bash <(curl -sL https://raw.githubusercontent.com/node-red/linux-installers/master/deb/update-nodejs-and-nodered)
2. Start Node-RED and configure MQTT.
- It is possible to open the Node-RED web interface from the icon shown in the following figure or from the applications Menu -> Programming -> Node-RED

- When the Node-RED app is started, a Node-RED interface is available. This interface is reachable with an IP-address. This IP-address is visible as shown in the next figure when opening the Node-RED app.

-
Now it is necessary to add nodes to configure our system as desired. Theses nodes can be added from the left bar, and we can design a similar system as shown in the images below.

-
In this case, an “inject” node will be added with the purpose to add values in an interval of time. On the other hand, a “debug” node will be added to be able to see the messages sent to the ctrlX CORE. Additionally, a “random” node is also added with the objective to generate a random value in a predefined range. Finally, a “mqtt out” node is used to send the messages to ctrlX CORE. All these nodes are connected as shown below.
The inject node generates a signal every “X” second, and activates the random node. Each time the random node is activated, this node generates a random value and sends it to the “debug” and “mqtt out” nodes. The “debug” node gives the value in the debug tab on the right side of the interface and the “mqtt out” node sends the value to the MQTT broker.
- To configure the random node, it is just needed to double click over it, and define the range of the random values. The default configuration is between 1 and 10 and once decided which interval we want, click over the “Done” button.

- To configure the inject node, double click over the node and the default configuration is “timestamp”. If we want to send messages in a time interval, we can select “interval” next to the “Repeat” icon, and select every how many seconds we want to send a message.

- Now it is required to configure the MQTT node:
- Double click over the mqtt node
- In the Server tab: “Add new mqtt-broker”
- Give a name to the Node
- Enter in the Server configuration

- In the server configuration window, it is needed to fill the following blank spaces:

- Server: Introduce the ctrlX CORE IP address
- Port: Usually, the default port is 1883 and it is needed to change to 8883
- Protocol: Select MQTT V3.1.1
- Client ID: Introduce the previously defined client ID in the Mosquitto app in the ctrlX CORE
- Security: Enter in the Menu shown in the figure below and enter the previously defined credentials in the Mosquitto app in ctrlX CORE.

6 Use TLS: Check the space and select the pencil to enter in the TLS configuration window. There, it is just required to uncheck “Verify server certificate” and click “Update” in the top right corner.

-
Once everything has been configured, click on the right top corner on “Add”, and a similar window as shown below should appear. In “Topic” we just write the desired name and click over “Done”.

- The window will be closed, and in the node, a blue dot will be visible because it is required to deploy. For this purpose, just click over “Deploy” in the top right corner of the interface.

- Once deployed, the “Connected” status should be visible in the configured node.

- On the right bar, the debug menu is visible and from there it is possible to see all the sent values thanks to the use of the “Debug” node.

Step 3: Connection check and final configuration
1. Now we can return back to ctrlX CORE, and check that there is a new client in the Cedalo Mosquitto App.

2. In the Topic Tree section, we can check the received values in ctrlX CORE. As the “Temperature” topic was given in the Raspberry Pi, this is the name seen in the Topic Tree.

- Once we have checked that all the values are being received by the broker, we can subscribe to it to get the values in the ctrlX CORE Node-RED app.
3. In the ctrlX CORE web interface, access the Node-Red App. A new window will be opened, and now a similar process as done in the Node-RED app in the Raspberry Pi will be followed:
- Insert a “MQTT in” and “debug” nodes from the nodes bar. The result should be as follows.

- Configure the “MQTT in” node by double clicking over it and fill the blank spaces as shown in the next figure.

- Server: Click over the pencil and enter the values shown in the next figure. NOTE: In "Security" introduce the credentials defined for Node-RED for the ctrlX CORE and not the ones defined for the Raspberry Pi. Otherwise, they would not be able to connect at the same time because the broker only accepts one connection per client. On the other hand, activate the TLS configuration as performed in the Raspberry Pi configuration, and do not forget to uncheck “Verify server certificate” in the TLS configuration menu.
- Action: Subscribe to single topic
- Topic: “Temperature” as it is what was defined in the Raspberry Pi. It is very important to write here the same topic because otherwise it will not be possible to read the values coming from the Raspberry Pi.
- QoS: Defines the quality of the connection
- Output: We leave as it is per default
- Name: We can give any name

4. Once everything has been configured click over “Update” and “Deploy” to check if the node is able to subscribe to the MQTT broker.

5. By clicking over the debug menu, it will be possible to see the values sent from the Raspberry Pi.
Note: As now there are two additional clients connected to the Broker, it we return back to the MQTT Broker App in the ctrlX CORE, the following will be visible:

TCP connection
The TCP configuration is much easier because everything is already integrated, and it is just needed to introduce the configuration parameters in both devices.

Step 1: Raspberry Pi configuration
As explained in the MQTT Broker case, it is required to install the Node-RED app.
1. Install the Node-RED app in Raspberry Pi. To perform this step, it is possible to follow the guidelines of the Official Node-RED webpage
To download and install the app, write the following command, and follow all the steps:
bash <(curl -sL https://raw.githubusercontent.com/node-red/linux-installers/master/deb/update-nodejs-and-nodered)2. Start Node-RED and configure TCP.
- It is possible to open the Node-RED web interface from the icon shown in the following figure or from the applications Mneu -> Programming -> Node-RED
- When the Node-RED app is started, a Node-RED interface is available. This interface is reachable with an IP-address. This IP-address is visible as shown in the next figure when opening the Node-RED app.
- In this case, an inject node will be added with the purpose to add values in an interval of time. On the other hand, a debug node will be added to be able to see the messages sent to the ctrlX CORE. Additionally, a random node is also added with the objective to generate a random value in a predefined range. Finally, a TCP out node is used to send the messages to ctrlX CORE. All these nodes are connected as shown below.

Note: The TCP out node can be found in the Network section as shown in the following image.

-
To configure the random node, it is just needed to double click over it and define the range of the random values. The default configuration is between 1 and 10 and once decided which interval we want, click over the “Done” button.
-
To configure the inject node, double click over the node and the default configuration is “timestamp”. If we want to send messages in a time interval, we can select “interval” next to the “Repeat” icon and select every how many seconds we want to send a message.

- Once all the nodes have been added, TCP can be configured. For this purpose, double click over the “TCP out” node and it is just required to configure what is shown below. The port can be chosen as desired and in the “at host” space, it is just required to write the ctrlX CORE’s IP address. When finished, click over “Done”.

- Finally, in the TCP node, a blue dot will be visible because it is required to deploy. For this purpose, just click over “Deploy” in the top right corner of the interface and the Raspberry should connect to the ctrlX CORE.

If everything is correct, the “Connected” status should be visible as shown below.

Note: In the case TCP has still not been configured in the ctrlX CORE, it will not be able to connect and the “Disconnected” status will be shown.
Step 2: ctrlX CORE configuration
1. First, ctrlX CORE will be connected to the Engineering computer and the ctrlX WORKS program will be started.
2. Now, the Node-RED will be installed. Firstly, it is required to download the app from the Bosch Rexroth store.
- To perform this step, it is recommended to follow the intructions shown in the following article.
3. The app is installed. In the ctrlX CORE web interface the “Settings” menu es clicked -> Access “Apps” -> Change to “Service mode” because otherwise it will not be possible to install the app, and the “Install from file” button is clicked. A new window will be opened where the previously downloaded file is selected.
Once installed, the app will be visible as shown in the previous figure.
4. Node-RED app access. Click over the Node-RED section as shown and click on “Flow editor”.

5. Insert the TCP in and debug nodes and connect them.

6. Configure the TCP in node as shown below. Include the port used in the Raspberry Pi and select how we want the data to be received. Close the window by clicking over “Done”.

7. Click over “Deploy” and check that there is one connection as shown below.

8. Check the received values in the right tab.


You must be a registered user to add a comment. If you've already registered, sign in. Otherwise, register and sign in.