- Subscribe to RSS Feed
- Mark as New
- Mark as Read
- Bookmark
- Subscribe
- Printer Friendly Page
- Report Inappropriate Content
Versions used
All the functions and screen shots are based on:
- ctrlX SAFETY Engineering version >= 1.7.1.8190
- SAFEX Runtime / Firmwareversion >= 1.0.0.1 (C-sample)
Prerequisites
A connection to the ctrlX SAFETY control and IndraDrive has been successfully established, the devices are correctly wired and 24 V are successfully put on. As well the engineering tools ctrlX SAFETY and ctrlX DRIVE Engineering or IndraWorks Engineering have been started.
Be aware that you can find the blog entry as well as zipped document in the attachment. Similarly the sample PLC program and the sample drive parameters are attached.
1. Function of the established SAFEX logic program
The principle function of the SAFEX logic program is the following:
EMERGENCY STOP (SMES)
If the EMERGENCY STOP button at ctrlX SAFETY is pressed, the corre-sponding safety function at the drive, is activated immediately, which leads to a deceleration of a still moving axis. After coming to standstill and acknowledging the EMERGENCY STOP function the drive is shut off and thus torque/force free. The door is released to be opened at that time.
Note, that the “Drive Enable” signal from the control has to be removed before the time entered for the reaction time of the EMERGENCY STOP function or the time delay inside the Safe logic program for the STO function is exceeded, thus directly after the standstill is accomplished. Otherwise an error is shown.
If the EMERGENCY STOP button is released again and the door is shut, the Reset button needs to be shortly pressed twice in order that the EMERGENCY STOP and thus the function is released as well. Then the drive can be activated (drive enable be set) again.
Mind that the EMERGENCY STOP is always prior to all other safety functions and, if activated, superseding the in before active safety function.
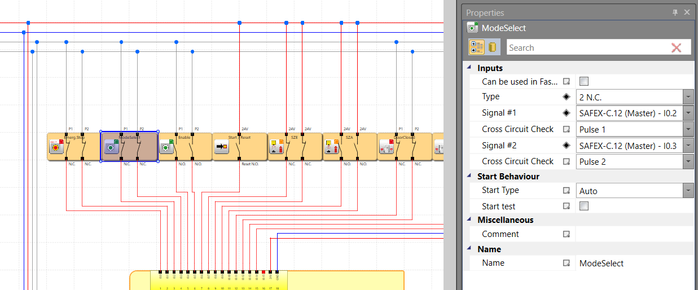
Mode Select - Change to Safety Operation Mode (activating the safe operational stop (SMST2))
If the “Mode Select” switch at ctrlX SAFETY is engaged, the correspon-ding safety function at the drive is activated immediately, which leads to a deceleration of a still moving axis. After getting to standstill the drive is in operational stop with torque/force on. The door is released to be opened at that time.
If the “Mode Select” switch is released again and the door is shut, the Reset button needs to be shortly pressed in order that the SMST2 function is released again. Then the drive can be activated (drive enable be set) again.
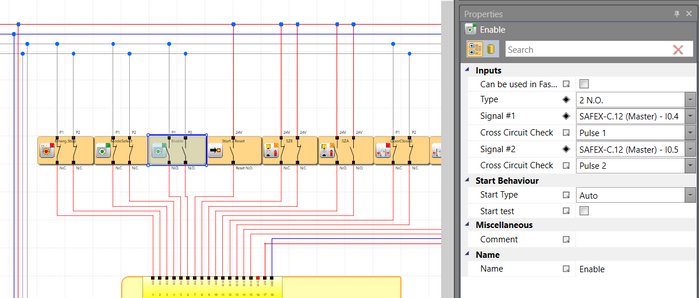
Enabling Control (activating safe motion with limited speed)(SMM1)
If the “Enabling Control” button at ctrlX SAFETY is pressed additionally to the “Change to Safety Operation Mode” switch, the corresponding safety function at the drive incorporating the SMO function is activated immediately, which allows the control to set a command with reduced speed. In this condition the door can be opened to take a closer look to the moving axis. If the “Enabling Control” button is released again, the safe operational stop (SMST2) is getting active again.
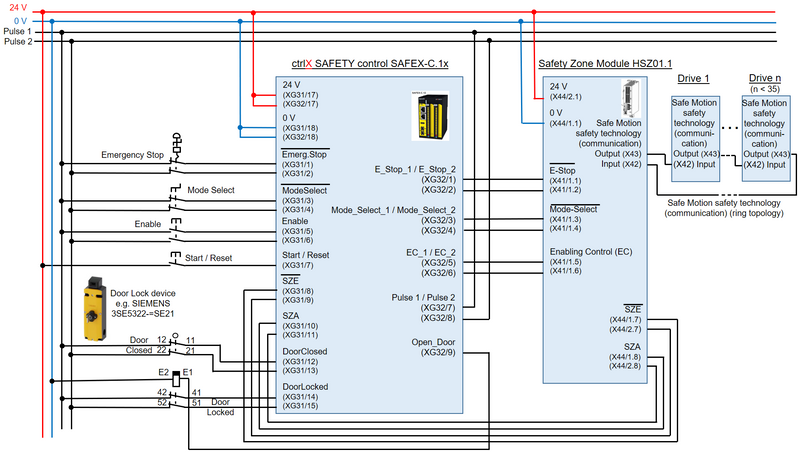
Safe Zone Module HSZ01.1
The safe Zone Module HSZ01.1 is used to spread the different safety operation mode to up to 35 IndraDrives. The HSZ01.1 itself is controlled via hard wiring to the ctrlX SAFETY control SAFEX.
Safe Motion safety technology communication (ring topology)
The connection to the drives incorporating the SMO function is accomplished via the so-called Safe Motion safety technology communication connection, a ring connection to all IndraDrive devices and back.
Fig. 1.: Overall schematics
2. Wiring schematics
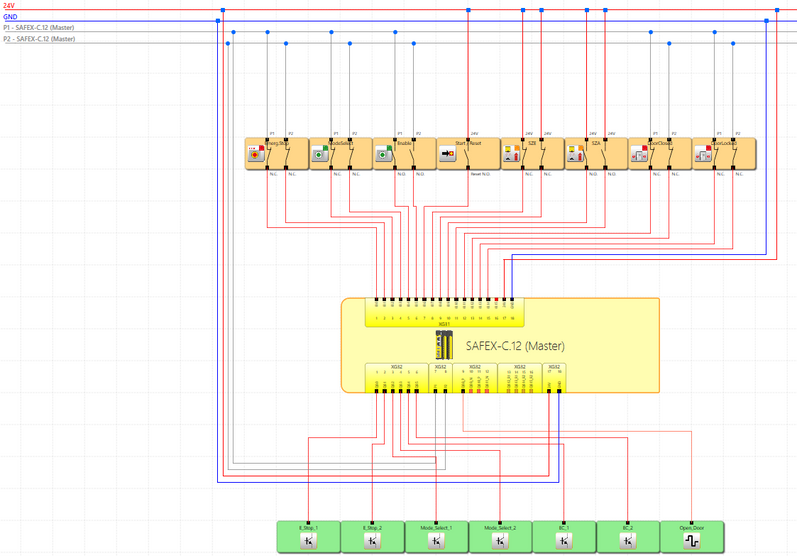
The SAFEX control´s input devices are:
- 1 double channel EMERGENCY STOP button
- 1 double channel “Mode Select” switch
- 1 double channel “Enabling control” button
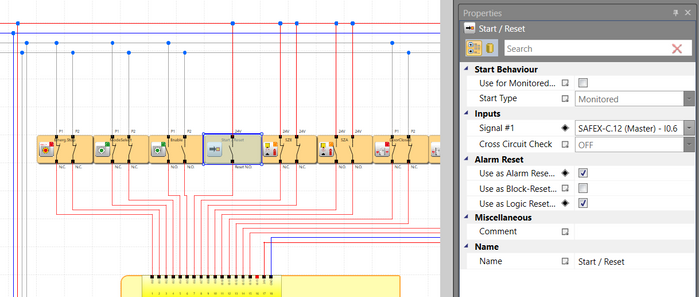
- 1 single channel Reset button
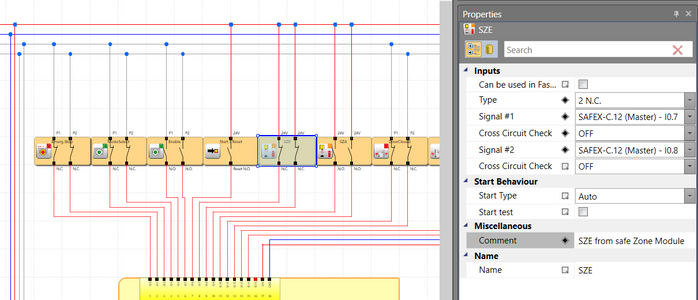
- 1 double channel input SZE coming from safe Zone Module HSZ01.1 acknowledging that no safety error is present at all connected drives
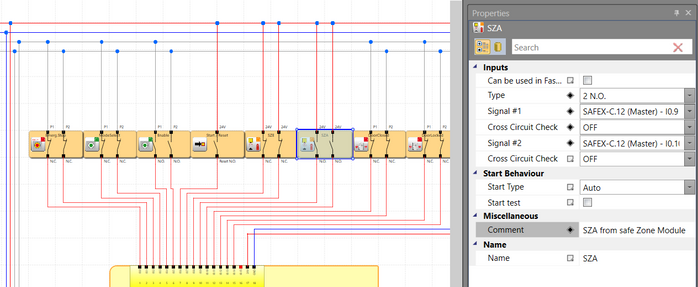
- 1 double channel input SZA coming from safe Zone Module HSZ01.1 acknowledging that the safety zone is in safe operation mode at all connected drives
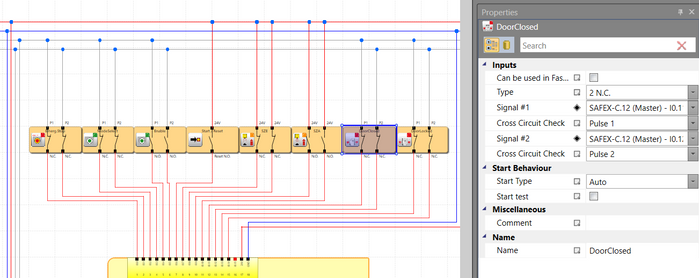
- Double channel “Door closed” contacts from the safety door
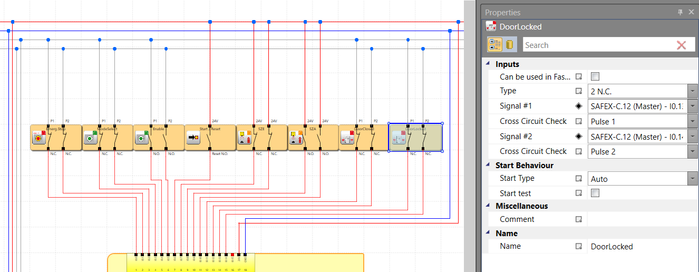
- Double channel “Door locked” contacts from the safety door
- All double channel buttons except on the ones coming from the safe Zone Module HSZ01.1 are fed by pulsed 24V
The output devices are:
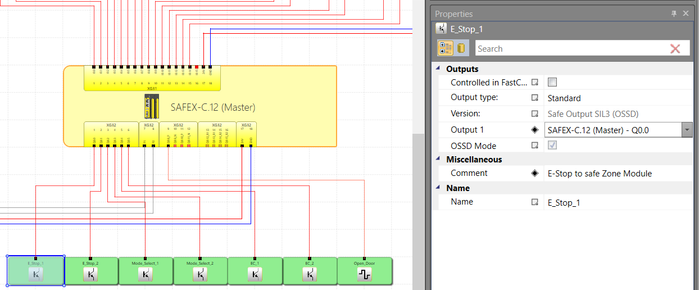
- 1 double channel transferring the EMERGENCY STOP information to the safe Zone Module HSZ01.1
- 1 double channel transferring the “Mode Select” switch information to the safe Zone Module HSZ01.1
- 1 double channel transferring the “Enabling control” information to the safe Zone Module HSZ01.1
- 1 single channel output to open the safety door
Fig. 2.: Overall wiring schematics with ctrlX SAFETY
3. Settings inside SAFEX control
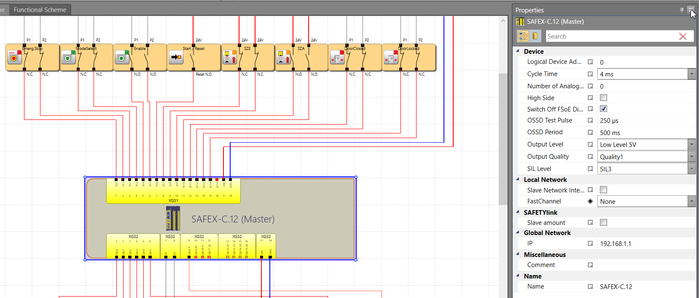
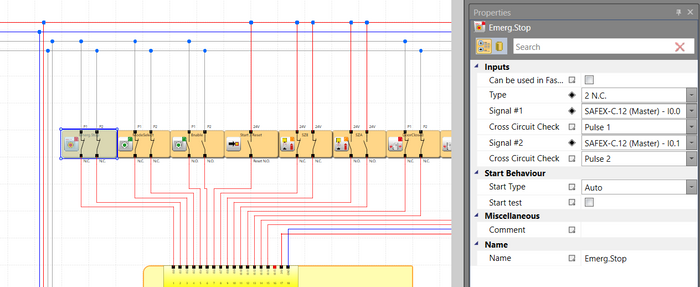
The settings of the SAFEX control and the devices connected to the ctrlX SAFETY control should be according to the following.
Fig. 3.: Settings of SAFEX control
Fig. 4.: Settings of “Emergency Stop” button connected to SAFEX control
Fig. 5.: Settings of “Mode Select” switch connected to SAFEX control
Fig. 6.: Settings of “Enabling Control” buttons connected to SAFEX control
Fig. 7.: Settings of “Start/Reset” button connected to SAFEX control
Fig. 8.: Settings of “SZE” signal connected from safe Zone Module HSZ01.1 to SAFEX control
Fig. 9.: Settings of “SZA” signal connected from safe Zone Module HSZ01.1 to SAFEX control
Fig. 10.: Settings of “DoorClosed” signal connected to SAFEX control
Fig. 11.: Settings of “DoorLocked” signal connected to SAFEX control
Fig. 13.: Settings of “E-Stop” output connected from SAFEX control to safe Zone Module HSZ01.1
Fig. 13.: Settings of “ModeSelect” output connected from SAFEX control to safe Zone Module HSZ01.1
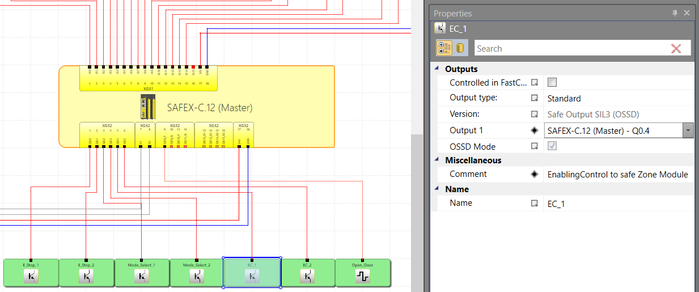
Fig. 14.: Settings of “EnablingControl” output connected from SAFEX control to safe Zone Module HSZ01.1
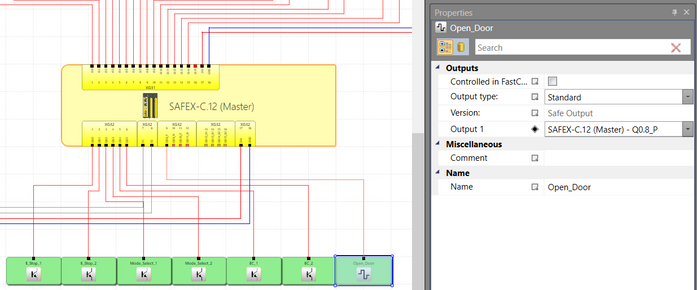
Fig. 15.: Settings of “Open Door” output of SAFEX control
4. Safe logic inside SAFEX control
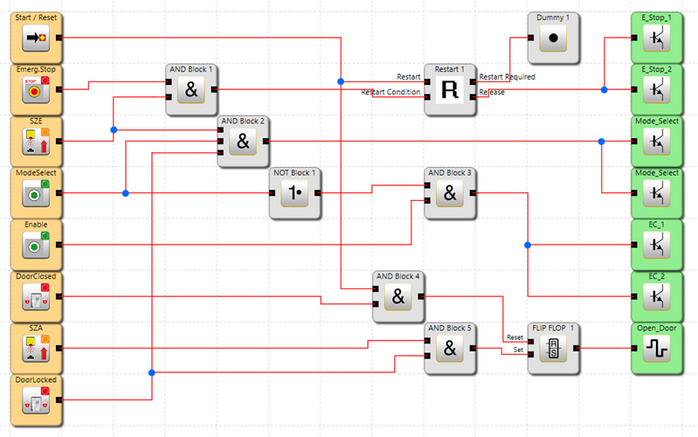
The safe logic inside the SAFEX control is created according to the following schematics.
Fig. 16.: Safe logic inside SAFEX control (1) (inside Functional Scheme)
Fig. 17.: Configuration of elements “And Block” (inside Functional Scheme)
Fig. 18.: Configuration of element “Not” (inside Functional Scheme)
Fig. 19.: Configuration of element “Restart” (inside Functional Scheme)
Fig. 20.: Configuration of element “Dummy” (inside Functional Scheme)
Mind: Instead of using the Dummy element, the information that “Restart is required” may passed on to a control system via digital output or fieldbus connection of the SAFEX control.
Fig. 21.: Configuration of element “Flip Flop” (inside Functional Scheme)
5. Settings of IndraDrive with SMO
The settings of IndraDrive are done according to the following:
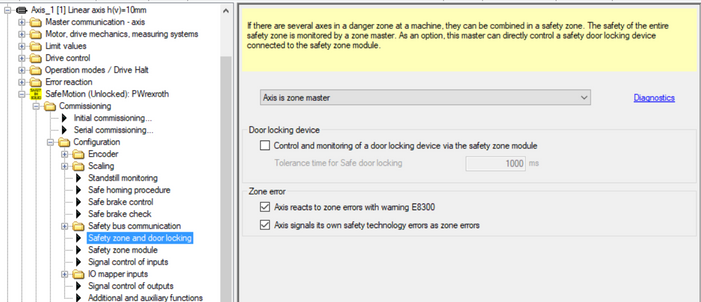
Fig. 22.: Settings of IndraDrive (1): Safety zone settings
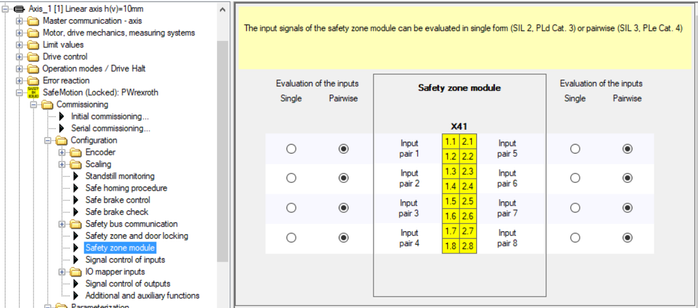
Fig. 23.: Settings of IndraDrive (2): Safety zone module settings
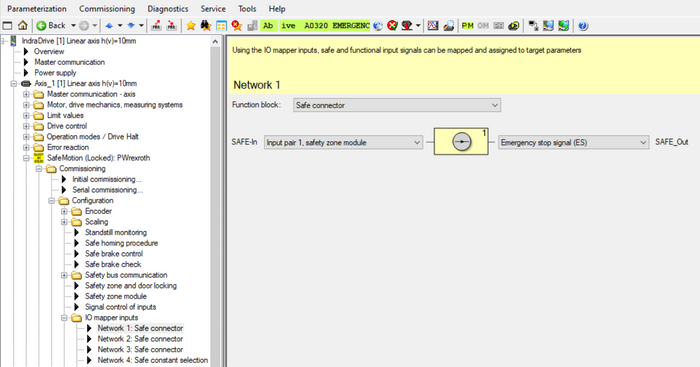
Fig. 24.: Settings of IndraDrive (3): I/O mapper input settings (1)
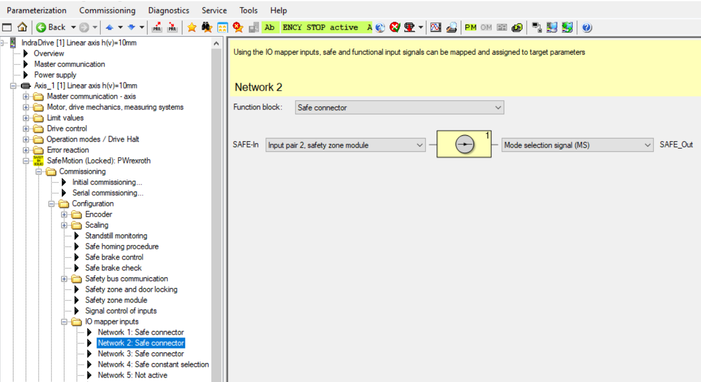
Fig. 25.: Settings of IndraDrive (4): I/O mapper input settings (2)
Fig. 26.: Settings of IndraDrive (5): I/O mapper input settings (3)
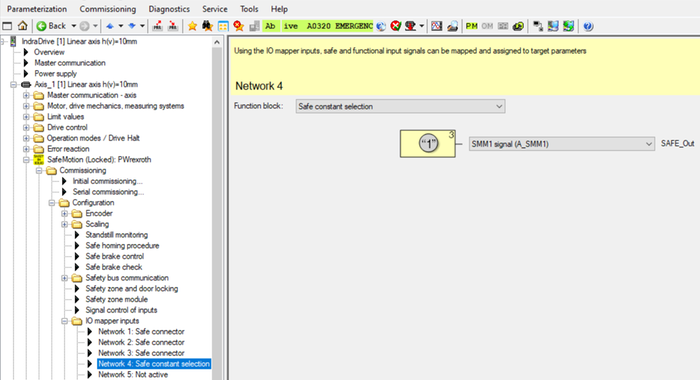
Fig. 27.: Settings of IndraDrive (6): I/O mapper input settings (4)
You must be a registered user to add a comment. If you've already registered, sign in. Otherwise, register and sign in.


