
- Subscribe to RSS Feed
- Mark as New
- Mark as Read
- Bookmark
- Subscribe
- Printer Friendly Page
- Report Inappropriate Content
Introduction
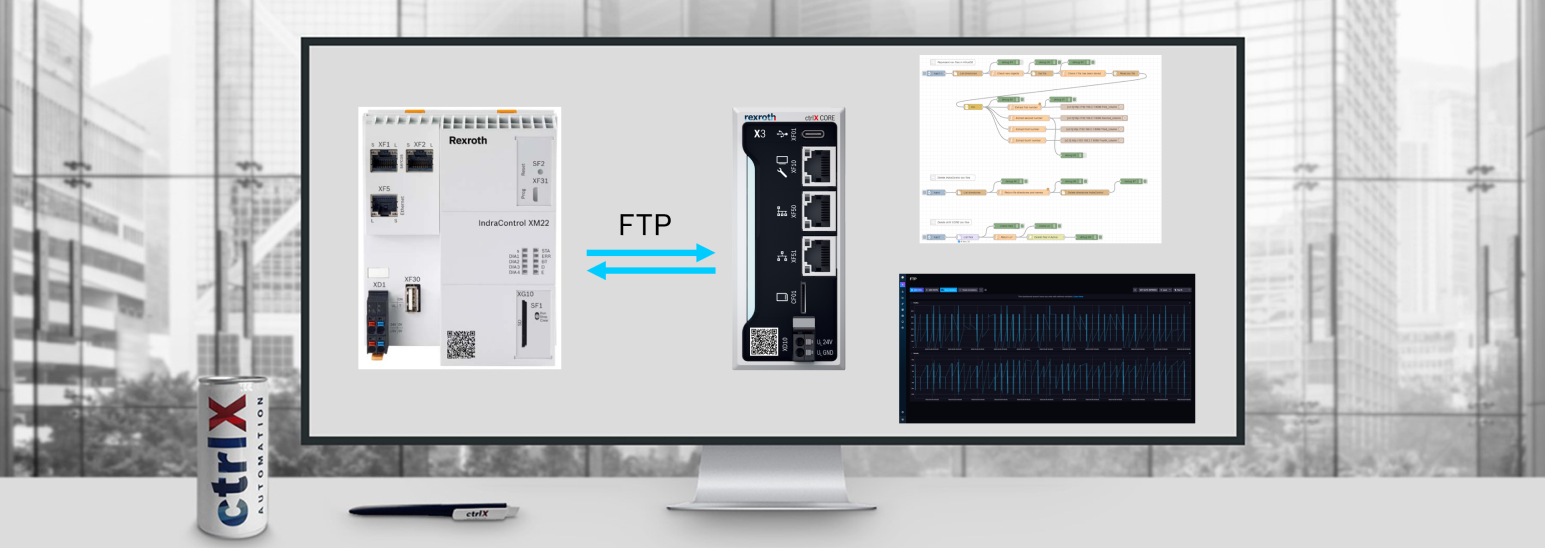
In this tutorial it will be shown how to configure Node-RED to be able to get CSV files stored in an IndraControl and represent the content of these files in InfluxDB. To be able to communicate with the IndraControl, the FTP communication protocol is used. For this purpose it is required to install the FTP nodes in Node-RED. On the other hand, with the use of function and csv nodes, the content of the csv files will be read and processed, so that the information can be sent to InfluxDB in the correct format. Finally, with the use of the InfluxDB node, data is sent and represented.
Prerequisites
Establish communication between both devices
- First, it is required to connect the IndraControl and the ctrlX CORE to be able to establish the FTP communication. For this purpose, please connect them as shown in the image:

- Secondly, it is required to configure the IP address between both devices. For that, connect to the ctrlX CORE with the Engineering computer. In the case, the user does not know how to achieve this, please check this tutorial. Once we are inside the ctrlX CORE web interface, it is required to follow the steps:
- Access the "Settings" menu
- Press "Network Interfaces"
- Select the "XF51" interface
- Select the "IPv4" tab
- Enter an IP address in the same range as the IndraControl, but not with the same IP address because otherwise it will have conflicts. Additionally, enter the subnet mask.
- Press the "Save" button and store the configuration

- Once the configuration has been saved, a "Connected" message should appear:

- To make sure, the device is correctly connected, it is of interest to ping to the IndraControl from the ctrlX CORE. For that, return back to "Settings" and press over "Network Diagnostics"

- In the "Network diagnostics" menu, enter the IndraControl IP address and check if data is transmitted and received as shown below:

- Finally, it is recommended to check that the IndraControl has the FTP communication protocol active.
- Disconnect the IndraControl with the ctrlX CORE and connect the IndraControl with the Engineering computer. Once done that, configure the static IP address accordingly.
- Start IndraWorks and communicate with the IndraControl
- Access the communication protocols menu: Right click over the device --> Communication --> Protocols

4 Check that FTP is active as shown below:

Configure InfluxDB
Step 1: Install InfluxDB
Download the app from this link and install it. In the case, it is the first time installing an app in the ctrlX CORE, please check the steps shown in this tutorial.
Step 2: Configure InfluxDB
- Define user settings
Provide a username, password, organization name, an initial bucket name, and press "Continue".
Note: A bucket is a named location where all our data is stored.

- In the next window, select any of the options.
Step 3: Get API token
To be able to use the InfluxDB node in Node-RED it is required to get a bearer token from InfluxDB.
- Hover the mouse over the Load data symbol in the InfluxDB homepage
- Select "API Tokens" and the window as shown below will appear
- Press over "Generate API Token"
- Select the "All access API Token" option

- Provide a description, click over "Save" and a new window with the API token will appear

- Press over "Copy to clipboard" and keep the token in a safe place because later this will be required
Step 4: Create bucket
To store all the data sent from Node-RED to InfluxDB, a bucket es required to define.
- Hover with the mouse over the Data explorer symbol
- Press over "Create bucket"
- Provide a name. In this case, we will name this bucket "FTP"
- Press the "Create" button

Configure Node-RED
Step 1: Install the Node-RED app
Download the app from this link and install it. In the case, it is the first time installing an app in the ctrlX CORE, please check the steps shown in this tutorial.
Step 2: Provide internet connection to the ctrlX CORE
To be able to install some nodes required to successfully connect per FTP to the IndraControl, it is necessary to connect to the Internet. For this purpose, connect the XF51 port to a router and make sure that in the Network Interfaces menu, the automatic settings configuration is enabled.

- If the connection has been correctly established, a similar window as the previously shown should appear.
Note: It is required to have internet access in the ctrlX CORE and in the Engineering computer.
Step 3: Start Node-RED and install the required nodes
- Press over the three horizontal lines
- Select "Manage palette"

- Install the FTP nodes:
- In the palettes menu, press over "Install"
- Write ftp and find the node-red-contrib-ftp package
- Press over the "Install" button

Once the nodes have been successfully installed, the following message should appear:

- In addition to these nodes, it is also required to install the following ones:
- node-red-contrib-influxdb
- node-red-contrib-fs
Step 4: Download Node-RED flow and import it
At the end of this tutorial, there is a zip file which contains the json file required to upload to Node-RED.
- Press over the three horizontal lines
- Press over "Import"

In the "Import nodes" menu follow the steps:
- Press "Select a file to import"
- Select downloaded and extracted json file and the following code should be visible
- Import the flow

- Once the flow has been imported, the following overview should be visible:

Step 5: Connect ctrlX CORE with IndraControl
As we previously used the XF51 port to connect the ctrlX CORE to the internet, now it is required to connect again both devices to be able to establish a FTP connection. For this purpose, please connect both devices as shown in the first image of this tutorial with their corresponding IP addresses.
Step 6: Configure nodes
Once the file has been imported, the flows need to be configured to be able to connect to the IndraControl.
1. FTP nodes:

- Double click over the node and a new window will be opened. In the filename, introduce the path of where the csv files are located in the FTP server.

- On the other hand, provide the FTP server configuration by clicking over the pencil. With the FTP server IP address, port, username and password, the ctrlX CORE will be able to connect to the server. Once all the information has been introduced, press over "Update" and you will return back to the first window where it is required to click over "Done" to close it

- Once this information has been introduced, all the FTP nodes used in this flow will automatically be updated with this data.

2. InfluxDB nodes:

- Double click over the node and a new window will be opened:
- Check that the organization name matches with the one introduced when configuring InfluxDB
- Check the bucket name
- Enter the InfluxDB configuration menu

- In the new window, it is required to follow these steps:
- Select version 2.0
- Introduce the ctrlX CORE url with port 8086 per default
- Introduce the previously stored API token
- Press over the "Update" button to store the configuration

- Once this node has been updated, the other three influxDB nodes will automatically be updated.
3. Return url node:
In this function node, the ctrlX CORE IP address is introduced and it is required to make sure that it matches with your ctrlX CORE address

4. Delete files in Active node:
In this node it is required to introduce the ctrlX CORE credentials to be able to make HTTP requests

Step 7: Deploy
Once all the nodes have configured, we can deploy the flow by clicking over the "Deploy" button

Testing
Data visualization
Once the deploy button is clicked, if everything has correctly been configured, these debug messages will appear:

- In these messages the user can read the csv values and their corresponding timestamps.
Now that data is sent to InfluxDB, we can check in the Data explorer if data is arriving:
- Select the Data explorer button
- Select the FTP bucket to visualize the data that has been stored there
- Select which column of the csv file you want to visualize. Note: It is possible to select multiple columns
- Press over "Custom" in the window period
- Select 1ms to be able to read data at ms level if data is sent at this frequency
- In "Aggregate function", select custom and do not select any function sot hat raw data is shown
- Choose the data you want to visualize. In the case, the csv files have been generated in a defined hour, it is possible to configure this
- Press over the "Submit" button to visualize the received data

Delete IndraControl csv file
In the case the user wants to delete all the csv files stored in the IndraControl, there is a button in the Node-RED flow which provides this capability.

- In the debug messages, it is possible to see all the files which will be deleted. In this case, 445 csv files will be deleted. Additionally, for every deleted file, a "File deleted" message will appear.
Delete ctrlX CORE csv files
As all the read csv files are also stored in the ctrlX CORE, the user may be interested on deleting these files.
Note: In this case, the flow has been configured so that all the csv files are stored in active configuration folder of node-RED

- To change the path where the folders have to be stored, open the "Check new objects" node and change the local path variable:

- Keep in mind, that in the case the path is changed, it is required to modify the code in the following nodes:
1. "Check if file has been stored" node

2. "List files" node

3. "Return url" node

- Once we have understood where the csv files are stored in the ctrlX CORE, we can test the button to delete the files by using the inject node:

- In this case 38 files have been deleted

You must be a registered user to add a comment. If you've already registered, sign in. Otherwise, register and sign in.