
- Subscribe to RSS Feed
- Mark as New
- Mark as Read
- Bookmark
- Subscribe
- Printer Friendly Page
- Report Inappropriate Content
Disclaimer
This article has been created starting from the experiences of me, TheCodeCaptain and GenerationCtrlX.
If it's te first time that you are doing a routing experience i suggest you to start with a Simpler Task
This procedure is not addressed to the basic user, In order to fully understand what is happening and to debug the setup it is necessary to have a good knowledge about IPtables, networking and VPNs. Furthermore the document is not a complete setup to a production case. It is just a proof of concept which the user must be able to develop in order to fit his own case.
Use Case
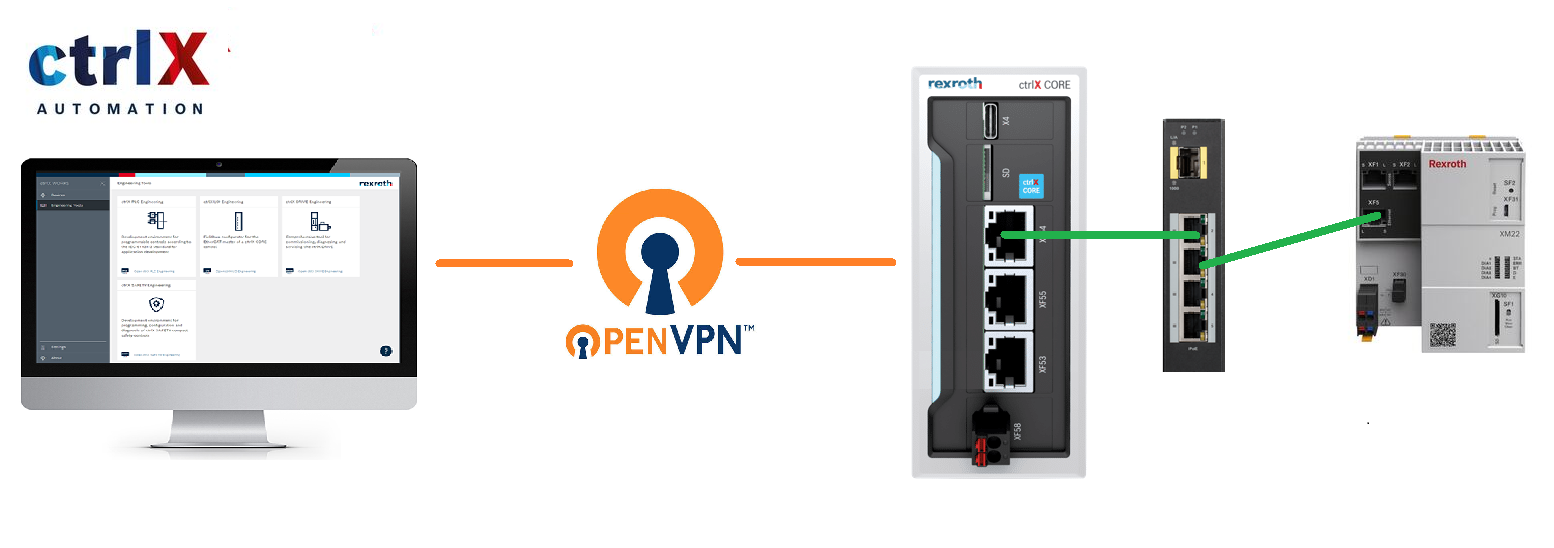
To connect your ctrlX via VPN and access it directly, there exists a good Youtube Video Here . In this How-To we go a step further and use the ctrlX as an IoT Gateway to also access other devices which are either directly connected to the ctrlX or which are in the same network as the ctrlX (e.g. via a switch). In this example there is a XM in the same network, which we want to access via VPN. The network topology used in this example is as follows:

Equipment used
The test has been done with:
- ctrlX CORE release 21.11
- eth0 set to IP address: 192.168.1.1
- Openvpn server, see Step1 option A or B.
- App Firewall 1.12.0
- App VPN 1.12.0
Setup a proper connection
Step 1: Setup server option A
There are many ways to setup an openvpn server, there are online several guides online such as this . Here i am displaying the additional setups needed on a bare openvpn server starting from the linked guide. We two certificates: one for the ctrlX, the other one for the PC we would like to use to connect with the XM controller. What we need to add inside the server configuration file,usually placed in "/etc/openvpn/server/server.conf" are the following rules. (considering that the ctrlx LAN is in 192.168.1.x rage).

Fig. 2.: Server.conf additional rules.
Syntetically:
- with "client-to-client" we are telling the server that a client can connect direclty to another client
- "route 192.168.1.0 255.255.255.0" tells to the server that he must be able to be the router for that subnet otherwise we would direct the traffic to its default gateway
- push "route 192.168.1.0 255.255.255.0" is tellingo to the server to push this rule to all the clients that connects to the server. Basically you don't need more to add the routing rule to the clients, they will look at the vpn server when they need the subnet 192.168.1.x. (step 3 previous guide)
- client-config-dir: well we are specifing a folder that the server will use to collect client specific configurations.

Fig. 3.: CCD directory content.
The ccd folder must be organized like this: it must contain a file for any VPN client on which we would like to setup some additional settings. The file must be named as the vpn client certificate itself. For instance, in the picture, we do have two certificates configuration displayed (there are several mores) but the one we are interested in is the "piproduction" one. its content is shown below.

Fig. 4.: CCD file content.
"ifconfig-push .." is setting the VPN address client-side as 10.8.0.35 while "iroute 192.168.1.0 255.255.255.0" is setting this client as the gateway for the 192.168.1.x subnet.
Now the openvpn plain server should be set, to apply the change a reboot is needed.
Step 1: Setup server option B
Here we're explaining how to create an Openvpn server in a different way. The guide has been done with the subnet 192.168.0.x. it is trivial to follow the same with 192.168.1.x or another subent. Additionally the user must have created an OpenVPN free account (with the free account you are able to setup an OpenVPN server which allows up to three VPN connections).
This part has been created and tried by GenerationCtrlX.
Enter the "xxxxx.openvpn.com" URL, which you have chosen during the account creation and chose Admin Portal to configure your OpenVPN server. Login with your credentials.

Fig. 5.: VPN service login.
Now first a network has to be configured. For this click on "Networks". OpenVPN leads us throgh the configuration of the network with a wizard. Select "Remote Access", as we want to access the network behind the ctrlX from other VPN clients. Now enter the following information in the according steps:
- Enter a name for the network and a name for the device which is used as "connector" to the network. In our case this means the ctrlX. Also select the location closest to you. From Germany e.g. Frankfurt. Click "Next".
- In this step the subnets which should be accessible behind the ctrlX have to be defined. In our example this is the subnet 192.168.0.0/24. You have also the option to define more than one subnet (if you e.g., use both network ports of the ctrlX). Click "Next".
- Multiple options where the network connector should be deployed are offered. Select "OpenVPN Compatible Router". Afterwards click on "Download OVPN Profile" to download the profile, which will afterwards uploaded to the ctrlX. Do not click on "Next" yet.


Fig. 6-7-8-9.: Web-Based OpenVPN server setup.
Step 2: Setup openvpn connection and allow IP forwarding
Once we do have the .ovpn file we're ready to rock the ctrlX app. Pleas take in account that the VPN connection page can be in a different place and its layout can change depending by the system and app version. One that ctrlX has internet access we need to upload the configuration and enable the "Connect automatically" option in case we need the system connected with the VPN at each boot.

Fig. 10.: OpenVPN client app overview.
In order to forward data packets it is necessary to allow it from the eth0 and tun0 interfaces:

Fig. 11.: Eth0 IP forward.

Fig. 12.: tun0 IP forward.
From firewall point of view it is also necessary to allow the packet forwarding (by default it is allowed).
Step 3: No gateway set on XM: SNAT Setting
Now it should be possible to connect to the PLC but it is necessary to setup the XM22 Gateway: It must be set to the ctrlX CORE IP address, in this case being the XM address 192.168.1.25, it must be set to 192.168.1.1.
Otherwise the connection would be dropped by the PLC.
In order to avoid this configuration for the PLC or the others devices on the machine network it is possible to setup a simple SNAT routing rule. Assuming again that the ctrlX CORE address from the machine point of view is 192.168.1.1 here is the configuration adopted.


Fig. 13.: NAT Settings.
Now that anything is ok we restart the ctrlx.
Step 4: XM21 access
Connect your PC to the OpenVPN serve with his own certificate.
Now it is all set up!! Pointing with the browser to http://192.168.1.25 the XM22 WebAssistant page should be reachable!

Fig. 14.: WebAssistant
Now Even Indraworks should be able to program the XM22 passing trough ctrlX.

Fig. 15.: XM22 programming
Step 5: Multiple machines access: DNAT Setting
This part has been developed by TheCodeCaptain. We've attached also the Firewall postman collection (just rename it .json).
Well well well, if you got to make it run till here then you should be proud of yourself. Once you're able to connect to a machine than maybe you would like to connect to many machine whch are deployed in the world. With the method above alone any machine must have a different subnet otherwise we would not be able to connect with it. EG 192.168.2.x, 192.168.3.x ... To avoid this problem we have three ways:
1 Use an OpenVPN server for each machine
2 Any machine has a different ip addess (not really cool)
3 Use DNAT.
The option 1 is definitely really clear, the second also. The option number 3 is what is interesting to us now but we need to go back to step 1a. We have to create another client .ovpn and then replicate all the rules inserted in 1a containing 192.168.1.0 with the address 192.168.5.0 instead. Obviously also the new "ifconfig-push" addess should be different (otherwise we wuold have two VPN clients with the same address). The eth0 interface and the XM22 interface addresses are still 192.168.1.1 and 192.168.1.25. We're not going to change them.

Fig. 16.: Route reminder

Fig. 17.: iRoute reminder
Reboot the server and reconnect all, now if we try to reach the 192.168.5.x address the VPN server tries to send us to the new VPN client but the the connection is not succesfull because ctrlX has no device in such subnet. What we need now is a DNAT.
We want to translate 192.168.5.X to 192.168.1.X inside ctrlX core. We need a rule for any device in the LAN we want to reach! To insert a rule the Firewall part we need to use is remarked in figures18-19. An example of Dnat ruels is then exposed by figure 20. The postman collection contains already a script to create a DNAT rule for any device in the subnet.

Fig. 18.: Firewall overview

Fig. 19.:Dnat location

Fig. 20.:Dnat rule(S)
Explaination
The packets we exchange are something wery close to what is represented in the picture below:

Fig. 21.: Data Packet
The image is just indicative, what is important to us is that our packet has:
- A destination address (where the packet should arrive)
- A source address (who is sending the packet)
- A Payload ( the data exchanged)
The packet takes 3 main steps to get to destination and 3 also to get back. 
Fig. 22.: ctrlX core Firewall structure
Setting the routing rules on our PC in step 3 we're able to send packets destined for 192.168.1.25 to ctrlX core. Here is where the trick is starting.
Once the packets are inside the ctrlX core we can do many things, first of all we could change the destination IP applying a Destination NAT (Number 1 in Fig.8 ) here is where the Destination IP translation happens, the packets destinated to 192.168.5.x are translated and redirected to 192.168.1.x. How? the DNAT part changes in the packet the destination address setting up his corrispective in the ctrlX LAN. We also must be shure that the packets are not being filtered!! To do that the step number 1 of the guide is mandatory, also it is good to check inside the "Forward FIlter" part of the firewall that there are no other rules that may block the packets. The last part is the most important, before to exit from ctrlX the packets are passing trough a SNAT (Source SNAT: number 3 in Fig.8 ). In this last step the source address of the packet that, till now, is something like 10.8.0.x is then converted in 192.168.1.1 which is the ctrlX core address of the interfaces that is connected to the XM22. Why that? because once the XM22 receives the packet and answers it already knows that the one who sent him the packt was the ctrlX and answers directly to him (otherwise we would have to set the gatway address). The rules to setup this last part are explained in step 2.
The packets that have to come back from the xm22 to the pc are automatically translated by ctrlX itself on they way back.
This tutorial does not have the aim to explain all routing capabilities the ctrlX can offer. We're just using a subset of features useful to obtain our goal. To fully understand what is behind the ctrlX firewall and routing configuration a basic knowledge on computer networks and firewall rules is necessary. Starting from iptables and NFT tables.
