
- Subscribe to RSS Feed
- Mark as New
- Mark as Read
- Bookmark
- Subscribe
- Printer Friendly Page
- Report Inappropriate Content
- Introduction
- Install OpenSSL
- Generate Private Certificate Authority (CA)
- Generate ctrlX Web Server Certificate and Key
- Add Certificate Authority to Browser Certificate Stores
- Add Web Server Certificate and Key to ctrlX Certificate Manager
- Test HTTPS Connection
- Related Links
Introduction
In this article, a method of generating and installing TLS server certificates in the ctrlX OS, and a certificate authority in Chrome and Firefox browsers, will be explained.
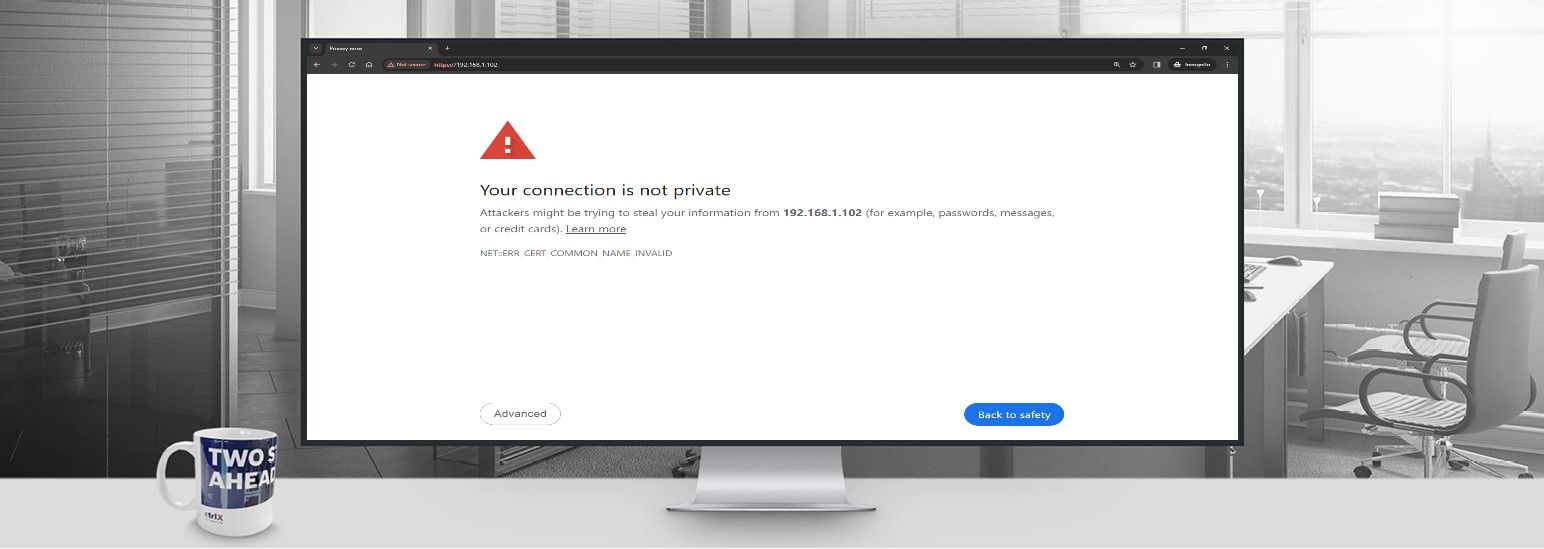
A common complaint when accessing the ctrlX Web UI is the warning in the image below.
This isn't a problem with ctrlX OS, but rather a security feature! Instead of using HTTP, the ctrlX web interface server provides an HTTPS connection. HTTPS encrypts and digitally signs all web server traffic, making it a far more secure communication protocol. Most browsers do not accept the self signed TLS certificates provided by ctrlX OS and display this warning when attempting to access the ctrlX web UI. This can be disabled in many browsers, but the secure connection can be made following the instructions below.
These certificates are specific to the DNS or IP address. Therefore, they can be reused across devices, so long as the certificate includes the device IP address. As an example, a certificate covering IP:127.0.0.1 should provide HTTPS connection to all ctrlX CORE Virtual instances forwarded to the local host, after the web server certificate and key are uploaded to the ctrlX OS.
Install OpenSSL
The first step is to gain access to OpenSSL. You can install this on a system of your choice, or use the installation that comes as part of a ctrlX WORKS app build environment.
OpenSSL is also included in standard Git installation. You can utilize the executable at the default location for openssl.exe: "C:\Program Files\Git\usr\bin". Following commands needs to be written into one line without the \.
VSCode as a development environment is highly recommended. The included terminal will accept the commands below with direct copy and paste.
Generate Private Certificate Authority (CA)
Open a terminal in a directory of your choice. Run the openssl command below. Modify the -subj parameter as necessary.
openssl req -x509 -nodes \
  -newkey RSA:2048       \
  -keyout root-ca.key    \
  -days 365              \
  -out root-ca.crt       \
  -subj '/C=US/ST=MN/L=Earth/O=Bosch Rexroth/CN=ctrlX_OS*'
This will generate a private key and certificate for your certificate authority.
Generate ctrlX Web Server Certificate and Key
In the same directory as above, run the openssl command below. Modify the -subj parameter as necessary.
openssl req -nodes   \
  -newkey rsa:2048   \
  -keyout server.key \
  -out server.csr    \
  -subj '/C=US/ST=MN/L=Earth/O=Bosch Rexroth/CN=ctrlX_OS*'
This will generate a key and certificate signing request for the ctrlX OS web server.
Create a text file named config.txt, in the same directory that you are running the openssl commands, and add the following text. Modify subjectAltName to fit your device IP. You can list multiple comma seperated addresses here if you'd like the certificate to apply to more than one device or address.
subjectAltName = IP:192.168.1.100, IP:127.0.0.1
authorityKeyIdentifier = keyid,issuer
basicConstraints = CA:FALSE
keyUsage = digitalSignature, keyEncipherment
extendedKeyUsage=serverAuth
Execute the following openssl command in a terminal, located in the same working directory as the previous commands, to generate the signed web server certificate.
openssl x509 -req    \
  -CA root-ca.crt    \
  -CAkey root-ca.key \
  -in server.csr     \
  -out server.crt    \
  -days 365          \
  -CAcreateserial    \
  -extfile config.txt
Add Certificate Authority to Browser Certificate Stores
Add the generated root-ca.crt to your browser certificate stores. The location for Chrome and Firefox are provided below.
- Chrome
- Settings --> Privacy and Security --> Manage Device Certificates --> Trusted Root Certification Authorities --> Import
Chrome Certificate Import
- Settings --> Privacy and Security --> Manage Device Certificates --> Trusted Root Certification Authorities --> Import
- Firefox
- Settings --> Privacy and Security --> Certificates --> View Certificates --> Authorities --> Import
Firefox Certificate Import
- Trust the CA to identify websites
- Settings --> Privacy and Security --> Certificates --> View Certificates --> Authorities --> Import

Add Web Server Certificate and Key to ctrlX Certificate Manager
- Rename the generated server.crt to webserver_custom_cert.pem.
- Rename the generated server.key to webserver_custom_key.pem.
- Certificate
- Settings --> Certificates and Keys --> Web Server --> Certificates
- Delete the existing webserver_custom_cert.pem
- Import new webserver_custom_cert.pem
- Select category Own
Replace Web Server Certificate
- Key
- ctrlX OS web UI --> Settings --> Certificates and Keys --> Web Server --> Keys
- Delete the existing webserver_custom_key.pem
- Import new webserver_custom_key.pem
- Select category Own
ctrlX Web Server Key Upload
Test HTTPS Connection
- Reboot the control
- Clear browser caches
- Access web pages under the specified subjectAltName ip addresses with an HTTPS connection. Note: Sometimes the browser will display the warning message, after the browser cache has been cleared, the first time the page is accessed. Refresh the page after ~30s and the message should no longer appear.
CtrlX Web Server Secure Connection
Related Links

You must be a registered user to add a comment. If you've already registered, sign in. Otherwise, register and sign in.