
- Subscribe to RSS Feed
- Mark as New
- Mark as Read
- Bookmark
- Subscribe
- Printer Friendly Page
- Report Inappropriate Content
This How-to shows you how you could use your own diagnostic messages to support users while troubleshooting. We include a direct interface with the Data Layer (point 3), using Node-RED (point 4) and using PLC (point 5).
The ctrlX diagnostic system uses the linux service journald as logbook. Please have a look at the official documentation.
1. Prerequisites and equipment used
- Having a ctrlX CORE or ctrlX COREVIRTUAL with version => 2.4
- Example with Node-RED: Node-RED app and basic Node-RED knowledge
- Example with PLC: PLC app and ctrlX WORKS installed and basic CODESYS knowledge
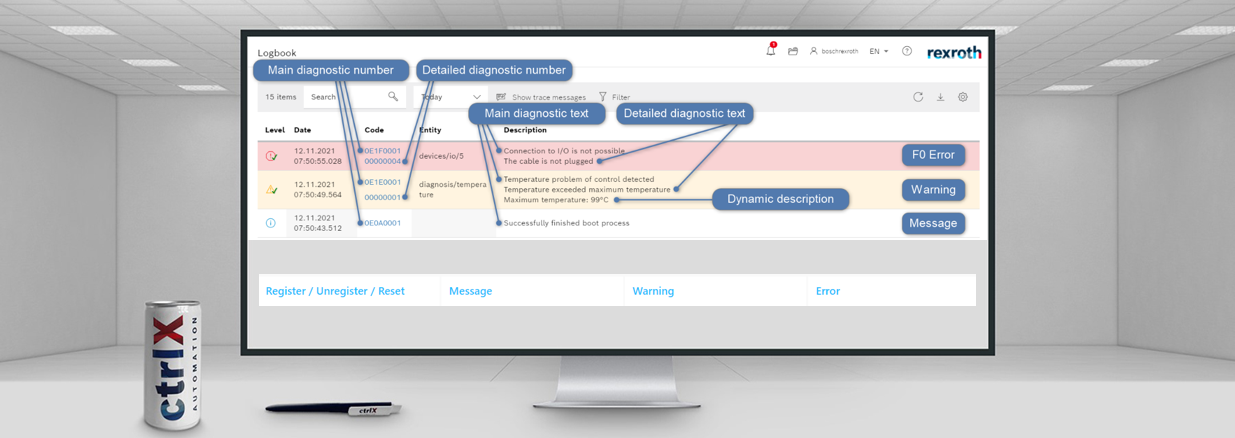
2. Important Definitions

-
ERROR (0xF), WARNINGS (0xE) and MESSAGES (0xA) are available as class/type.
-
A main diagnostic (number and text) must be used.
-
A detailed diagnostic (number and text) is optional, but recommended.
-
Be careful with ERROR and choose the right priority for the status code, see definition.
-
User defined diagnostics must be provided by a JSON file. Note that each language (english, german, spanish, etc.) needs a separate JSON file. Following an example of a JSON file:
{
   "product": "XCR-V-0114",
   "mainDiagnostics": {
      "0E0A0001": {
         "text": "Successfully finished boot process",
         "version": 1,
         }
   }
   "detailedDiagnostics": {
       "00000001": {
         "text": "Finished boot process without errors",
         "version": 1
         }
   }
}
3. Direct interaction with Data Layer - Diagnostic categories
3.1. «Fire and forget»
It can be set via Data Layer address diagnosis/set/set-and-reset

Logbook example with a MESSAGE:
- Only a log entry is created. MESSAGES are only set.

Logbook example with a WARNING:
- Only a log entry is created.
- WARNINGS are immediately set and automatically deleted.

Logbook example with an ERROR:
- LED (ctrlX light pipe) = blinking RED.
- Framework state = ERROR.
- ERRORS are set to the "inactive/reset" status. The errors have to be deleted separately. See below 3.3.

3.2. «Fire and remember»
It can be set via Data Layer address diagnosis/set/set-active. ERRORS and WARNINGS are given an active state and must be followed up. MESSAGES are not supported in this method since they do not need to be reset.

Logbook example with a WARNING:
- LED (ctrlX light pipe) = blinking orange.
- Framework state = WARNING.
- Status: to fix within the logbook.
- The warning must be deleted via method reset-active, see below 3.3
")
Logbook example with an ERROR:
- LED (ctrlX light pipe) = blinking red.
- Framework state = ERROR.
- Status: to fix within the logbook.
- The error must be deleted via method reset-active, see below 3.3.
- The reset-active command generates a new error (but inactive), see below 3.3.
")
3.3. «Error and warnings clearing»
a) Data Layer address diagnosis/set/reset-active.
- Active WARNINGS will be cleared/deleted directly.
- Active ERROR will be reset but a new inactive ERROR will be generated, which must be cleared via Data Layer address diagnosis/confirm/all-errors.
b) Data Layer address diagnosis/confirm/all-errors.
- Inactive ERRORS will be cleared.
Logbook example with a WARNING:
- The warning will be cleared/deleted.
- Status: changed from "to fix" to "occured" and a new entry with "solved" was generated.
")
Logbook example with an ERROR:
- Status: changed from "to fix" to "occured" and a new entry "to clear" was generated.
")
- Now the inactive error must be cleared/deleted (diagnosis/confirm/all-errors):
")
- Status: changed from "to clear" to "solved".
4. CODE example with Node-RED
We are including a Node-RED example with the following features:
- Register and unregister a JSON file which contains the diagnostic definitions.
- Create a MESSAGE, WARNING and ERROR.
- Clear specific warning and error.
- Clear all diagnostics.
4.1. Upload the JSON file via ctrlX WebUI
The main and detailed diagnostics are defined within a JSON file. This file has to be uploaded to the app data of the ctrlX CORE. You can do that easily via WebUI of the ctrlX CORE:
- Open the ctrlX WebUI and navigate to the manage app data.
- Open the File view.
- Create a new folder diagnostics.
- Upload the JSON file to this new folder.
After these steps it should look like this:

4.2. Import the Node-RED example and run it
- Open the Flow Editor from Node-RED and import the example code (JSON file).
- Do the setting for the Data Layer Request and Subscribe nodes.
- Deploy the program and open the dashboard.
After these steps you should be able to register/unregister the JSON file with the own messages and to set and reset errors, warnings and messages:

5. CODE example with PLC
We are including a PLC example with the following features:
- Register and unregister a JSON file which contains the diagnostic definitions.
- Create a message, warning and error.
- Clear specific warning and error.
- Clear all diagnostics.
5.1. Upload the JSON file with PLC Engineering
The main and detailed diagnostics are defined within a JSON file. This file must be uploaded to the ctrlX CORE. The upload could be done with ctrlX PLC Engineering:
- Open your PLC Engineering project.
- Double click on the ctrlX CORE device.
- Go to tab Files.
- Host (left hand side): navigate to the directory, where you saved the JSON file.
- Runtime (right hand side upper corner): press the refresh button to see the existing files.
- Upload the JSON file.
After these steps the JSON file should be uploaded to the ctrlX CORE. See the picture below:

5.2. Import and run the PLC example
- Import the PLC example
Click on Application, then on Project -> Import -> choose the provided *.export file. Then you should get these objects:PLC export data
- Call the program PRG_Diagnostics() in a cyclically program.
- Add the library CXA_DIAGNOSTICS.
PLC Library Manager
- Login and open the internal visualization.
Here you can see several functions. Start with register the JSON file, after you are able to set/reset errors, a warning and a message.PLC visualization

You must be a registered user to add a comment. If you've already registered, sign in. Otherwise, register and sign in.