- Subscribe to RSS Feed
- Mark as New
- Mark as Read
- Bookmark
- Subscribe
- Printer Friendly Page
- Report Inappropriate Content
Mind that you find the sample safe logic code, the sample drive parameter file and a word file at the end of the blog entry!
1. General information
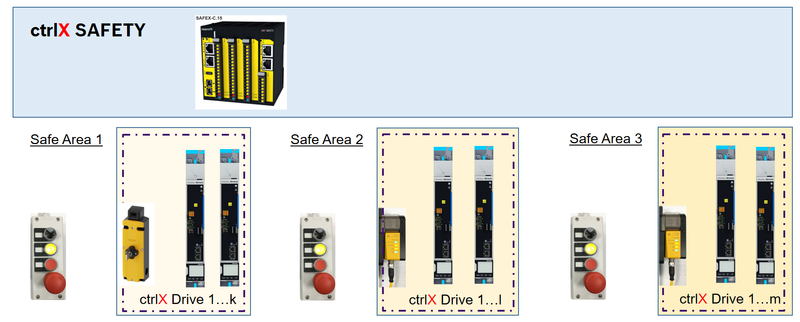
In the following we show to you how to control the SMO function of several ctrlX DRIVE in 3 safe areas each with a safe door via 1 ctrlX SAFETY.
Fig. 1.: Overview (k + l + m < 16)
Versions used
All the functions and screen shots are based on:
- ctrlX SAFETY Engineering version >= 1.7.1.8190
- SAFEX Runtime / Firmwareversion >= 1.0.0.1 (C-sample)
- ctrlX DRIVE Engineering version 01V14
- Runtime / Firmware version of drive AXS-V-0306
Prerequisites
A connection to the ctrlX SAFETY control and ctrlX DRIVE has been successfully established, the devices are correctly wired and 24 V are successfully put on. As well the engineering tools ctrlX SAFETY and ctrlX DRIVE Engineering have been started.
2. Function of the established SAFEX logic program
The principle function of the SAFEX logic program is the following:
EMERGENCY STOP (SMES)
If at least one of the three EMERGENCY STOP buttons at ctrlX SAFETY is pressed, the corresponding safety function at all the drives is activated immediately, which leads to a deceleration of still moving axes. After coming to standstill and acknowledging the EMERGENCY STOP function the drives are shut off and thus torque/force free.
Note, that the “Drive Enable” signal from the control has to be removed before the time entered for the reaction time of the EMERGENCY STOP function is exceeded, thus directly after the standstill is accomplished. Otherwise an error is shown.
If the EMERGENCY STOP button is released again the Reset button needs to be shortly pressed once that the EMERGENCY STOP and thus the function is released again as well. Then the drives can be activated (drive enable be set) again.
Mind that the EMERGENCY STOP is always prior to all other safety functions and, if activated, superseding the in before active safety function.
Mode Select - Change to Safety Operation Mode (activating the safe operational stop (SMST2))
If the “Mode Select” of one safe area at ctrlX SAFETY is switched, the corresponding safety function at the drives in this safe area is activated immediately, which leads to a deceleration of a still moving axes. After getting to standstill the drives are in operational stop with torque/force on.
The door in the safe area is released to be opened at that time. Mode select of several safe areas may be switched.
If the Mode Select switch is released again the Reset button needs to be shortly pressed once in order that the safe function SMST2 is released again.
Enabling Control (activating safe motion with limited speed)(SMM1)
If the “Enabling Control” button of a safe area is pressed additionally to the “Mode Select” switch of the corresponding safe area, the correspond-ding safety function SMM1 at the drives in this safe area is activated immediately, which allows the control to set a command with reduced speed. If the “Enabling Control” button is released again the safe operational stop (SMST2) is getting active again.
Mind that this function is prohibited if several Mode Select switches of more than one safe area are switched.
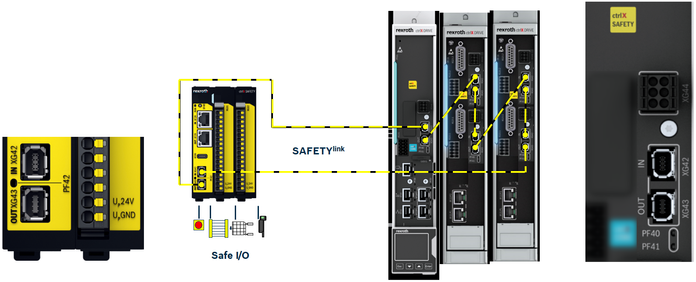
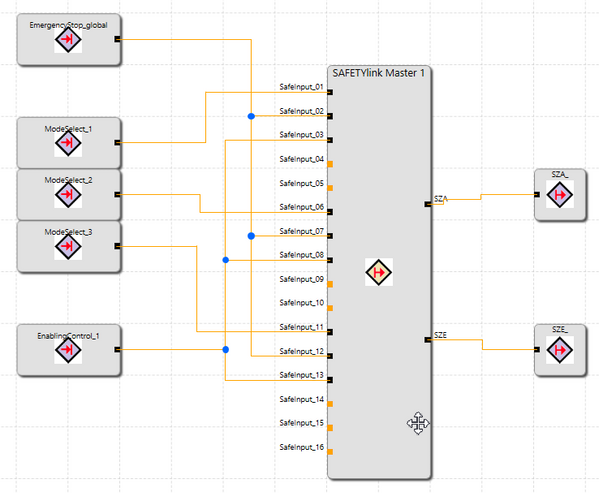
ctrlX SAFETYlink
The connection to the drive is accomplished via the so-called ctrlX SAFETYlink connection, a ring connection from the ctrlX SAFETY control SAFEX to all ctrlX DRIVE and back.
Fig. 2.: SAFETYlink schematics
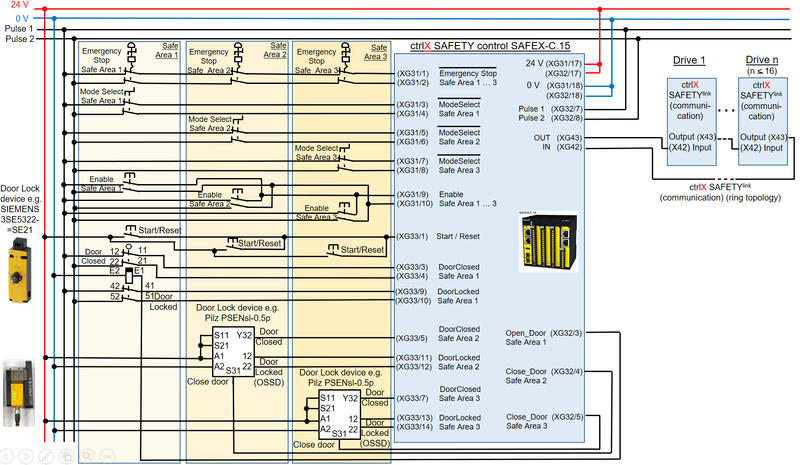
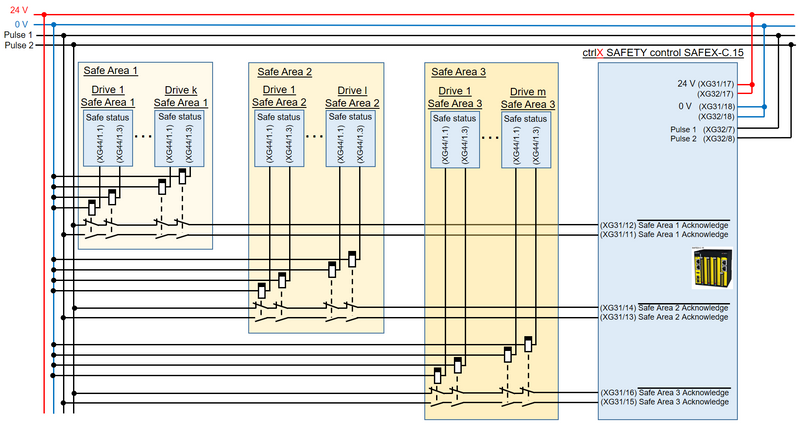
Wiring of safety elements
The following wiring is used to connect the different safety elements to SAFEX-C1.x:
Fig. 3.: Wiring (1)
Fig. 4.: Wiring (2) (k + l + m < 16)
3. Wiring schematics
The SAFEX control´s input devices are:
- 3 double channel EMERGENCY STOP buttons fed by pulsed 24V
- 3 double channel Mode Select switches fed by pulsed 24V
- 3 single channel reset button fed by non-pulsed 24V
- 3 Reset buttons
- 1 Double channel “Door closed” contacts from the SIEMENS safety door (in total 1 double input)
- 1 Single channel “Door closed” contacts from each of the 2 Pilz safety doors (in total 2 single inputs)
- 1 Double channel “Door locked” contact from each of the 3 safety doors (in total 3 double inputs)
All double channel buttons are fed by pulsed 24V
The output devices are:
- One single channel output for indication of no ctrlX SAFETYlink error present
- One single channel output for indication of complete
ctrlX SAFETYlink in safe condition - One OSSD fed output connected to open the 1 SIEMENS safety door
- Two OSSD fed outputs connected to close the 2 Pilz safety doors
- 3 single OSSD fed outputs to indicate that safe area is in safe condition (if in SMES, SMST2 or SMM1 doesn´t matter)
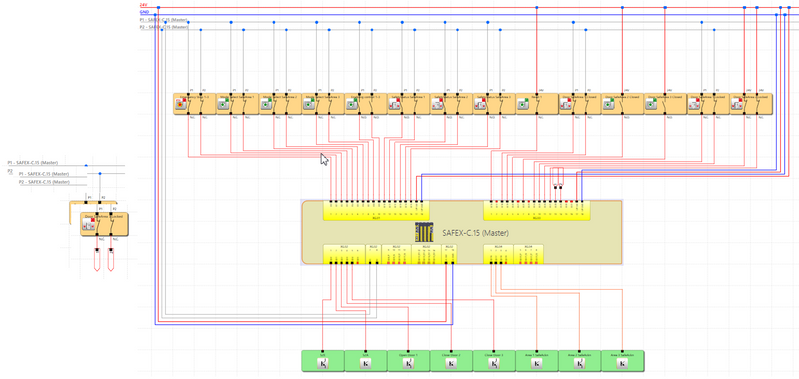
Fig. 5.: Wiring schematics
4. Settings inside SAFEX control
The settings of the SAFEX control and the devices connected to the ctrlX SAFETY control should be according to the following.
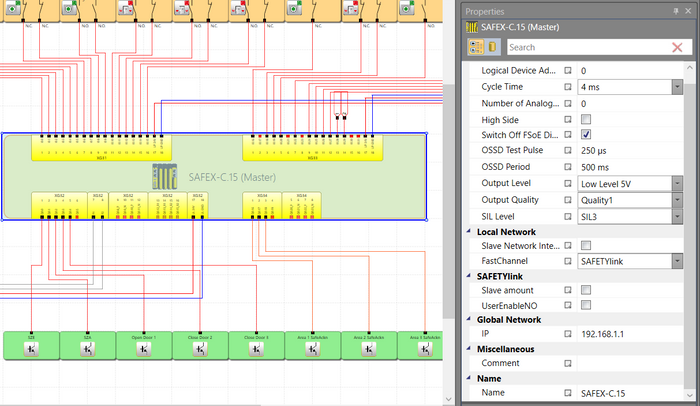
Fig. 6.: Settings of SAFEX control
Fig. 7.: Settings of “Emergency Stop 1-3” buttons connected to SAFEX control
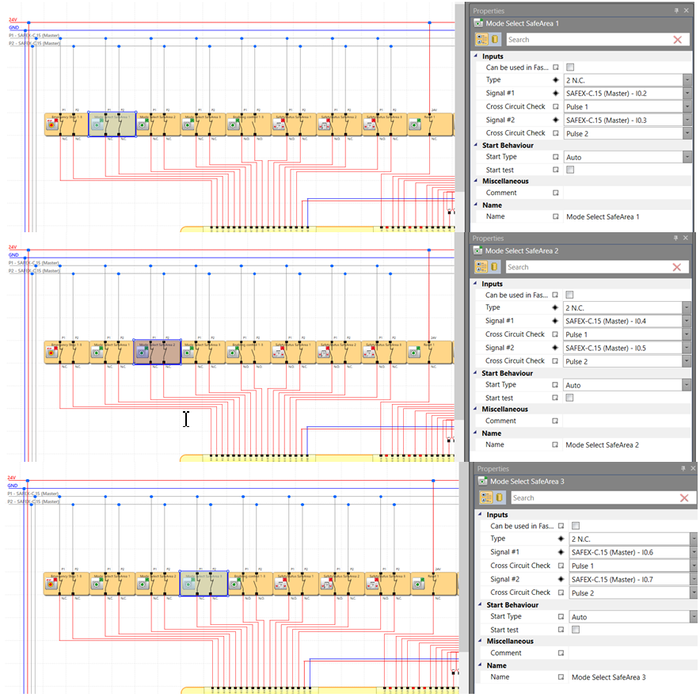
Fig. 8.: Settings of different “ModeSelect” switches connected to SAFEX control
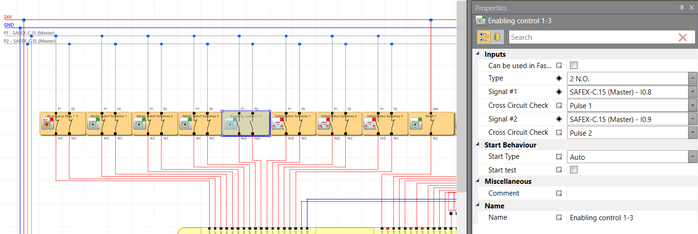
Fig. 9.: Settings of “Enabling control” buttons 1-3 connected to SAFEX control
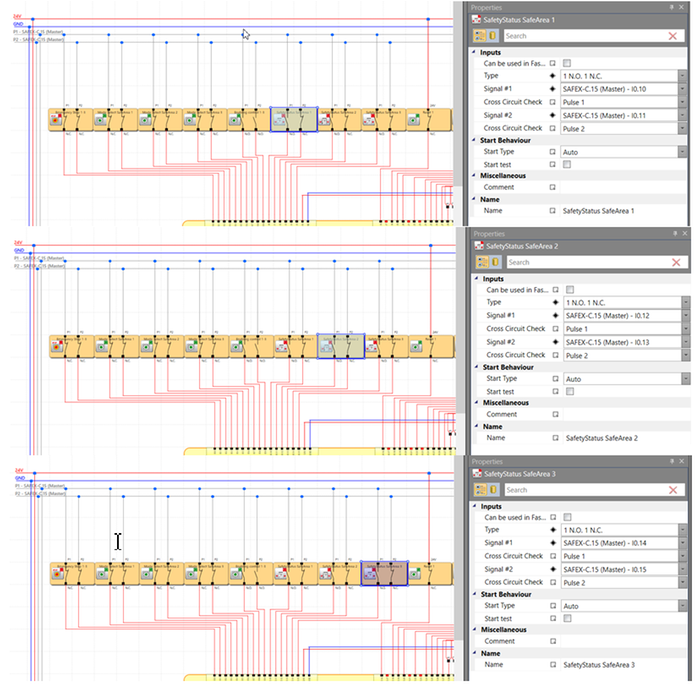
Fig. 10.: Settings of “SafetyStatus SafeArea 1..3” information from the relays connected to SAFEX control
Fig. 11.: Settings of “Start/Reset” button connected to SAFEX control
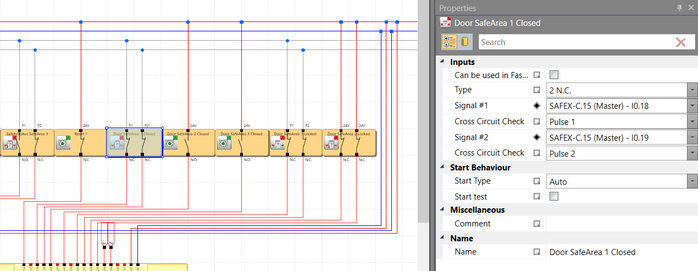
Fig. 12.: Settings of “Door SafeArea 1 Closed” contacts connected to SAFEX control
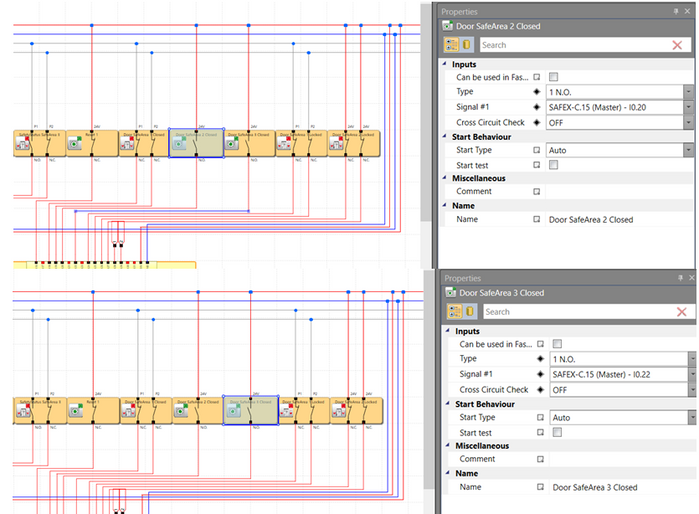
Fig. 13.: Settings of “Door SafeArea 2 - 3 Closed” contacts connected to SAFEX control
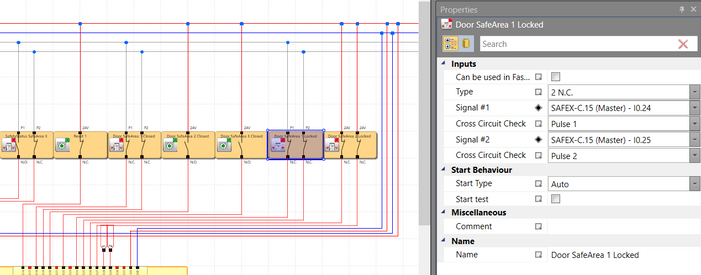
Fig. 14.: Settings of “Door SafeArea 1 Locked” contacts connected to SAFEX control
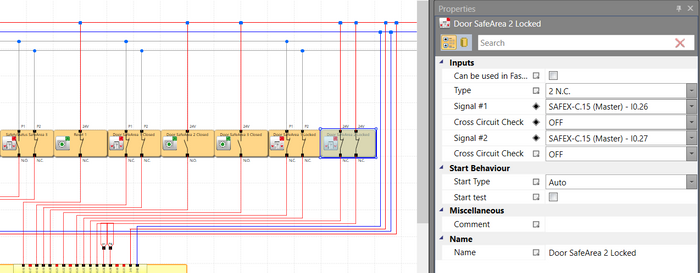
Fig. 15.: Settings of “Door SafeArea 2 Locked” contacts connected to SAFEX control (Pilz device uses OSSD outputs therefor here “Cross Circuit Check” is off)
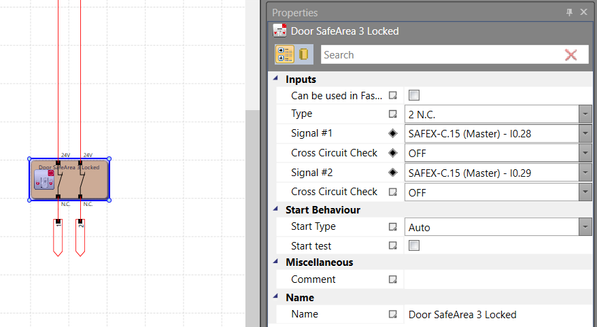
Fig. 16.: Settings of “Door SafeArea 3 Locked” contacts connected to SAFEX control (Pilz device uses OSSD outputs therefor here “Cross Circuit Check” is off)(on separate page as number of input elements is too high)
Fig. 17.: Settings of SZE output of SAFEX control
Fig. 18.: Settings of SZA output of SAFEX control
Fig. 19.: Settings of “Open Door 1” output of SAFEX control
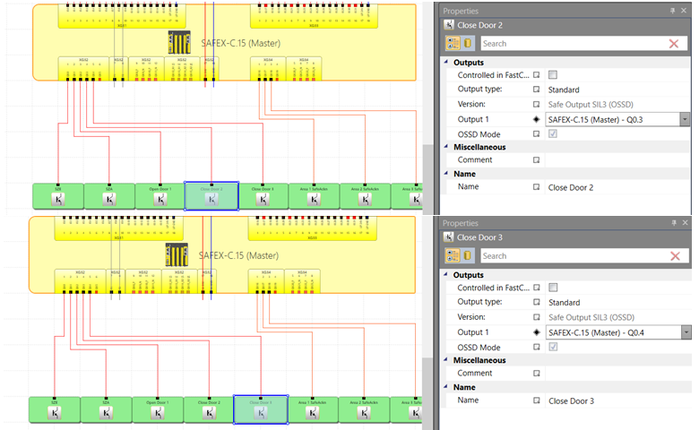
Fig. 20.: Settings of “Close Door 2” and “Close Door 3” outputs of SAFEX control
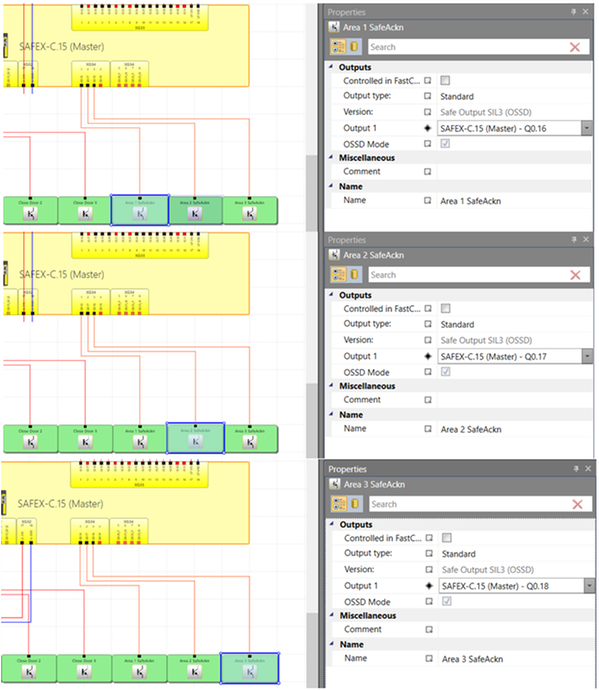
Fig. 21.: Settings of “Area 1 SafeAckn” to “Area 3 SafeAckn” outputs of SAFEX control
5. Safe logic inside SAFEX control
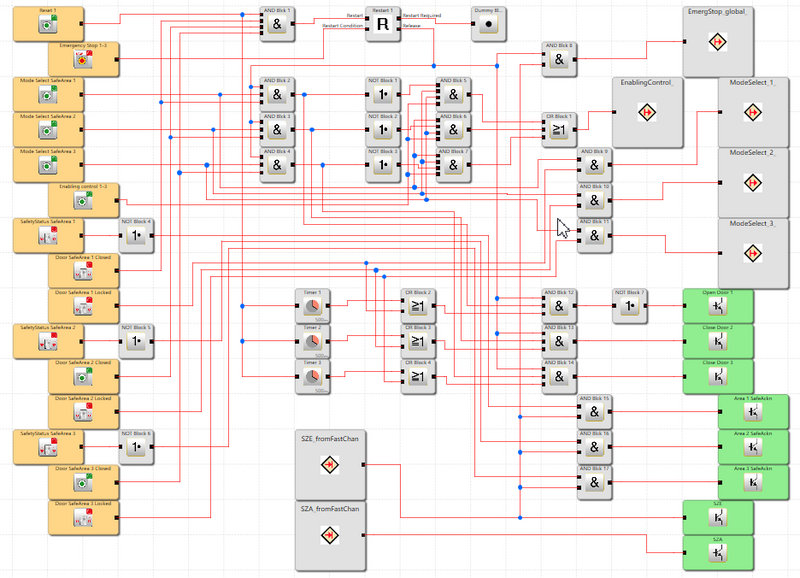
The safe logic inside the SAFEX control is created according to the following schematics.
Fig. 22.: Safe logic inside SAFEX control
Fig. 23.: FastChannel Scheme inside SAFEX control
Fig. 24.: Settings of Restart block
Fig. 25.: Settings of Timers 1 - 3 (in here as delay time 0,5 s is chosen, in your application this time may differ)
6. Settings of ctrlX DRIVE
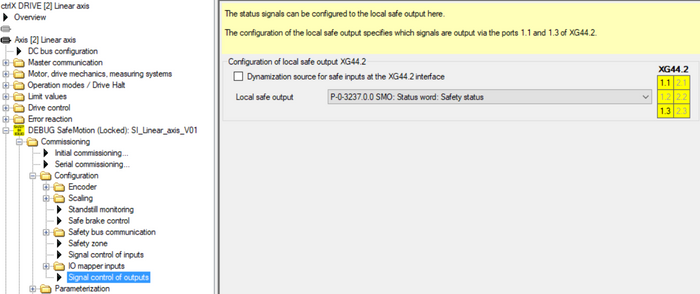
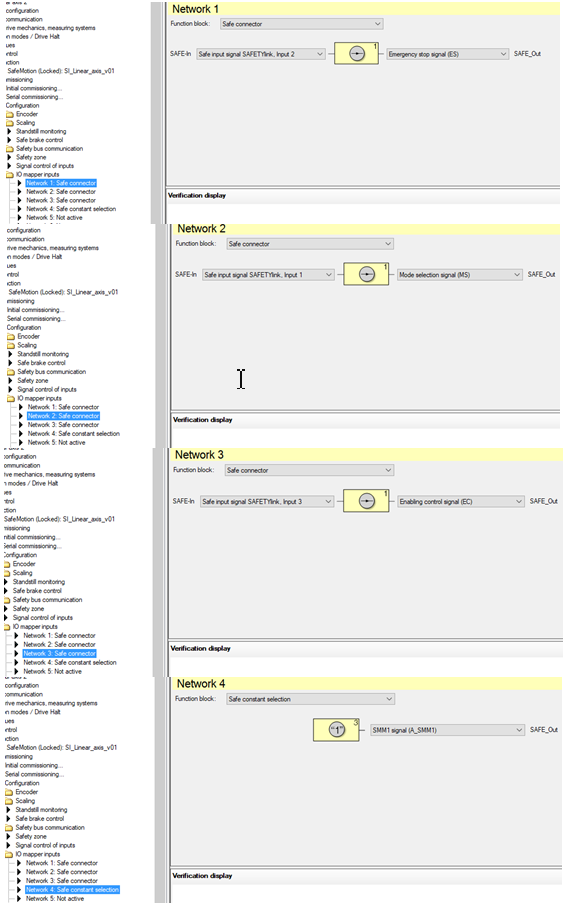
The settings inside ctrlX DRIVE are done according to the following:
Fig. 26.: Settings of ctrlX DRIVE: Safe Output signal settings in each drive
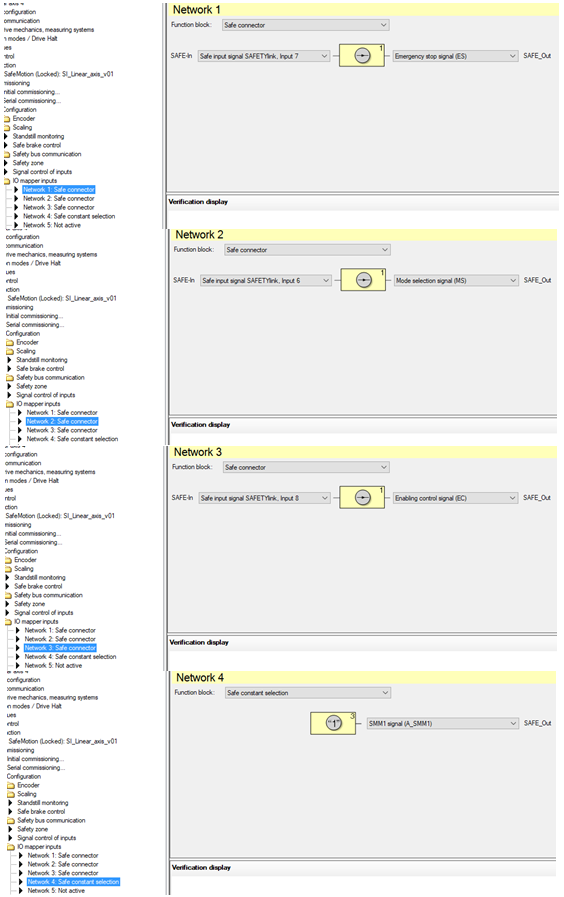
Fig. 27.: Settings of ctrlX DRIVE: I/O mapper input settings in drive of safe area 1
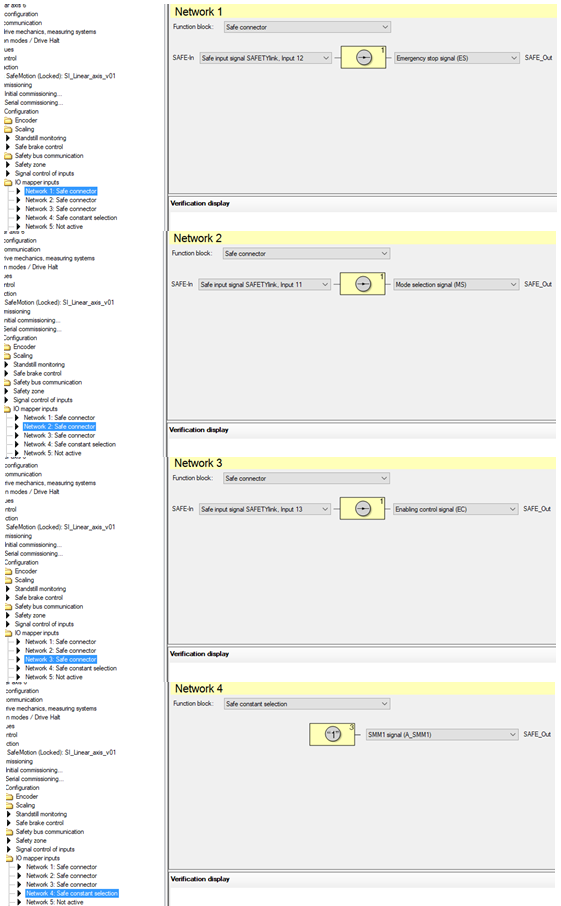
Fig. 28.: Settings of ctrlX DRIVE: I/O mapper input settings in drive of safe area 2
Fig. 29.: Settings of ctrlX DRIVE: I/O mapper input settings in drive of safe area 3
You must be a registered user to add a comment. If you've already registered, sign in. Otherwise, register and sign in.


