
- Subscribe to RSS Feed
- Mark as New
- Mark as Read
- Bookmark
- Subscribe
- Printer Friendly Page
- Report Inappropriate Content
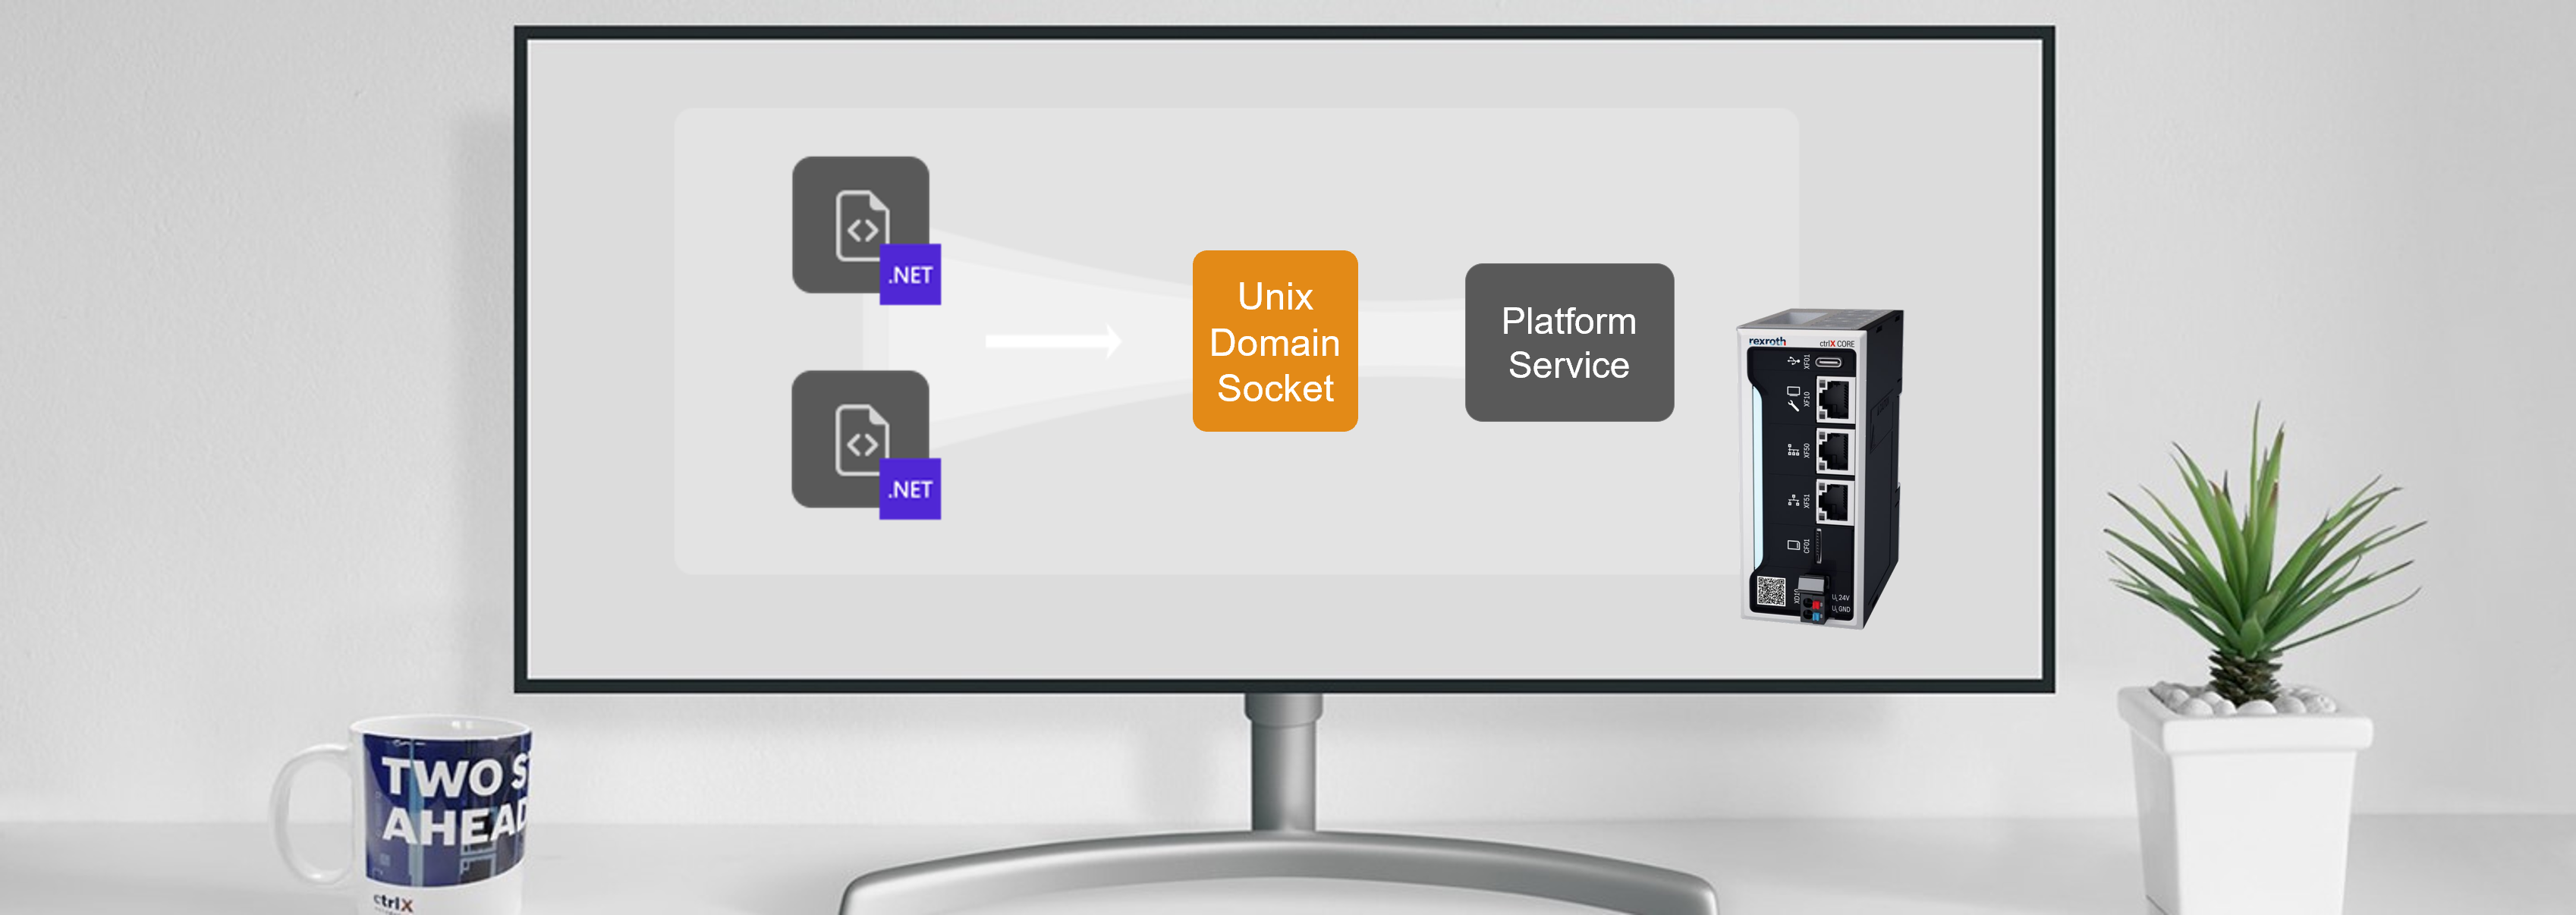
Creating cross-platform capable apps using .NET became easier with the evolution towards .NET 6. Applications built on ASP.NET typically serve the app and consume APIs via TCP/IP using a specific interface and port. That makes sense due to web applications are interacting over a network regularly. For apps based on .NET that targets ctrlX CORE you will have to re-think this behavior in a very early stage. This article will show you how to serve apps and consume APIs via Unix Domain Sockets in .NET and how to apply this to ctrlX CORE specific applications.
What is a Unix Domain Socket?
Before diving into code samples, let’s take a quick look at Unix Domain Sockets (or Unix Socket) and how they differ from a TCP/IP socket.
A Unix Domain Socket is an inter-process communication mechanism that allows bidirectional data exchange between multiple applications. Like almost everything on a Unix-based operating system, Unix Sockets are file-based. Hence, access can be controlled via file system permissions and communication is limited to applications running on the same machine.
When applications are running on the same Unix-based host,
Unix Domain Sockets should be preferred because they are more
lightweight and faster than TCP/IP sockets.
In contrast, TCP/IP sockets allow communication between applications over a network. By using the loopback interface, communication can take place on the same machine too. Because of the purpose of inter-machine communication, TCP/IP sockets have to consider operations like routing, among others. That’s why they are not as fast and lightweight as Unix Domain Sockets.
Serving a .NET Minimal API over Unix Sockets
Applications based on ASP.NET are served via the build-in cross-platform web server named Kestrel. By default, Kestrel is set up based on a TCP/IP Socket using the parameters specified within different environment variables, for example using ASPNETCORE_URLS for interface and port bindings. That makes sense because APIs are usually created for communication between applications over a network.
But it’s just the default. Adjusting the configuration via the well-designed interface is very easy. With a few lines of code, you can build and run an API that uses Unix Domain Sockets instead of TCP/IP Sockets based on ASP.NET. We will look at some practical use cases later in this article. But for now, we will walk through server and client application code which demonstrates how to work with Unix Sockets. To get started with our first server application we create a new minimal API using the dotnet CLI:
dotnet new webapi -minimal -o SocketDemo
Then we replace the entire content of the Program.cs file using the next code snippet. Within this code extract, the constant UnixSocketPath defines the path that is used to create the socket on the file system. After some sanity checks, Kestrel is advised to use the defined socket file via ListenUnixSocket With this simple line of code all pre-defined registrations of TCP/IP stack-related settings are replaced. The remaining parts of the snippet follow the common syntax when creating minimal APIs using .NET
const string UnixSocketPath = "/tmp/foo.sock";

if (File.Exists(UnixSocketPath))
{
    File.Delete(UnixSocketPath);
}

var builder = WebApplication.CreateBuilder(args);
builder.WebHost.ConfigureKestrel(options =>
{
    options.ListenUnixSocket(UnixSocketPath);
});

var app = builder.Build();
app.MapGet("/", () => "Hello from Foo API served via Unix Socket.");

app.Run();
To run the example on Windows-based systems, I can recommend WSL 2. Visual Studio and Visual Studio Code come with excellent remote integrations so you can run the code directly from the development environment. The screenshot below shows the previously presented sample executed within a Visual Studio Code WSL 2 remote session. The left terminal window shows the running ASP.NET application executed via dotnet run, confirming that we are serving the API using the defined Unix Socket.

The right terminal window shows a client request using the curl command curl -w "\n" --unix-socket /tmp/foo.sock http://localhost/ The output represents the expected response from our server application.
Consuming an API using Unix Domain Sockets
With the command line tool curl we just saw one of many possibilities to request data from our server application. In this section, you will learn how to build .NET clients that can consume data from our Unix Socket-based backend. We will focus on ASP.NET-based application since this type is typically used when building apps for ctrlX CORE.
In the case of web applications developed with ASP.NET, we can benefit from both embedded dependency injection and Refit. This combination allows centralized configuration of our endpoints, whereby no API-specific knowledge is required during the use of the external API over Unix Sockets.
Refit is an automatic type-safe REST library for .NET Core,
Xamarin and .NET that turns your REST API into a live interface.
(https://github.com/reactiveui/refit)
Within the next code snippet, we will have a look at the configuration and usage of a Unix Socket-based API with ASP.NET and Refit. The snippet covers the following steps:
- Create an interface representing the API
APIs are described by an interface. Methods represent single endpoints configured via additional attributes. In our example, theIFooApiinterface represents our Minimal API backend. Using the attribute[Get("/")]the specific endpoint of the API is mapped to the interface method. - Register the Refit client embedded dependency injection (DI) container
By the call of the extension methodAddRefitClientall required dependencies are registered within the DI container. For this the NuGet package Refit.HttpClientFactory must be installed previously. - Configure the primary HTTP message handler
With this next step, Refit is advised to use the SocketsHttpHandler class as the primary HTTP message handler, which is the same implementation as in our console application example before. Hence, all API calls using the registered interface are processed using the HTTP messaging pipeline. - Configure the HTTP client
Finally, the set-up of the HTTP client should take place. In the example below, the configuration is reduced to the base address of our backend. Since we are focusing on Unix Domain Sockets, of course, this is localhost.
using System.Net.Sockets;
using Refit;

const string BaseAddress = "http://localhost";
const string UnixSocketPath = "/tmp/foo.sock";

var builder = WebApplication.CreateBuilder(args);
builder.Services
    .AddRefitClient<IFooApi>()
    .ConfigurePrimaryHttpMessageHandler((_) =>
    {
        return new SocketsHttpHandler
        {
            ConnectCallback = async (_, _) =>
            {
                var socket = new Socket(AddressFamily.Unix, SocketType.Stream, ProtocolType.IP);
                var endpoint = new UnixDomainSocketEndPoint(UnixSocketPath);
                await socket.ConnectAsync(endpoint).ConfigureAwait(false);

                return new NetworkStream(socket, ownsSocket: false);
            }
        };
    })
    .ConfigureHttpClient((_, client) =>
    {
        client.BaseAddress = new Uri(BaseAddress);
    });

var app = builder.Build();

app.MapGet("/", (IFooApi fooApi) =>
{
    return fooApi.GetFoo();
});

app.Run();

internal interface IFooApi
{
    [Get("/")]
    Task<string> GetFoo();
}
With this basic configuration, the API can be called via the interface IFooApi. The interface can be injected using the mechanisms of ASP.NET, which means in every instance created by DI, for example, Controllers.
 Consuming APIs over Unix Domain Sockets using ASP.NET and Refit inside a WSL2 remote session
Example: Acquire a license from ctrlX CORE
For sure, you know that ctrlX CORE offers the possibility to develop third-party applications and distribute them over the ctrlX Store. These apps can be developed using various programming languages and are packed using Snap technology. For a seamless integration the platform offers various REST interfaces, for example, user management or licensing. To benefit from platform features these APIs must be used.
Of course, the REST interfaces can be addressed using regular HTTP calls. In the case of ctrlX CORE all endpoints enforce HTTPS and require a Bearer token to prevent unallowed access. For non-interactive scenarios, for example, an app needs to request license data, this token is not available. But how to realize integration in these scenarios? The solution is almost obvious.
Snap containers can be linked to each other via slots and plugs. The licensing service on ctrlX CORE offers such a plug:
plugs:
  licensing-service:
    interface: content
    content: licensing-service
    target: $SNAP_DATA/licensing-service
Thereby, third-party apps can request data from the license system API via the Unix Domain Socket $SNAP_DATA/licensing-service/licensing-service.sock. This socket is accessible only to applications running on the same system. Hence, a request does not need to use HTTPS and a Bearer token is no longer required.
Let’s have a look at some details about a possible implementation. We will not discuss all aspects required to create a .NET app for ctrlX CORE. Maybe I will write about that in a future article 😉
A Snap is described by a file named snapcraft.yaml. This file is the main entry point for Snapcraft (please see official documentation for further details). To access the Unix Socket provided by another Snap, this file must be extended. In the case of ctrlX CORE this could look like below:
name: id-of-the-snap
version: "1.0.0"
title: Title of the Snap
summary: Summary of the Snap
description: Description of the snap
grade: stable
architectures:
- arm64
base: core20
confinement: strict
type: app

...

plugs:
  licensing-service:
    interface: content
    content: licensing-service
    target: $SNAP_DATA/licensing-service
After adding the plug to the list of known plugs inside our snapcraft.yaml file, we can now access the specific Unix Domain Socket. Since we are still within our technology stack, the approaches mentioned above can be used in this case also. The next code extracts show the application of this stack. It consists mainly of
- Startup
A class that is responsible for putting all applications parts together. This covers for example the registration and configuration of the components within the dependency injection container. The procedure for socket-related interfaces and classes follows the scheme that we have learned before. - ICtrlXLicenseApi
This interface describes the licensing API. Each method is decorated with a Refit-specific attribute. In the sample code, only the method to acquire a license is exemplarily shown. - CtrlXLicenseValidator
A class that takes responsibility for application-specific logic concerning license management. It uses the ICtrlXLicenseApi interface to access the API hosted on ctrlX CORE using the configuration provided via Startup class.
internal interface ICtrlXLicenseApi
{
  [Post("/license-manager/api/v1/license")]
  Task<ApiResponse<AcquiredLicense>> AcquireLicense([Body] AcquireLicenseRequestBody body);
}

public class Startup
{
  // More startup related code...

  public void ConfigureServices(IServiceCollection services)
  {
    var settings = new RefitSettings(new SystemTextJsonContentSerializer(new JsonSerializerOptions
    {
      PropertyNameCaseInsensitive = true
    }));

    services
      .AddRefitClient<ICtrlXLicenseApi>(settings)
      .ConfigurePrimaryHttpMessageHandler((sp) =>
      {
        var configuration = sp.GetRequiredService<IConfiguration>();
        var snapDataFolder = configuration.GetValue<string>("SNAP_DATA");

        return new SocketsHttpHandler
        {
          ConnectCallback = async (_, cancellationToken) =>
          {
            var socket = new Socket(AddressFamily.Unix, SocketType.Stream, ProtocolType.Unspecified);
            var endpoint = new UnixDomainSocketEndPoint($"{snapDataFolder}/licensing-service/licensing-service.sock");
            await socket.ConnectAsync(endpoint, cancellationToken).ConfigureAwait(false);

            return new NetworkStream(socket, ownsSocket: false);
          }
        };
      })
      .ConfigureHttpClient((sp, httpClient) =>
      {
        httpClient.BaseAddress = new Uri("http://localhost");
      });
  }

  // More startup related code...
}

internal sealed class CtrlXLicenseValidator
{
  private readonly ICtrlXLicenseApi _service;
  private AcquiredLicense _acquiredLicense;

  public CtrlXLicenseValidator(ICtrlXLicenseApi service)
  {
    _service = service;
  }

  public async Task<bool> AcquireLicenseAsync()
  {
    try
    {
      var body = new AcquireLicenseRequestBody
      {
        Name = "CapabilityName",
        Version = "CapabilityVersion"
      };

      var response = await _service.AcquireLicense(body).ConfigureAwait(false);

      if (!response.IsSuccessStatusCode || response.Content is null)
      {
        return false;
      }

      _acquiredLicense = response.Content;
      return true;
    }
    catch
    {
      return false;
    }
  }
}
Wrapping up
In this article, the basics of using Unix Domain Sockets in .NET-based applications are explained. A practical walkthrough explains, how to use these approaches in the context of ctrlX CORE. For .NET, we can state that integrated mechanisms, like HTTP message handlers, make it very simple to establish lightweight and fast communication for services running on the same machine. In combination with other libraries such as Refit, most communication-related initialization can be decoupled from productive code.
This post is based on an article I've written for my channel on Medium. The original post explains how to use Unix Domain Sockets in .NET 6 and covers even more approaches and examples. On GitHub, a full working sample application is available. It covers client and server applications using Unix Domain Socket for communication.
Related Topics
- Unix Domain Sockets in .NET 6 - Basics and Real-World Examples
- Example how to work with Unix Sockets using .NET 6
- Microsoft Docs: SocketsHttpHandler Klasse
- Refit: The automatic type-safe REST library for .NET Core, Xamarin and .NET

You must be a registered user to add a comment. If you've already registered, sign in. Otherwise, register and sign in.