
- Subscribe to RSS Feed
- Mark as New
- Mark as Read
- Bookmark
- Subscribe
- Printer Friendly Page
- Report Inappropriate Content
1. Introduction
In this How-to you will learn how to setup a demo example for an HMI designed in Control Plus Studio that interacts with a PLC program running on a real ctrlX CORE X3. Such control system operates a 3D simulation of a machine, later referred to as Digital Machine.
Nexeed Control Plus is a software tool powered by Bosch Connected Industry. This tool is conceived to assist developers to design industrial automation systems applications such as PLC, HMI, etc. For more information about this please visit this link.
1.1. Requirements
- Programming device: PC with Windows 10
- ctrlX Works 1.20 (PLC Engineering is necessary)
- Controller device: ctrlX CORE X3 apps version 1.20
- EtherCAT Master 1.20 app
- OPC UA Server 1.20 app
- PLC 1.20 app
- Simulation device: PC with Windows 10 (good graphic card) + Monitors + Touchscreen/Peripherals.
- Control Plus Studio v5.8
- Digital Machine Project
NOTE: The same Windows 10 PC can be used in a first step as the programming device to load the PLC project into the ctrlX CORE, and after that as the host machine where the Nexeed software will run the Digital Machine and the HMI. This is actually the case in the showcase for Buttikon showroom. The difference between the engineering PC and the Tower PC (simulation host) has been made in this tutorial since it is not strictly necessary to have the ctrlX WORKS tools installed in the Simulation host device.
1.2. System overview
In the diagram we can see an overview of the system. The three main components listed in the previous section can be seen: programming, control and simulation devices.

The programming stage refers to loading the PLC program into the ctrlX CORE X3. This can be done using a TCP/IP connection from the engineering PC to the port XF10 of the X3. It is the usual method of loading a PLC program. Once the PLC program is already running in the X3 the engineering PC is not longer required.
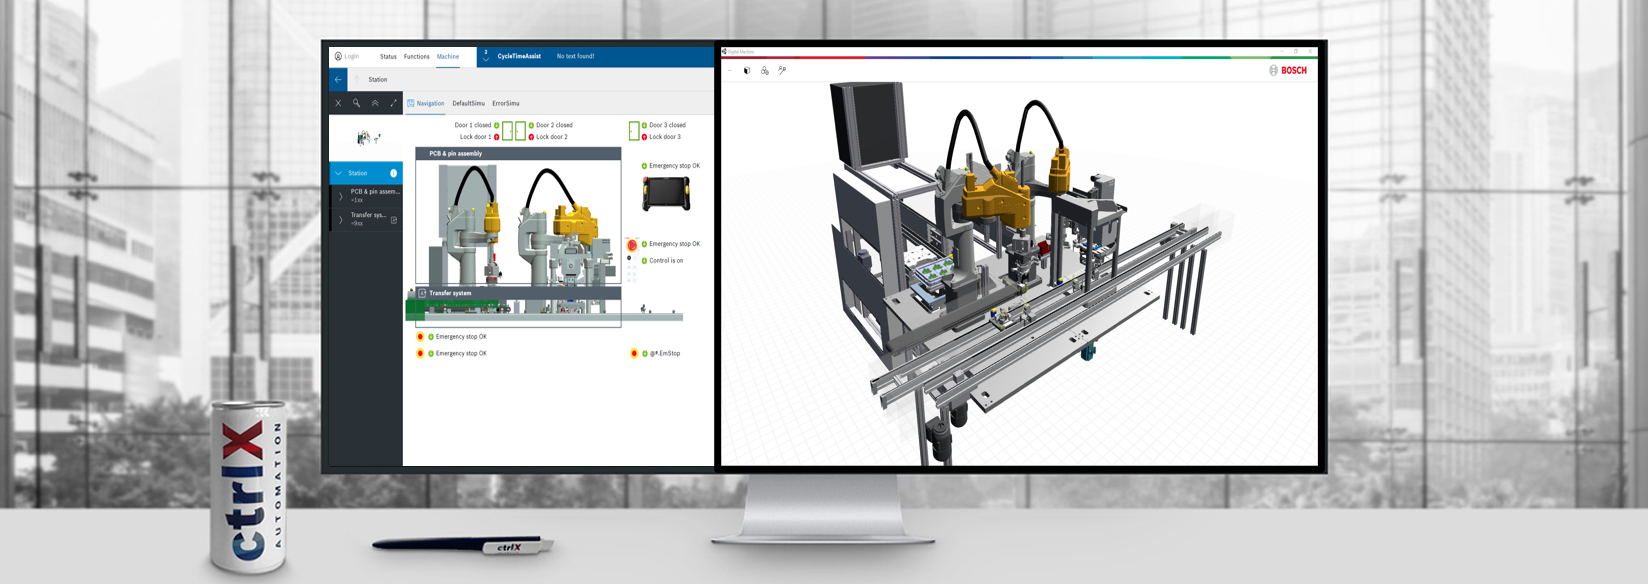
The tower PC is connected to two displays via a display port connection. In one of them the Digital Machine based on Unity 3D will be visualized, whereas in the other one the HMI, developed with the help of Control Plus Studio, will be shown. The small monitor (HMI) is actually a touchscreen, hence such input is directed to the tower PC via a serial communication USB-A.
The tower PC is also connected to the ctrlX CORE X3 (port XF10), the communication between the applications running in the PC and the X3 is handled via OPC/UA protocol.
2. Installation
2.1. Project download
The apps for the ctrlX CORE X3 can be found in the ctrlX Store.
The project example and control plus studio can be found in the developer portal (only for Bosch employees).
Control Plus Studio v5.8:

Unzip the downloaded file, and then place the files in the PC that will host the simulation.
Digital Machine Example v2.8:

Unzip the .zip you get from the download. You will get a folder with a subfolder called “V2.8”, this is the project example. Place this folder “V2.8” in a directory included directly in your C:/. For example: C:/Simulation_project/V2.8. It is important to place it in the root of your system and not in any subdirectory from the user folder, this includes the Desktop.
2.2. Project settings
This section is just a summary of the user guide that comes with the example download (C:/<yourPath>/V2.8/_Readme/DigitalMachine_ctrlX_EngineeringGuideline_V2.8.0_DE.pdf).
The Engineering Guideline is currently only available in German.
Don't mix it up with the English version of the Beckhoff project documentation.
The mentioned official user guide is adapted for the case of a real hardware ctrlX CORE X3 and other minor modifications in the current How-to you are reading. To set up the project you should follow up the next steps:
2.2.1. Install the PLC, OPC UA Server and EtherCAT master app (v1.20) and their respective licenses in the ctrlX CORE X3.
2.2.2. Install Control Plus Studio V5.8 in the Windows 10 that will be used to host the simulation (using the software you downloaded previously).
2.2.3. Open your PLC Engineering (from ctrlX WORKS 1.20 software package) in your engineering PC (recall that this device can be in practice the same that hosts the simulation).
Open the PLC project that comes with the example. It can be found under: C:/<yourPath>/V2.8/RexrothCtrlX/Stat000/Plc/Stat000_PLC.project
Verify that the PLC project is configured with the right target architecture for your device, in case of a ctrlX CORE X3 it is arm64. By default, the project is configured for a ctrlX CORE virtual, i.e. amd64.

If not, you must change it, following these steps:


And then click on “Device Update”.
After that, you can login into your ctrlX CORE and load the PLC program.
2.2.4. If the PC that will host the simulation has not hard disk D:\, you must follow point 6.3 from the official user guide (“Einstellungen zum Betrieb ohne Festplatten-Laufwerk”).
Open the Control Plus Studio project in C:/<yourPath>/V2.8/RexrothCtrlX/Stat000/Engineering/Stat000.cpsp.
You could also call the batch file in
C:/<yourPath>/V2.8/RexrothCtrlX/_Batch/OpenProject.bat.
Both paths open the same project.
Open the search with Ctrl+F, look for all the “D:\” and replace them by “C:\”.

Save the project.

2.2.5. Although it is not strictly necessary, it is recommended to complete the point 6.4 from the official user guide “Einstellungen zum Betrieb des Cycle-Time-Assist- und Part-Counter-Service. To do so, follow these steps:
- Download SQL Server Express 2016 from the official website.
- Place the SLQEXPR_x64_ENU.exe in C:/<yourPath>/V2.8/RexrothCtrlX/_Readme/SQLEXPRESS/ SLQEXPR_x64_ENU.exe
- Run as Administrator the batch file “SQLEXPR_x64_ENU.bat” placed in the same directory.
2.3. Changes in the project for the specific showcase for Buttikon Showroom.
Apart from the configurations described in the official guide, some minor changes have been done for this specific showcase. Please also consider conducting them for your own deployment. We recommend try first skipping the changes presented in this sections, and if the system does not work, then proceed with them.
2.3.1. We have identified that there are some issues with the PLC compiling in this project as it is configured by default. In our case it was necessary to modify an attribute of the HeadDataStruct struct definition. It was necessary to deactivate the “{attribute 'pack_mode' := '1'}”.

2.3.2. Another point that is sometimes conflicting is the constants substitution. If you are experiencing this, please hard-code those numbers in the places where the constant is used. Use Ctrl+F to search for the constant appearances.

2.3.3. If you see that the simulation is running slow, or even not running, it could be due to an overload in the ctrlX CORE X3. You can easily check this via ctrlX CORE web-ui under Settings > Information > Resources > CPU usage.
If you see that any of the Cores is near 100%, it is clearly an overloading in the system. To reduce this load, you can make the PLC program slower by increasing the cycle time.
Open the PLC project (C:/<yourPath>/V2.8/RexrothCtrlX/Stat000/Plc/Stat000_PLC.project), then go to task configuration and increase the interval parameter. In our case with a cycle time of 40 ms, the system was working smoothly.

3. System starting
3.1. Following the official user guide
In this section you will learn how to start the system following the official guidelines. It requires to start all the processes manually. It is a way to test that the system has been properly set up. The batch files that are later referred to are placed in C:/<yourPath>/V2.8/RexrothCtrlX/_Batch/*. All the files must be called as administrator.
3.1.1. Open the Control Plus studio with “01_OpenProject.bat”.
3.1.2. Export the Control Plus Studio project. This step must be done again only if the project in Control Plus Studio has changed.

3.1.3. Now we will add the robot data to the ctrlX CORE, this step must only be done once, data is stored in the memory of the ctrlX CORE.
We must search for a folder called “Robot” in the following path: C:/<yourPath>/V2.8/RexrothCtrlX/Stat000/Targets/_mPad/OPCON_DATA_PATH/Robot.
The same folder can also be found in C:/OpconData/Robot. They should be equivalent.
Then we go to the ctrlX CORE web-ui and open the Manage App Data by clicking on the icon in the upper bar.

Next, we download the current app data by clicking on the three dots in the upper right corner on the central section, and then proceed with download.

You will get a file called “appdata.zip” in your computer. Open this file with 7-Zip or any equivalent app and navigate to the following path: ~\appdata.zip\plc\run/linux-gcc-x64\data\

Copy the folder “Robot” in that directory. Confirm it, in case an info window popped up.
Now, we will upload this new app data to the ctrlX CORE. First switch the operation mode to “Setup”.

And then select “Upload” in the menu that appears after clicking in the three points.

Select the appdata.zip you just modified.
3.1.4. Generate the OPC/UA certificate for the communication between HMI (Control Plus Studio) and ctrlX CORE with “03_RunAppServices.bat”. A terminal will start, and some processes will run. Now go to the ctrlX CORE web-ui and navigate to Settings > Certificates & Keys > OPC UA Server as shown in the images.


After that, trust the certificate issued by OpCon.DataSetAcess that will have appeared there.

3.1.6. The 3D simulation will have generated another certificate for the OPC/UA communication, in this case between the 3D simulation and the ctrlX CORE. Go to the ctrlX CORE web-ui and navigate to Settings > Certificate & Keys > OPC/UA Server as before and trust the certificate issue by “game4automation”.
3.1.7. The last step is to start the HMI. Go back to the Control Plus Studio Project. And start the HMI following the instructions in the picture.

3.1.8. Since it is the first time you start it, you will need to modify a couple of details that are incorrect by default. However, before you can start using the HMI, you need to get “Operator privileges”, to do so just click on the lock on the right bottom corner. For more details about the HMI usage and a detailed tutorial, please have a look to the “ShowroomPresentation.pdf” file attached in this How-to.
Once you have the “Operator privileges”, the HMI will be unlocked. Now let’s clean the faults. Go to machine in the upper part.

Once there, select “Tools” from the middle bar. Next, search for the tools that have a red sign. They do not need to be in order as you see in the picture, you can use the arrows in your keyboard to navigate in this menu (the mouse wheel does not work). Click on the tool/s with a red sign, and then “Edit”, following “Save & Quit”.
Repeat this same process with any faulty tool you can find expanding the left side menu, it is not complex, they are highlighted in red.
3.1.9. Finally, if everything was successful, the system is ready for use. Simply follow the instructions in the “ShowroomPresentation.pdf” attached to this How-to to learn how to use the HMI.
3.2. Non-expert user experience for showroom
In this section you will learn how to make the system start automatically. This feature is necessary in a setup that will be used in a showroom by non-expert users. For the instructions in this section, it is assumed that the system has been started at least once following the official user guide, since it configures the OPC/UA communication.
For the showcase in Buttikon, we have written three (pseudo) batch files:
- presentation.ahk: it closes all and then starts the “ShowroomPresentation” presentation.
- system.ahk: it closes all and then starts the 3D simulation, the HMI and necessary background processes.
- closeAll.ahk: it closes all the programs.
You can find these files attached to this How-to inside “non-expert-experience.zip”.
The “.ahk” corresponds to the file type that is executed Autohotkey, an open-source tool to automate Window based processes. If you want to use this same approach to automate the process, you must install Autohotkey. You can download it from this link. For this project, we recommend using v1.1 although the website says it is deprecated.
The idea with this automatic start is that “presentation.ahk” is called when the system boots, and displays an overview of the system in the big screen (full screen of a png photo) while it shows the “ShowroomPresentation” in the small monitor. Since this small monitor is a touch screen, the user can interact with it and learn how the HMI works.
NOTE: It starts a *.odp presentation that is open with LibreOffice Impress, not the *.pdf attached in this readme.
From such presentation, there is a button that will call “system.ahk”. It starts everything that is needed to use the HMI/Simulation.
closeAll.ahk is simply there just in case the non-expert user messes up something and wants to close everything and start from zero. Both “presentation.ahk” and “system.ahk” can be called manually from a shortcut link placed in the Desktop.
Understanding how a presentation is started from a *.ahk is not complex, just have a look at the file, but the question is: How do we start the HMI and Simulation without manually doing all the steps that were described above? Well, we need to configure some things for that. We want to start 3 things when calling the system.ahk.
- background processes for the OPC/UA communication
- 3D simulation
- HMI
First, we need to start the process that handles the OPC/UA communication between HMI and ctrlX CORE. To avoid the need to trust a new certificate each time, this would be the case if we called the “DataSetAcess.bat”, we can directly call C:/<yourPath>/V2.8/ RexrothCtrlX/_RuntimeSimu/DataSetAccess/OpCon.DataSetAccess.exe with a “\DEBUG” flag. Find the shortcut that calls to this path with the proper flag in the “non-expert-experience.zip”, you can explore the properties of the shortcut to see where the “\DEBUG” flag is called.
Secondly, to start the 3D simulation, you must simply call C:/<yourPath>/V2.8/RexrothCtrlX/3D_Simu/DigitalMachine.exe. Clicking “ll” is still necessary to skip the “Activate” window. No new OPC/UA certificate in the ctrlX CORE must be trusted. Also find the shortcut to this path in “non-expert-experience.zip”.
And finally, to start the HMI you must call C:/<yourPath>/V2.8/RexrothCtrlX/Std/Hmi_V5_8/OpCon.HMI.Modulo.exe. The shortcut to this path is included in “non-expert-experience.zip” too. However, to open a fully operating HMI you need to copy all the files from C:/<yourPath>/V2.8/RexrothCtrlX/Stat000/Hmi/ into C:/<yourPath>/V2.8/RexrothCtrlX/Std/Hmi_V5_8/ directory. C:/<yourPath>/V2.8/RexrothCtrlX/Std/Hmi_V5_8/ should contain 92 elements and not 69 as it originally does. These added files are called by OpCon.HMI.Modulo.exe and must be placed in the same directory.
After all these steps, to start the system automatically, the *.ahk just calls these shortcuts in the right order, with the necessary delay times, and placing the windows in the right monitor for the required user experience.

You must be a registered user to add a comment. If you've already registered, sign in. Otherwise, register and sign in.