- Subscribe to RSS Feed
- Mark as New
- Mark as Read
- Bookmark
- Subscribe
- Printer Friendly Page
- Report Inappropriate Content
- Introduction
- Prerequisites
- Configuration
- Step 1: Add HTTP pallet in the LabVIEW environment
- Step 2: Open a new VI in LabView
- Create a flow to request a token
- Create flow to read single data layer node
- Create flow to write single data layer node
- Create a flow to read bulk or multiple data layer nodes
- Create a flow to write bulk or multiple data layer nodes
Introduction
LabVIEW is a graphical programming language, widely used in scientific and engineering communities. It is often used to develop control systems, data acquisition and analysis applications, and other complex software systems. One common task that LabVIEW developers may need is making HTTP requests or REST calls to web services or APIs.
This is a basic overview of how to make HTTP requests or REST calls in LabVIEW using the built-in HTTP client library. Of course, there are many more advanced features and options available, depending on your specific application and requirements. But this should give you a good starting point for building your own HTTP client applications in LabVIEW.
Prerequisites
- LabVIEW software
- ctrlX CORE web interface
If you are used to the LabVIEW environment skip the description which starts with '-->'.
Configuration
To create such an interface in LabVIEW go through the step-by-step description.
Step 1: Add HTTP pallet in the LabVIEW environment
To make an HTTP request or REST call in LabVIEW, you can either use the built-in HTTP client libraries that are included with the LabVIEW software or you can download the 'Blue Easy HTTP Client pallet' from the VI package manager. These libraries allow you to easily send and receive HTTP requests, parse the response data, and handle any errors or exceptions that may occur.
To download the 'Blue Easy HTTP Client Pallet', first start for the VI package manager and a window that can be seen in the picture below will open.

Step 2: Open a new VI in LabView
To open a new VI in LabVIEW go to File --> New VI and a new window will open. To get the Front panel and Block Diagram window side-by-side click on windows --> Tile left and right. Now interface should look like the picture below.

To Bulit HTTP Request VI, insert HTTP objects from Blue Easy HTTP client as can be found in the picture above.
In this pallet, there are different VIs for HTTP requests, generate HTTP request headers and OPEN and CLOSE Client.
Create a flow to request a token
To get a token for authorization add VIs as described below from the blue easy HTTP client pallet
- Open Handle
- Add Headers
- Post
Connect and configure these VIs from nodes client, handle and error IO as shown in the picture below.

To configure input and output of these VIs, click on respective VI and go to the node you want to configure, right click and there you will find three options for it.
- Create Constant
- Create Control
- Create Indicator

--> For 'open handle': Go to verify server node and right-click. Now choose 'create constant' and set it to a false value by clicking on the generated button. We have to set it to false because by default while making the rest call to the core server it will find it inauthentic and to clear this error, we have set verify server to a false value.
--> For 'add headers': Go to the HTTP header node. You can find the node on the left side of 'add headers VI'. Additionally the “Content-Type” and “application/json” has to be added to the request header to tell the server how data should be interpreted.
--> For 'POST': We need to configure three points 'url, data, error out and body'. Url is from where we want to post the data. To configure url go to the left side of POST VI and choose create constant for that node. Now add 'https://192.168.1.1/identity-manager/api/v1/auth/token' to this url dialogue box. Also on the left side, you can find data. Create a constant for this node. The data has to be a permitted user and a password written as a JSON (JavaScript Object Notation) object. The standard ones are “boschrexroth” ({"name":"boschrexroth","password":"boschrexroth"}). On right side of this VI, you can find error-out and body node. For these nodes create indicator.
Now click on the run button or press ctrl+r to run the code and the front panel will look like this. we can move and resize these boxes as we like to get better readability of data.

Now copy this bearer token for later use.
Create flow to read single data layer node
To make HTTP read requests add VIs as described below from the blue easy HTTP client pallet
- Open Handle
- Add Headers (3 times)
- GET
Connect these VIs from the node's client handle and error IO as shown in the picture below.

--> Configure add header: Go to the HTTP headers node and create a constant, now add "Content-Type" and "application/json" to the boxes generated.
--> Configure second add header VI: Go to HTTP headers node create constantly. Now in the generated box, you can define the "authorization" header and set the value to "Bearer+space+generated_token_from_above".
--> Configure GET: For GET VI we are going to generate control for 'url and body'.
After configuration, your block diagram should look like the image below in the block diagram window. If you want to continuously read value then please add a while loop as shown image.

In the front panel, there should be a dialogue box for URLs in this box use can type in the API address of the variable node that they want to read. In my case, I have defined the PLC variable in PLC Engineering App which I want to read. For that purpose, I use the link: https://192.168.1.1/automation/api/v1/plc/app/Application/sym/PLC_PRG/iI'.
Now run this code with ctrl+r and your front panel window should look like this.

After pressing the stop button you can stop the while loop.
Create flow to write single data layer node
To make HTTP write requests configuration of VIs and connection between VI is the same as the read method but the only change, in this case, is that we will use PUT instead of GET.
--> Configure PUT: For PUT VI we are going to generate control for 'url, data and body'. Here data section is used as a payload for making the rest call.
After configuration, your Block Diagram window should look like this.

Now go to front panel and define url and data to write. In my case:
url:https://192.168.1.1/automation/api/v1/plc/app/Application/sym/PLC_PRG/iI
data:{"type":"int16","value":-50}
and after running program with ctrl+r, your front panel should look like below.

You can also check your data layer node in the ctrlX CORE web interface to verify that it has made a change.
Create a flow to read bulk or multiple data layer nodes
To create such program we need to insert '1 OpenHandle, 3 Add Headers, 1 PUT'. Basically the same as the write method but we are going to include one more header in this case.
These three headers are respectively configured for
- 'Content-Type':'application/json'
- Create control and go to the front panel and type define the "Authorization" header and set the value to "Bearer+space+generated_token_from_above"
- 'Accept': 'application/json'
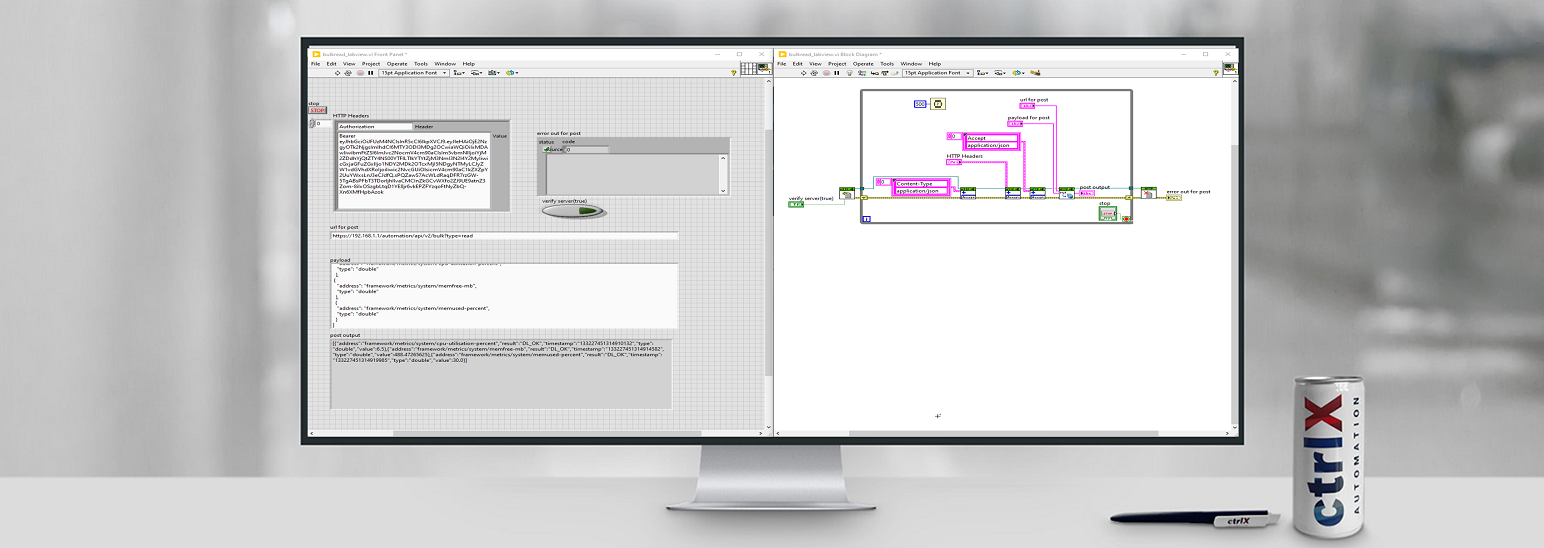
Now your block diagram window should look like this:

Now go to the front panel and in url box type exact link below for bulk reading:
https://192.168.1.1/automation/api/v2/bulk?type=read
In data box please type in json format below:
[
{
"address": "plc/app/Application/sym/PLC_PRG/iI",
"type": "int16"
},
{
"address": "plc/app/Application/sym/PLC_PRG/iB",
"type": "bool8"
},
{
"address": "plc/app/Application/sym/PLC_PRG/iR",
"type": "float"
},
{
"address": "plc/app/Application/sym/PLC_PRG/iS",
"type": "string"
}
]
You can get these addresses and types from the data layer section of the ctrlX core web interface as described in the picture below. So instead of values that I defined, you can type in the address and type that you want to read.

Now press ctrl+r to run the LabVIEW program and your front panel should look like something in the below image.

Click the stop button to terminate the while loop.
Create a flow to write bulk or multiple data layer nodes
For this purpose, we going to use the same program that we have created for a bulk reading method. Only things which changes in this case are 'url and data'.
In url section of front panel copy link below:
https://192.168.1.1/automation/api/v2/bulk?type=write
In data section write json below:
[
{
"address": "plc/app/Application/sym/PLC_PRG/iI",
"type": "int16",
"value":100
},
{
"address": "plc/app/Application/sym/PLC_PRG/iB",
"type": "bool8",
"value":false
},
{
"address": "plc/app/Application/sym/PLC_PRG/iR",
"type": "float",
"value":5.55555
},
{
"address": "plc/app/Application/sym/PLC_PRG/iS",
"type": "string",
"value":"HELLO WORLD SECOND TIME"
}
]
As I mentioned above in bulk reading method you can change address and type as per your requirement. Now press run button and changes should have made to following addresses. To verify go to data layer web interface check for your nodes.

Thank you for taking the time to read this article. I hope you found it informative and enjoyable. If you have any questions or comments, please feel free to leave them in the comments section below. I would love to hear from you and continue the conversation. Your feedback is always appreciated!