
- Subscribe to RSS Feed
- Mark as New
- Mark as Read
- Bookmark
- Subscribe
- Printer Friendly Page
- Report Inappropriate Content
Introduction
This article will explore the possibility to develop a kiosk type native HMI application displaying on any screen/monitor without using web interface but directly from the Display Port on the ctrlX Core X5/X7. We will start from the code all the way to the packaging the app in a snap which can be easily installed and managed from our ctrlX OS app management.
NOTE: This is only a demo example, use it at your own discretion. There is currently no official Bosch Rexroth support available for the Qt software package integration.
Requirements
- ctrlX Core X5/X7 with System Image v1.20.9
- Local Operating System: Ubuntu 20.4
- Qt v6.2.x
- Qt Libraries for local testing
- Install it from here: https://www.qt.io/download
- Qt Creator
- IDE to create Qt based projects
- Install it from here: https://www.qt.io/download
- Snapcraft
- Tool to build snaps
- You can install it by running the following in your terminal
sudo snap install snapcraft --classic
- Multipass
- Light weight VM Manager to build snaps
- You can install it by running the following in your terminal
sudo snap install multipass
Step 1: Create a project in Qt Creator
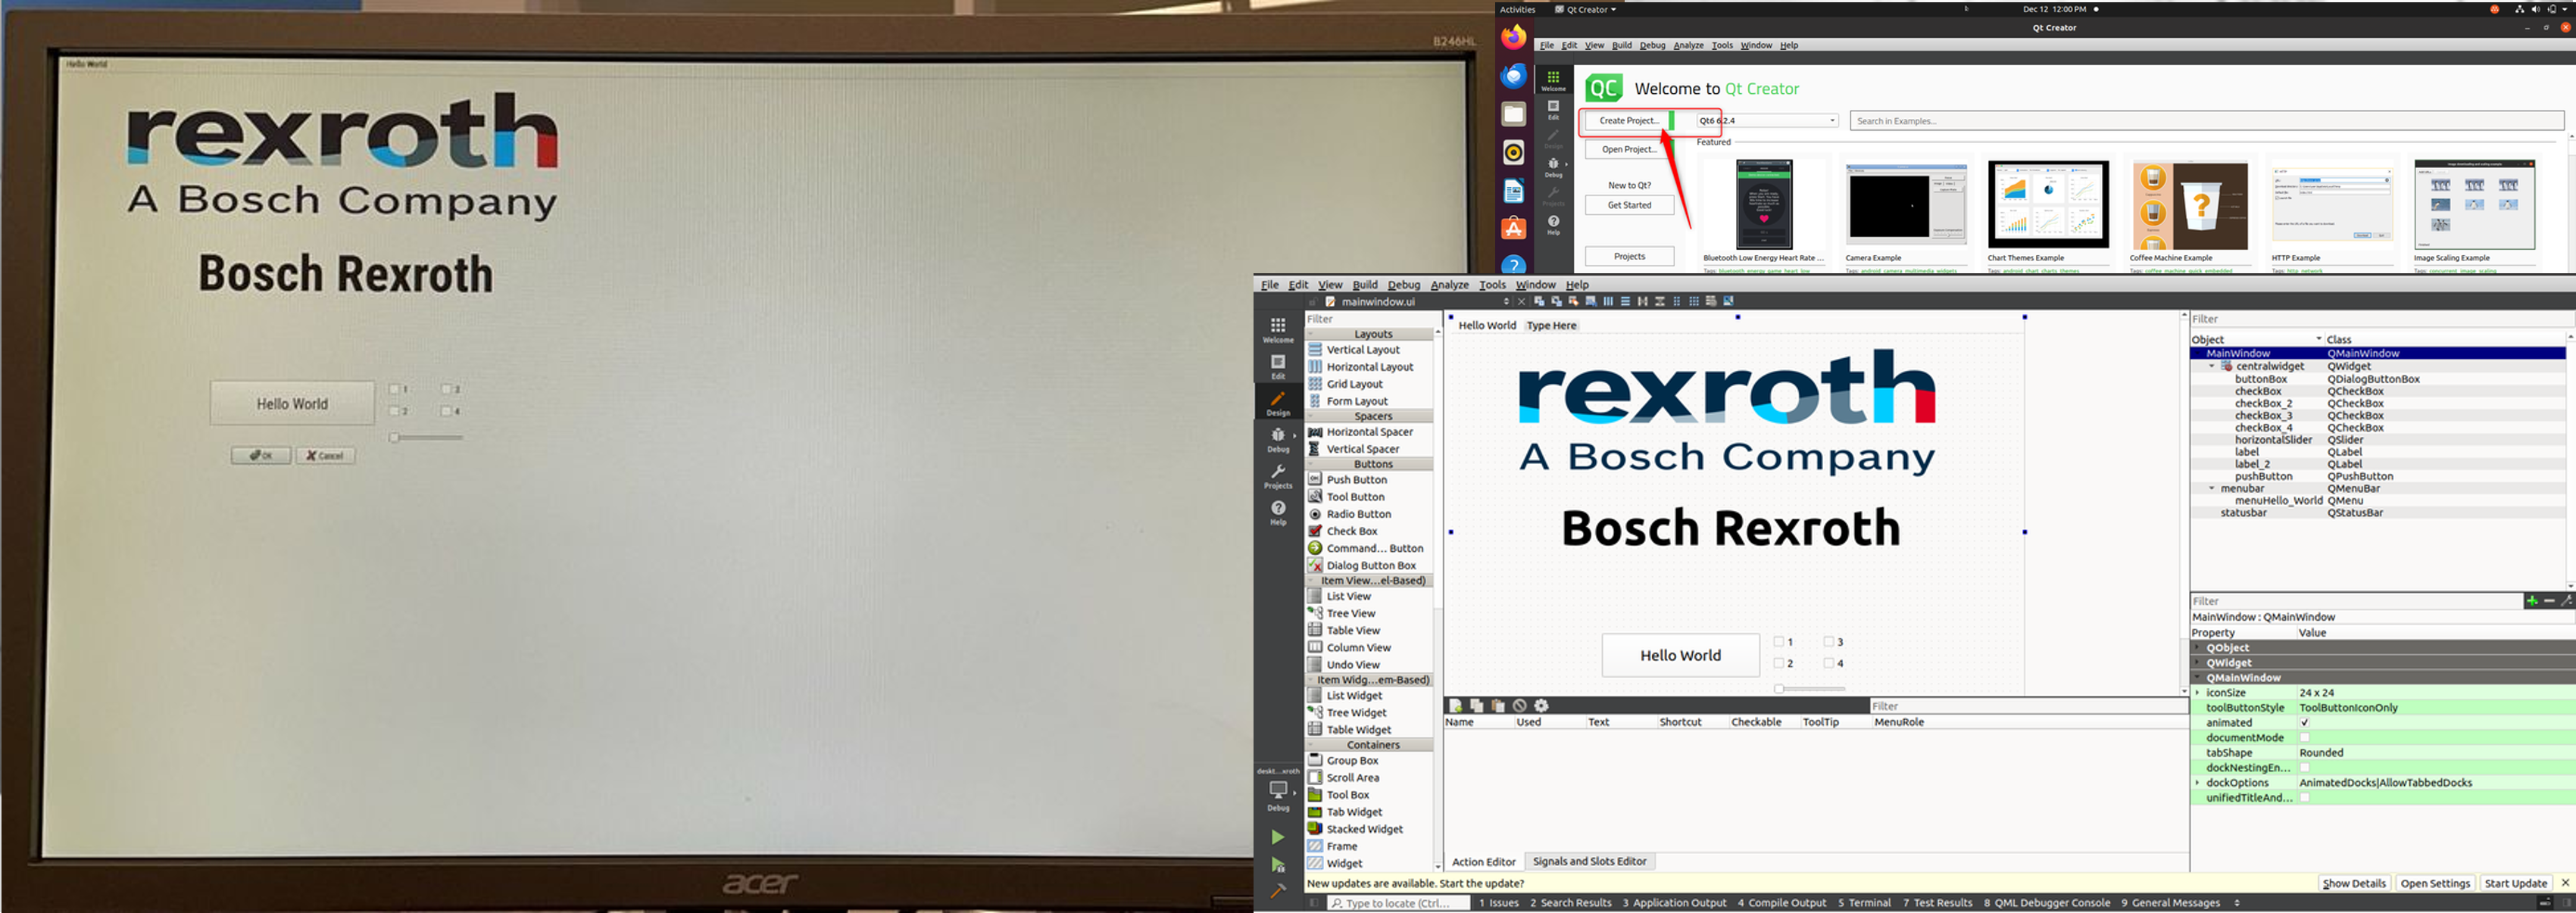
Before diving in, please make sure you have properly installed Qt and Qt Creator after which you would see something as follows:

")
Let's begin. Open Qt Creator and click "New Project".

While creating new project, select a Qt Widgets Application template to start with as shown in the image below. You can also create a Qt Quick Application but we will go with widgets based application for now.

Choose a name and default project path for your project and click Next.

Select the build system as "CMake" which is generally used for cross-platform applications. CMake creates a config file in your project folder which would be used to compile the project using snapcraft off your system.

Further, as shown below, you could rename the base classes and source code files of the template if you want but we will keep as it is for the sake of simplicity.

Then, we will skip the translation part for by clicking next. Afterwards you would see the step to select the kit (Qt versions) for your project. We would go with the Qt v6.2.4 for this example as shown below in the images (Make you have installed the Qt package before this step and updated the aptitude/apt ). Last step would be to add version control in your project like (Git, SVN, etc.) which we would not at this point so just click finish.


Step 2: Modify the project in Qt Creator
After the initial project selections, you should see the IDE-like space to edit and modify your project. On the left vertical pane, you should see the base header files (*.h) , C++ source files (*.cpp) and a "mainwindow.ui" file. Now lets begin with editing the "mainwindow.ui" file.

As shown below, you can edit and design the main window just as any HMI using push buttons, checkboxes, images, sliders, etc.(Note: If you are inserting images then you would have to create a Qt Resource File (*.qrc) in your project root folder and include those images in order to pick those up by Qt).


This is how you can create a Qt Resouce file (here application.qrc) and include all your images to display them while execution:


Step 3: Run and test your project in the local env

Before running the project, make sure your CMake path is properly set in the project settings along with the QMake, Qt and other variables as follows:

Now, if all set and good to go then you can run the project to see the output on your local screen. You would see the output as in the following image. If you see no errors while compilation then you have done the great job so far.

Step 4: Configure Snapcraft YAML
On building or running the project, Qt Creator creates a sibling directory starting with "build_<project_name>...." and ending with "...-Debug" or "...-Release" depending on your project settings which contains the executable file of your project.
Now, copy your original project root directory and paste into one of these sibling directory (before pasting you might how to rename the executable file to prevent name conflicts).
Create a new directory "snap" at: build_your_project_name....-Debug > snap, then create a new "snapcraft.yaml" YAML file in the newly created "snap" folder.


Open the "snapcraft.yaml" file in any text editor and copy paste the following contents. You can also download the "snapcraft.yaml" file from the attachments at the end of the page.
name: desktop-rexroth-qt6  # you probably want to 'snapcraft register <name>'
version: "0.1" # just for humans, typically '1.2+git' or '1.3.2'
summary: Testing GUI on X7 using DisplayPort # 79 char long summary
description: |
  This test would be exciting
confinement: strict
compression: lzo
grade: stable
base: core20


package-repositories:
  - type: apt
    ppa: daschuer/qt6-backports


apps:
  desktop-rexroth-qt6:
    command-chain: &_command-chain
      - bin/wayland-launch
    command: &_command usr/local/bin/desktop_rexroth

    plugs: &_plugs
      - opengl
      - wayland

    environment:
      QT_QPA_PLATFORM: wayland
      QT_PLUGIN_PATH: ${SNAP}/usr/lib/${SNAPCRAFT_ARCH_TRIPLET}/qt6/plugins/
      QT_QPA_PLATFORM_PLUGIN_PATH: ${SNAP}/usr/lib/${SNAPCRAFT_ARCH_TRIPLET}/qt6/plugins/platforms/
      QML2_IMPORT_PATH: ${SNAP}/usr/lib/${SNAPCRAFT_ARCH_TRIPLET}/qt6/qml
      QML_IMPORT_PATH: ${SNAP}/usr/lib/${SNAPCRAFT_ARCH_TRIPLET}/qt6/qml
      FONTCONFIG_PATH: ${SNAP}/etc/fonts/
      FONTCONFIG_FILE: ${SNAP}/etc/fonts/fonts.conf

  daemon:
    daemon: simple
    restart-delay: 3s
    restart-condition: always
    command-chain: *_command-chain
    command: *_command
    plugs: *_plugs

plugs:
  graphics-core20:
    interface: content
    target: $SNAP/graphics
    default-provider: mesa-core20

environment:
  # This is one of four snippets that relate to providing the userspace graphics needed by your application.
  LD_LIBRARY_PATH:    $SNAP/graphics/lib
  LIBGL_DRIVERS_PATH: $SNAP/graphics/dri
  LIBVA_DRIVERS_PATH: $SNAP/graphics/dri
  __EGL_VENDOR_LIBRARY_DIRS: $SNAP/graphics/glvnd/egl_vendor.d
  # Other, generally useful environment settings...
  # XDG config
  XDG_CACHE_HOME:  $SNAP_USER_COMMON/.cache
  XDG_CONFIG_HOME: $SNAP_USER_DATA/.config
  XDG_CONFIG_DIRS: $SNAP/etc/xdg
  # XKB config
  XKB_CONFIG_ROOT: $SNAP/usr/share/X11/xkb


layout:
  # This is one of four snippets that relate to providing the userspace graphics needed by your application.
  # These paths (/usr/share/libdrm and /usr/share/drirc.d) are hardcoded in mesa.
  /usr/share/libdrm:  # Needed by mesa-core20 on AMD GPUs
    bind: $SNAP/graphics/libdrm
  /usr/share/drirc.d:  # Used by mesa-core20 for app specific workarounds
    bind: $SNAP/graphics/drirc.d
  # Other, generally useful paths
  /usr/share/fonts:
    bind: $SNAP/usr/share/fonts
  /usr/share/icons:
    bind: $SNAP/usr/share/icons
  /usr/share/sounds:
    bind: $SNAP/usr/share/sounds
  /etc/fonts:
    bind: $SNAP/etc/fonts


parts:
  qtwayland:
    source: https://download.qt.io/official_releases/qt/6.2/6.2.3/submodules/qtwayland-everywhere-src-6.2.3.tar.xz
    plugin: cmake
    build-packages:
      - libvulkan-dev
      - libwayland-dev
      - libxkbcommon-dev
      - qt6-base-dev
      - qt6-base-private-dev
      - qt6-declarative-private-dev
    stage-packages:
      - libwayland-cursor0
      - libwayland-egl1

  app:
    plugin: cmake
    source: /root/project/desktop_rexroth
    source-type: local
    build-packages:
      - git
      - libglu1-mesa-dev
      - libqt6opengl6-dev
      - qt6-declarative-dev
    stage-packages:
      #- qt6-base-dev         # added for QtWidgets
      - libqt6svg6-dev       # added for QtWidgets
      #- qt6-base-private-dev # added for QtWidgets
      - qml6-module-qt-labs-settings
      - qml6-module-qtqml-workerscript
      - qml6-module-qtquick
      - qml6-module-qtquick-controls
      - qml6-module-qtquick-layouts
      - qml6-module-qtquick-templates
      - qml6-module-qtquick-window

  wayland-launch:
    plugin: dump
    source: wayland-launch
    override-build: |
      # The plugs needed to run Wayland. (wayland-launch checks them, setup.sh connects them)
      # You may add further plugs here if you want these options
      PLUGS="opengl wayland graphics-core20"
      sed --in-place "s/%PLUGS%/$PLUGS/g" $SNAPCRAFT_PART_BUILD/bin/wayland-launch
      sed --in-place "s/%PLUGS%/$PLUGS/g" $SNAPCRAFT_PART_BUILD/bin/setup.sh
      snapcraftctl build
    stage-packages:
      - inotify-tools

  resources:
    plugin: dump
    source: resources
    organize:
      'fonts/*' : 'usr/share/fonts/'

  # This is one of four snippets that relate to providing the userspace graphics needed by your application.
  # This ensures that your snap doesn't contain its own copy of the userspace drivers
  cleanup:
    after:
      - app
      - wayland-launch
    plugin: nil
    build-snaps: [ mesa-core20 ]
    override-prime: |
      set -eux
      cd /snap/mesa-core20/current/egl/lib
      find . -type f,l -exec rm -f $SNAPCRAFT_PRIME/usr/lib/${SNAPCRAFT_ARCH_TRIPLET}/{} \;
      rm -fr "$SNAPCRAFT_PRIME/usr/lib/${SNAPCRAFT_ARCH_TRIPLET}/dri"
      for CRUFT in bug drirc.d glvnd libdrm lintian man; do
        rm -rf "$SNAPCRAFT_PRIME/usr/share/$CRUFT"
      done
      for CRUFT in apport doc doc-base fonts pkgconfig xml ; do
        rm -rf "$SNAPCRAFT_PRIME/usr/share/$CRUFT"
      done

architectures:
  - build-on: amd64
Step 5 : Build a snap (using multipass)
- Before jumping on to build the snaps, we need some scripts to run after installing our application to configure wayland plugs and slots properly to run the snap on our Core X7. You can direcly download zip file from the attachments here at the end of the page or follow these steps :
- Download the zip file
- Extract the zip file and copy "wayland-launch" directory
- Copy "wayland-launch" directory to "build-your-project-name....-Debug"
Copied folder "wayland-launch" in project folder
- Now lets build the snap
- Open terminal > go to your "build-....-Debug" directory and fire command "sudo snapcraft"
Build snap using terminal
- As shown above in the image, make sure you have following sub directories before building the snap:
- snap
- wayland-launch
- <your original project root directory>
- Open terminal > go to your "build-....-Debug" directory and fire command "sudo snapcraft"
- After successful snapping of your application, you would see the terminal output as in the image below and a snap package "<your-project-name>_0.1_amd64.snap" being "<your-project-name>" replaced with whatever name you chose in your snapcraft YAML file. Here in our case you would see a file with name "desktop-rexroth-qt_0.1_amd64.snap"
Step 6 : Install the dependencies (Ubuntu Frame , mesa )
- Okay, now its time to install the dependencies which would be critical to provide a base for our custom "desktop-rexroth" application
- mesa-core20
-
A content snap providing the mesa userspace libraries and drivers for core20. This supplies the graphics-core20 content interface required by Ubuntu frame to display our application on the screen. More details at: Click here
- It is recommended to download the snap directly from the snap store
snap download mesa-core20Download "mesa-core20" snap from snapstore
- You can also directly download it from the attachments at the end of the page.
- Install the snap in your Core X7
Install "mesa-core20" in ctrlX OS
-
- Ubuntu Frame
-
It is the base or the foundation for many embedded graphical display implementations. It is a simple fullscreen shell (based on Wayland) used for kiosks, industrial displays, digital signage, smart mirrors, etc. Using Ubuntu Frame, our example application we developed here gets a fullscreen window (or windows) and input from touch, keyboard and mouse without needing to deal with the specific hardware. More details can found be - here
- Download directly from the snap store
snap download ubuntu-frame --channel=20/stableDownload "ubuntu-frame" snap from snapstore
- Or you can also find it from the attachments
- Install the snap in your Core X7
Install "ubuntu-frame" in ctrlX OS
-
Step 7 : Install our snapped application
- Finally, its time to test our application on our ctrlX Core X7
- Connect the display port on the Core X7 to the monitor or any screen. If you see the black background in your screen lit up that means Ubuntu Frame is working.
- Install the app the same way we did as for other dependencies
Select our custom built snap to install
Install our custom built snap
After installing, "desktop-rexroth-qt_0.1_amd64.snap" snap package you would see a koisk-type GUI (Graphical User Interface) / HMI on the screen displaying directly through the Display Port present on the Core X7. It is even more interesting that you do not have to install any additional drivers for keyboard or mouse inputs. You can connect keyboard or mouse directly through the XF01C USB port.
Result
Here is the final output on the screen connected via Display Port without using any web interface

Related Links

You must be a registered user to add a comment. If you've already registered, sign in. Otherwise, register and sign in.