
- Subscribe to RSS Feed
- Mark as New
- Mark as Read
- Bookmark
- Subscribe
- Printer Friendly Page
- Report Inappropriate Content
Introduction
In this article, we will use the built-in functionality of Labview 2023 to run our user-defined DLL inside labview and we will also go through a simple example of creating required DLLs with the help of Visual Studio 2022.
Before you go through this article, I would recommend to first have a look at the article
"How to read Data Layer Nodes through Visual Studio".
In this article you will find a description of how to solve dependency issues in Visual Studio.
Prerequisites
- LabVIEW software
- ctrlX CORE
- Visual Studio with the latest release
- ctrlX Automation SDK from GitHub
Configuration
Use Case --> First, we are going to build DLL around our required functions and then we will build another wrapper DLL around the first DLL and we will import this wrapper DLL inside LabView and use DLL functions. Below is a step-by-step description of how to implement this flow.
Step 1: Create a Dynamic-Link Library project in Visual Studio
Open a Visual Studio and click on create a new project as shown in the picture below.

Now you can see the templates library for creating a new project. In the search bar type in "DLL" and choose the ICON shown in the picture below.

After clicking on the Next button, you will encounter configure window. There you can give your project a relevant name and click on Create. Now your project window should look like in the picture below.

Step 2: Write and build DLL project
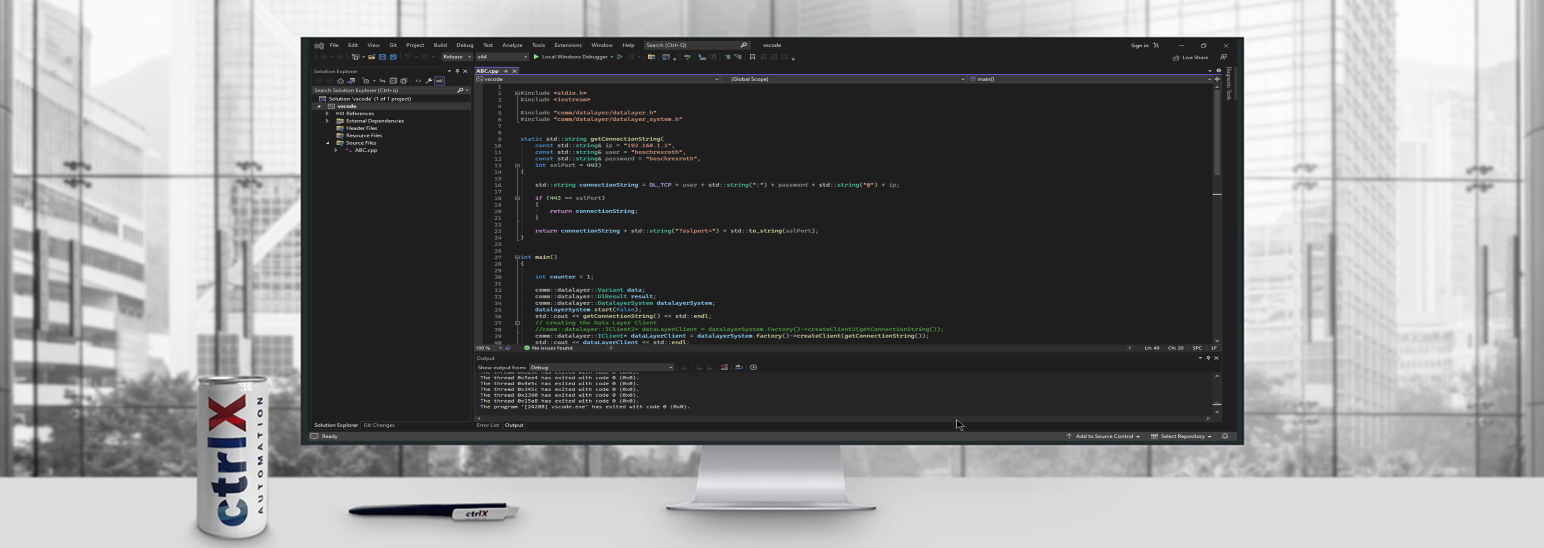
In the C++ code below, I have created a SharedLib class and its functions. For the shared lib class there are different functions for getting a connection string, connecting a client, reading a value at the datalayer node and deleting a client. And there are two additional functions to define the constructor and destructor of the C++ class. Within those functions, I am using already defined datalayer functions from datalayer.dll.
Code for cpp file:
#include "pch.h"
#include <iostream>
#include <cstring>
#include <string>
#include <sstream>
#include "comm/datalayer/datalayer.h"
#include "comm/datalayer/datalayer_system.h"
#include "shared_lib.h"

extern "C" {
__declspec(dllexport) SharedLib::SharedLib(const const char* ip, const const char* user, const char* password, int sslPort)
{
_ip = ip;
_user = user;
_password = password;
_sslPort = sslPort;

}

__declspec(dllexport) SharedLib::~SharedLib()
{
Deleteclient();
}

const char* SharedLib::getConnectionString(const char* ip, const char* user, const char* password, int sslPort)
{
std::string connectionString = DL_TCP + std::string(user) + ":" + std::string(password) + "@" + std::string(ip);
if (sslPort == 443)
{
return _strdup(connectionString.c_str());
}

std::string connection = connectionString + "?sslport=" + std::to_string(sslPort);
return _strdup(connection.c_str());
}


comm::datalayer::IClient* SharedLib::Connectclient(const char* constr)
{
if (_client == nullptr) {
_datalayerSystem.start(false);
std::string connectionString = "tcp://" + std::string(_user) + ":" + std::string(_password) + "@" + std::string(_ip);
//std::string connectionString = "tcp://boschrexroth:boschrexroth@192.168.1.1";
_client = _datalayerSystem.factory()->createClient(std::string(constr));
}
if (_client->isConnected())
{
std::cout << "client has been generated" << std::endl;
return _client;
}

delete _client;

return nullptr;
}

const char* SharedLib::Readclient(const char* str)
{
_output.str("");
if (_client == nullptr) {
return nullptr;
}
//std::stringstream output;
//comm::datalayer::Variant data;
//comm::datalayer::DlResult result;
_result = _client->readSync(std::string(str), &_data);
if (_result == comm::datalayer::DlResult::DL_OK) {
_output << "value at given node address is: " << double(_data) << std::endl;
}
else {
_output << "Reading Datalayernode failed with: " << _result.toString() << std::endl;
}
return _strdup(_output.str().c_str());
}

void SharedLib::Deleteclient()
{
if (_client != nullptr) {
delete _client;
_client = nullptr;
}
}
}
Code for Header file: In this file, there is an export function which will export the class as a whole with its variable and function to dll.
#pragma once
#include"pch.h"
#include <iostream>
#include <cstring>
#include <string>
#include <sstream>
#include "comm/datalayer/datalayer.h"
#include "comm/datalayer/datalayer_system.h"


#ifdef __cplusplus
extern "C" {
#endif

#ifdef BUILD_FOR_X64
#ifdef _WIN64
#define SHARED_LIB __declspec(dllexport)
#endif
#else
#ifdef _WIN64
#define SHARED_LIB __declspec(dllimport)
#endif
#endif

class SHARED_LIB SharedLib
{
public:
const char* _ip;
const char* _user;
const char* _password;
int _sslPort;
std::stringstream _output;
comm::datalayer::IClient* _client;
comm::datalayer::DlResult _result;
comm::datalayer::Variant _data;
comm::datalayer::DatalayerSystem _datalayerSystem;
SharedLib(const const char* ip, const const char* user, const char* password, int sslPort);

const char* getConnectionString(const char* ip, const char* user, const char* password, int sslPort);

comm::datalayer::IClient* Connectclient(const char* constr);

const char* Readclient(const char* str);

void Deleteclient();
~SharedLib();
};

}
#ifdef __cplusplus
#endif
You will also notice that there is some defined global variable. We need them to carry client and other login detail from one function to another.
Now you can define the dependencies exactly as shown in the linked article in Introduction.
Save this project and build DLL in Release mode by clicking on "Menubar-->build -->build Shared_Lib" or pressing ctrl+B.

You can realise 4 new files in the dll project directory of your File Explorer as shown below.

Remember the location of these files because we will copy them as dependencies for wrapper DLL.
Step 3: Create and build Wrapper DLL project
This DLL is not directly readable by LabVIEW because Call Library Function can not interpret the function of the DLL if these functions are in class and we needed to build a class in order to carry global variables. So to solve this problem there is a terminology called Wrapper Dll. Basically, it is just the same DLL as we created in Step 2 but this wrapper DLL will import that DLL and call functions from it. That way we can create a DLL, which does not include class.
--> To create a wrapper DLL first, we need to make a DLL project the same way we did in Step 1.
In the cpp file of this project define imported functions from DLL, which we have built earlier in Step 2. And use those functions inside the newly defined function of this wrapper DLL as can be seen in the C++ code below:
#include "pch.h"
#include <iostream>
#include <cstring>
#include <string>
#include <sstream>
#include "comm/datalayer/datalayer.h"
#include "comm/datalayer/datalayer_system.h"
#include "shared_lib.h"

SharedLib Toast("192.168.1.1", "boschrexroth", "boschrexroth", 443);

extern "C" {
__declspec(dllexport) const char* Connectstring(const char* ip, const char* user, const char* password,int myPort) {
const char* a = Toast.getConnectionString(ip,user,password,443);
return a;
}
__declspec(dllexport) const char* read(const char* str, const char* corepipe) {
//comm::datalayer::IClient* client = Toast.Connectclient();
Toast.Connectclient(corepipe);
const char* b = "";
b = Toast.Readclient(str);
return b;
}
__declspec(dllexport) void Looseclient() {
Toast.Deleteclient();
}

}
In this code, I have defined an object name Toast to run functions defined in the SharedLib class.
And in order to share function across DLL define *.h header file too.
#pragma once
#include "pch.h"
#include <iostream>
#include <cstring>
#include <string>
#include <sstream>
#include "comm/datalayer/datalayer.h"
#include "comm/datalayer/datalayer_system.h"
#include "shared_lib.h"
#ifdef __cplusplus
extern "C" {
#endif

#ifdef BUILD_FOR_X64
#ifdef _WIN64
#define WRAP_FUN __declspec(dllexport)
#endif
#else
#ifdef _WIN64
#define WRAP_FUN __declspec(dllimport)
#endif
#endif

SharedLib Toast("192.168.1.1", "boschrexroth", "boschrexroth", 443);
__declspec(dllexport) const char* Connectstring(const char* ip, const char* user, const char* password, int myPort);
__declspec(dllexport) const char* read(const char* str, const char* corepipe);
__declspec(dllexport) void Looseclient();


}
#ifdef __cplusplus
#endif
As you realize that this project could not detect shared_lib.h file but it will be gone when you configure dependencies as described below.
At the time of the configuration dependencies for this project we need to add one more dependency for DLL that we have created in Step 2. Via linking the .lib file of that project and copying 4 files that we generated in the release folder earlier.
Now build this project in release mode and you will see the .dll file created in the directory of file explorer. In my case, I have named the project "wrapfun".

Step 4: Call library function in LabVIEW
If you do not want to use call library function then one can also directly import dll function inside LabVIEW via "tools-->import-->shared library (.dll). It will generate vis for each function, which you also make accessible in pallet. But for call Library function vi, first open LabVIEW and create a new VI.

In this VI go to the block diagram window and right-click on the whiteboard and the Function dialogue box will pop up. Go to Connectivity --> Libraries & Executables --> Call Library Function Node.

Double click on this node and the configuration dialogue box for the call library function will open. There you can define the path for wrapper DLL and import the function from the drop-down as shown in the picture below.

Before hitting the ok button go to the parameters tab and there you have to create and define the input-output variables of the function that you have chosen as can be seen in the picture below.

Now click on ok and your function is ready to use inside LabVIEW. You can import each useful function using the "Call library function node"
Step 5: Read the data layer node
To read the datalayer node from ctrlX CORE, you have to create a flow of call library functions first as can be seen in the picture below.

Or with the help of imported dll in tools, it will look something like below.

Now click on the "run" button on the top-left of the block diagram window and view on your front panel as shown in picture below.

This how-to example is just for reading a single datalayer node, depending on your use case further development is possible 🙂
If you have any questions, comments or encounter any unusual problems with the project, feel free to leave them in the comments section below. I would love to hear from you and continue the conversation.

You must be a registered user to add a comment. If you've already registered, sign in. Otherwise, register and sign in.