
- Subscribe to RSS Feed
- Mark as New
- Mark as Read
- Bookmark
- Subscribe
- Printer Friendly Page
- Report Inappropriate Content
Introduction
This article describes the installation and the basic settings to run CODESYS Softmotion on ctrlX CORE with one IndraDrive axis. With the similar method ctrlX CORE with softmotion can be connected to ctrlX DRIVE. The article describes the proceeding with crlX CORE 1.20 or higher version.
Additional information is avaialble in the following documents:
- CODESYS SoftMotion Online Help
- ctrlX CORE PLC Documentation
- Documentation of the Rexroth drives and motors which you want to control.
Also, some help videos are available:
- Quick Start Guide ctrlX AUTOMATION + CODESYS SoftMotion
- crlX CORE – CODESYS SoftMotion - camming
- ctrlX CORE – CODESYS SoftMotion – SCARA robot kinematics
-
ctrlX CORE – CODESYS SoftMotion – user-defined robot kinematics
In case of questions or if you experience any problem you can submit your issue in the Area for CODESYS PLC Add-Ons in the Developer Community.
Installation
The following ctrlX CORE apps are required by CODESYS SoftMotion:
- ctrlX PLC
- EtherCAT Master
For engineering purpose, a PC with ctrlX WORKS installation is required. All ctrlX software components need to have version V1.20 or higher.
CODESYS SoftMotion and the adaption layer to run CODESYS SoftMotion on ctrlX CORE are provided as CODESYS packages in the Collaboration Room.
The installation of CODESYS packages requires administrator rights on your Windows PC.
CODESYS SoftMotion Installation
Copy the file CODESYS SoftMotion X.X.X.X.package (this article will use versin 4.15.0.0 as example) to your preferred file location, start ctrlX PLC Engineering and open Add-on installer through Tools -> Add-on installer.

When the Add-on installer is opened. Press the Install File button.

Find you required Softmotion Package and select to install.

Accept the license agreement and press continue button, then wait until the installation finish. This might take several minutes.

You can find the CODESYS SoftMotion add-on exist in your Add-on Installer if you install the package successfully.

Installation of ctrlX SoftMotion Adaption Package
Copy file ctrlX PLC CDS_SM Adaption X.X.X.X.package (Till now the latest version of SoftMotion adaption package version is 1.20.4.0, please use this package or the newer version in the future)to your preferred file location. Open the Add-on Installer again as mentioned above.
Select the required adaption package and install.

Wait until the installation finish and then you can see the add-on is already in your add-ons list.

Configuration of Drive
The example is made with one IndraDrives. Ensure
- that your drives are configured for EtherCAT SoE/CoE communication
- that the EtherCAT line is connected correctly
- the power supply of the drives is on.
In this example the drive is rotary axis.
The modulo handling is completely handled by CODESYS SoftMotion. Therefor the drives have to be configured without modulo handling and with the full 32 bit range for the increments. The parameter S-0-0278 must be set to its maximum value, namely 214748.3647. The value is the result of (2^31 - 1) / 10000.
You can do this by ctrlX DRIVE Engineering. Click in the drive overview dialog on the box Axis mechanics / scaling and set the values like in the graphic below.

I/O Configuration
Connect with your web browser to ctrlX CORE, navigate to the EtherCAT Master App and add an EtherCAT Master.

Start ctrlX I/O Engineering and define the name of your application and the destination folder on your engineering PC.

Ensure that your drives are configured for EtherCAT SoE/CoE communication, the EtherCAT line is connected correctly, the power supply of the drives is on. Then click with the right mouse button on the Ethercatmaster node to open the menu where you can select Scan for Devices.

In the scan result you will see the drives which are connected to your ctrlX CORE. Press the button Insert all newly scanned devices in the scan result dialog to copy the drives to your project I/O configuration on the left side of the dialog.

Closing the scan dialog with OK button will add the drives under the ethercatmaster node in IO Engineering. Download the EtherCAT configuration to your ctrlX CORE via the I/O Engineering tool bar.

You can see a download completed info on the right bottom side of the window.

In ctrlX Web UI you can verify the EtherCAT status and change the operation modes. For further proceeding the operation mode OP has to be active. If the drives are not displayed in the slaves list, refresh the web page.

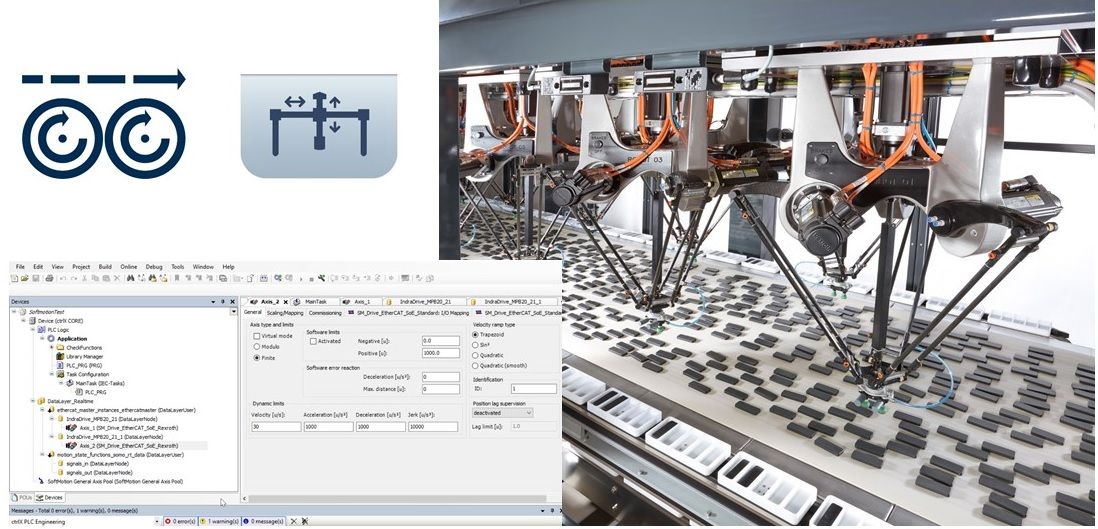
PLC Engineering
Start PLC Engineering from ctrlX CORE Web UI.
In your PLC Project Tree, find DataLayer_Realtime, right click on it select Select realtime data→Selectively from ctrlX CORE.

Select ethercat_master_instances_ethercatmaster in Source: Control, select the required datalayer node, and apply to add them to the PLC Project.

Then you can see the Datalayer Node has been added. Right click on it, secect Adding SoftMotion SoE axis/Adding SoftMotion CoE axis depending on your device type.

Then the softmotion axis will be added, softmotion function will be enabled automatically, required libraries will be added.

Communication Configuration
To make sure the sycronization between PLC and EtherCAT, more configurations should be set.
Go to web UI, find Settings → Schedular.

In Schedular, switch to Configuration page, find the ctrlXAutomation task, press the button.

A callable configure window will pop out, configure a PLC External Event on the configure window.

You don’t need do any settings on step 2 and step 3, press next until finish.

You can see the callable you configured under the task ctrlXAutomation.

Then go back to the PLC Engineering, in the project tree, double click the MainTask. Configure the task type to External and select a task external event (make sure the external event number is the same as you configured on the web→schedular→ctrlXAutomation). If you have multi tasks in you project, make sure your softmotion functions runs under the external event task.

Then double click on the EtherCAT Slave Node, change the Always updatevariables setting to Enable 2 (always in bus cyde task). If you have other EtherCAT Node here, each node should do the settings like this step.

Write your PLC Motion Program
Now you can create your PLC motion program using the PLCopen motion function blocks.

You must be a registered user to add a comment. If you've already registered, sign in. Otherwise, register and sign in.