FORUM CTRLX AUTOMATION
ctrlX World Partner Apps for ctrlX AUTOMATION
Dear Community User! We are updating our platform to a new
system.
Read more: Important
information on the platform change.
- ctrlX AUTOMATION Community
- Forum ctrlX AUTOMATION
- SDK
- How can I map bits of my realtime IO data to pins in Blocky (Visual Coding in IDE app)
How can I map bits of my realtime IO data to pins in Blocky (Visual Coding in IDE app)
- Subscribe to RSS Feed
- Mark Topic as New
- Mark Topic as Read
- Float this Topic for Current User
- Bookmark
- Subscribe
- Mute
- Printer Friendly Page
- Mark as New
- Bookmark
- Subscribe
- Mute
- Subscribe to RSS Feed
- Permalink
- Report Inappropriate Content
03-01-2023 03:48 AM
I am using the Visual Coding in the IDE app to program a motion sequence. I want to read a digital input in my Blocky program. My digital inputs are coming in through EtherCAT, and my EtherCAT IO configuration sents all digital inputs to a single uint32 (I cannot change this, but to me this seems like a very common way digital IO is managed through EtherCAT). So in my realtime data I have access to a digital input register, and each bit is an input.
Now I want to read one single input, bit 16, in the register, and based on this value I will go to the next step in my sequence. I was hoping to use the pins extension, but when I map my input register on the pins, I can only read this as a single input. How can (easily) I manage my digital inputs with Blocky?
(I also have digital outputs through the same mechanism, and also there I want to be able to set individual outputs)
Solved! Go to Solution.
- Mark as New
- Bookmark
- Subscribe
- Mute
- Subscribe to RSS Feed
- Permalink
- Report Inappropriate Content
03-02-2023 07:53 AM
Hi Robert,
you can take a look at the child nodes of the node "data". There you can access each data node from the fieldbus by its own and not in a byte array. In my screenshot you can see how a digital output module with 16 digital outputs would look like in the Data Layer.

The path to these Data Layer nodes you can copy out and use in the Visual Coding of the IDE-App to configure Pins. Click on Settings (top right corner) -> Project Settings -> Pins. In my screenshot you can see one Digital Output Channel and one Digital Input Channel, I configured as pins for my project.

Best regards,
Nick
- Mark as New
- Bookmark
- Subscribe
- Mute
- Subscribe to RSS Feed
- Permalink
- Report Inappropriate Content
03-02-2023 08:30 AM - edited 03-02-2023 08:47 AM
Which version of the ctrlX CORE - IDE app are you using?
In the actual one (1.18) the easiest way for single bits is to use the "In/Out" library:

- Mark as New
- Bookmark
- Subscribe
- Mute
- Subscribe to RSS Feed
- Permalink
- Report Inappropriate Content
03-02-2023 07:54 PM
From the answers I see the need to better explain my situation. I want to use the digital IO on my drives through Blockly.
In IO engineering, when I add my digital IOs to my PDO's, I need to add them as an UDINT / UINT (depending on the size of the parameter to map). E.g. For my IndraDrive, the digital inputs are on P-0-0303 and my digital output(s) are on P-0-0304:
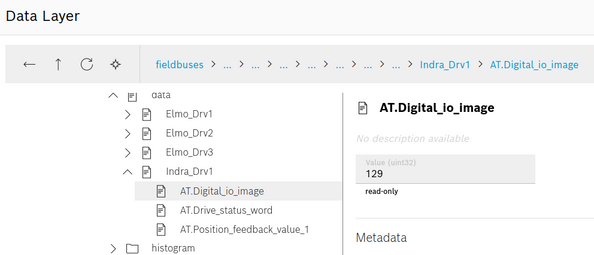
Once I add my IO in this way, in the datalayer I have the following structure:
In the example above my digital inputs 1 and 8 are active, so the digital IO image is 0b1000 0001 (=129 in decimal).
I am using the IDE app version 1.18, and I now want to pin my digital inputs:
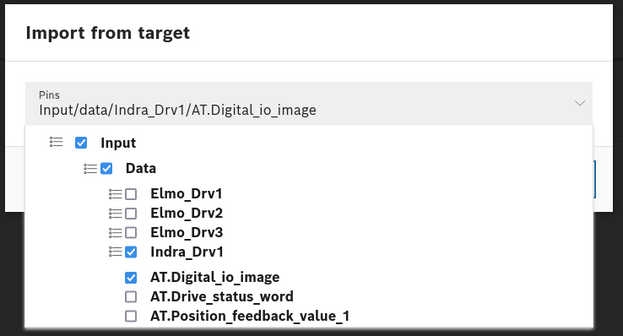
(In my project I go to > Project settings > Configure pins > Looking glass > Import from target)
I can select the digital io image (which is P-0-0303), however once imported, the pin is seen as a single input. If any of the digital inputs is high, the pin is high. I want to get access to all digital inputs from my IndraDrive. I looked around, but I cannot see a way to let the pins functions get access to the individual digital inputs.
I have a similar situation with my Elmo drive where I mapped the digital inputs through CoE parameter 1A1C (UDINT) and my digital outputs through CoE parameter 161D (UDINT).
- Mark as New
- Bookmark
- Subscribe
- Mute
- Subscribe to RSS Feed
- Permalink
- Report Inappropriate Content
03-03-2023 08:35 AM
Mapping a single bit of a bigger datum is at the moment not possible. We added this to our backlog. You have to read the datum manipulate it and then write it gain e.g. with the data layer library:

You could also create a own function doing this in one single line.
For checking/manipulating single bits there are are currently no representations in the block area but only in the textual programming languages.
//% shim=common::setBit    function setBit(value: number, bit: number): number;
//%
//% shim=common::clearBit    function clearBit(value: number, bit: number): number;
//%
//% shim=common::testBit    function testBit(value: number, bit: number): boolean;
//%
//% shim=common::toggleBit    function toggleBit(value: number, bit: number): number;


