
- Subscribe to RSS Feed
- Mark as New
- Mark as Read
- Bookmark
- Subscribe
- Printer Friendly Page
- Report Inappropriate Content
Overview
Function to exchange non real time data between PLC Engineering and ctrlX CORE. A user can exchange data online from ctrlX CORE watchlist. Both read and write of variables are supported.
- In version WRK-V-0204 (RM 23.11), only simple types like bool, int, string etc. are supported for data exchange.
- In version PLE-V-0206 (RM 24.03), simple and flatbuffer type (objects) are supported. Arrays and Structures are not supported.
- In version PLE-V-0302 (RM 24.07), simple and flatbuffer type (objects, arrays and structures) are supported.
Data exchange from ctrlX CORE watchlists
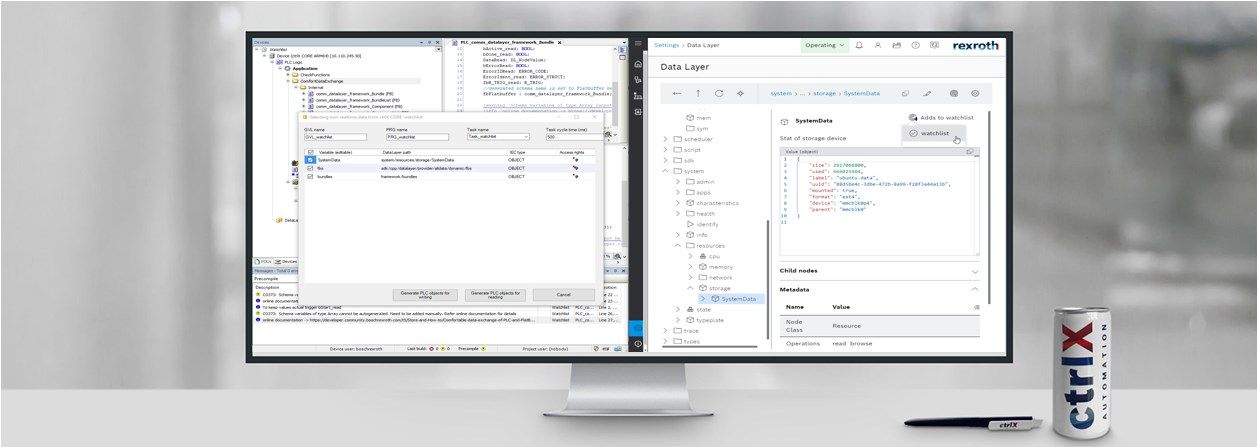
For online data exchange in PLC Engineering, variables need to be added to a watchlist. User can use the existing watchlist of a ctrlX CORE or create a new watchlist in the ctrlX CORE and then add variables to the created watchlist. To add variables to an existing watchlist, login to the ctrlX CORE and navigate to the desired variable in DataLayer and add to watchlist using the button ‘Adds to watchlist’ as shown below:

In this example, 3 variables are added to watchlist. Of these variables, two simple type variables (uint, bool) and one complex type variable (object) are added.
Note: Variable name for complex type shouldn't contain '_'. 
Add DataLayer variables in PLC Engineering from ctrlX CORE watchlists
- Open ctrlX PLC Engineering
- Create a new Project or Open an existing Project
- Open device node and connect to a ctrlX CORE in Communication Tab
- Right click on ‘Application’ node or on a folder node below application and click on context menu Add DataLayer variables -> from ctrlX CORE watchlists…
Add DataLayer variables in PLC Engineering from ctrlX CORE watchlists
- In the next dialog, select the desired watchlist and click OK.
Select watchlist
- In the next dialog, user can select the controller variables that are added to a watchlist. GVL, PRG and Task names are auto filled by the dialog. These names can also be edited. Existing task can be selected through the dropdown menu. Task cycle time can also be adjusted accordingly. After selecting the required variables in the dialog, User can click on ‘Generate PLC objects for writing’ or ‘Generate PLC objects for reading’.
Select non realtime data from watchlist
Dialog elements
GVL name Name of the GVL, which will be added to the Project. By default, GVL name is created by the dialog. This can be changed to any desired name. PRG name Name of the PRG, which will be added to the Project. By default, PRG name is created by the dialog. This can be changed to any desired name. Task name Name of the Task, which will be added to the Project. By default, Task name is created by the dialog. This can be changed to any desired name or select an existing task object from the combo box.
Type of the task by default is cyclic. This can be changed in the configuration tab of the Task.Task cycle time (ms) By default, Task cycle time is set to 500ms. This can be changed in the configuration tab of the Task. Variable editor Here the list of variables from the selected watchlist are shown, by default all valid variables will be checked. Variables can be checked or unchecked using the checkbox.
Variable name can be changed to a valid IEC name.
If the variable doesn’t have a valid IEC type, error icon with a tool tip is displayed.
Variable access rights can be ‘Read’, ‘Write’ and ‘Read & Write’. Each of the access rights has corresponding icon with a tooltipGenerate PLC objects for writing This button will generate required algorithm inside given GVL and PRG objects for writing values to the selected simple variables (INT, STRING, BOOL etc.)
If a FlatBuffer variables (OBJECT) is selected, then a folder ‘Internal’ is added below the selected node and required FB’s and PRG are generated below this Internal folder.
PRG object will be automatically added to the Task object.
If these objects already exist, overwrite dialog will be shown.Same GVL and PRG name cannot be used for both read and write.
Generate PLC objects for reading This button will generate required algorithm inside given GVL and PRG objects for reading values from the selected simple variables (INT, STRING, BOOL etc.)
If a FlatBuffer variables (OBJECT) is selected, then a folder ‘Internal’ is added below the selected node and required FB’s and PRG are generated below this Internal folder.
PRG object will be automatically added to the Task object.
Same GVL and PRG name cannot be used for both read and write.
If these objects already exist, overwrite dialog will be shown.Cancel This button will close the active dialog - To read value from variable
- For simple variables: Login and Start the application. Open GVL added by the dialog and read values displayed under column “Value”.
GVL editor in PLC Engineering
- For FlatBuffers variables: Expand Internal folder and Open PLC_<schema name> (PRG) read values displayed under column “Value”.
PRG editor in PLC Engineering
- For simple variables: Login and Start the application. Open GVL added by the dialog and read values displayed under column “Value”.
- To write value into variable
- For simple variables: Open GVL added by the dialog and write required value under column “Prepared value”. Right click on the same page to open context menu and click on “Write all Values of <device name.application name>”.
GVL editor in PLC Engineering
- For FlatBuffers variables: Expand Internal folder and Open PLC_<schema name> (PRG) and write required value under column “Prepared value”. Right click on the same page to open context menu and click on “Write all Values of <device name.application name>”.
PRG editor in PLC Engineering
- For simple variables: Open GVL added by the dialog and write required value under column “Prepared value”. Right click on the same page to open context menu and click on “Write all Values of <device name.application name>”.
Using FlatBuffers for type Arrays
Note: This feature is available in PLC Engineering version PLE-V-0302 and above.
Using Comfort data exchange complex flatbuffer types like arrays can be generated but due to the complexity involved in arrays, auto generated PLC programm doesn't contain schema (FB) methods that are required for data exchange. In this case a warning 'Schema variables of type Array cannot be autogenerated. Need to be added manually. Refer online documentation for details' is added automatically to the generated program.

As a reference open the project archive from the attached zip folder in PLC Engineering version PLE-V-0301 and above. Connect to a virtual/real controller and download the application 'DataProvider'. After successful download, data should be available under plc node in datalayer as shown below:

In the second application 'ReadArrayApplication' in PLC Engineering, a sample program is generated using the above 'struSample' and Array methods are called as shown below:
Note: Flatbuffer Array-Startindex is 0.

In a similar way, other complex variable of type Arrays can be used and programmed.
You must be a registered user to add a comment. If you've already registered, sign in. Otherwise, register and sign in.