FORUM CTRLX AUTOMATION
ctrlX World Partner Apps for ctrlX AUTOMATION
Dear Community User! We have started the migration process.
This community is now in READ ONLY mode.
Read more: Important
information on the platform change.
- ctrlX AUTOMATION Community
- Forum ctrlX AUTOMATION
- ctrlX CORE
- Change the certififcate for the reverse proxy aka webserver
Change the certififcate for the reverse proxy aka webserver
- Subscribe to RSS Feed
- Mark Topic as New
- Mark Topic as Read
- Float this Topic for Current User
- Bookmark
- Subscribe
- Mute
- Printer Friendly Page
- Mark as New
- Bookmark
- Subscribe
- Mute
- Subscribe to RSS Feed
- Permalink
- Report Inappropriate Content
06-24-2021 02:42 PM
Hi,
if connect to the ctrlx core via HTTPS eg. https://192.168.1.1/ it uses a certificate from Bosch with CN=* (btw this wildcard will cause issues in ssl clients if the DNS entry for the ip address 192.168.1.1 is a multi-level subdomain eg. ctrlx.cool.control.at.bosch.de)
You can change the certificate/keys via web UI or REST API ( eg. https://192.168.1.1/certificate-manager/api/v2/applications/webserver/certificates)
Nevertheless what I try, even if I delete all certs after a reboot the HTTPS connection uses always the dummy CN=* cert.
So two question:
1. Is the application named "webserver" the reverse proxy that handles all the traffic?
2. How can I change the used certificate for that endpoint eg. https://192.168.1.1
I read the docs -- really 😁 -- but there are only the functionalities of the buttons/REST API described. But there is no "set cert active for ..."
Solved! Go to Solution.
- Mark as New
- Bookmark
- Subscribe
- Mute
- Subscribe to RSS Feed
- Permalink
- Report Inappropriate Content
06-24-2021 03:32 PM
Hi drschiffler,
can you describe a bit deeper what your intention is?
I guess, you want to change the certificate against your own, created for a domain and signed by your own trusted CA?
Many thanks
- Mark as New
- Bookmark
- Subscribe
- Mute
- Subscribe to RSS Feed
- Permalink
- Report Inappropriate Content
06-24-2021 04:43 PM
Hi,
yes, the intention is to change the cert by replacing it with an own certificate. Unfortunately, this is also driven by the following situation.
- Network with multiple cores (virtual and real)
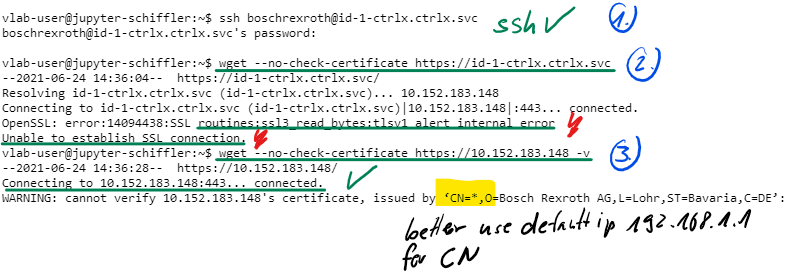
- DNS entries point to the ip adresses (eg. id-1-ctrlx.ctrlx.svc resolves to 10.148.52.28)
--> curl -X GET -k https://10.148.52.28 --> works
--> curl -X GET -k https://id-1-ctrlx.ctrlx.svc --> fails due to the CN=* entry in the default cert. (throws: routines:ssl3_read_bytes:tlsv1 alert internal error) Clearly this is NO issue with ctrlx but with SSL and understanding/reading the default certificate.
- Mark as New
- Bookmark
- Subscribe
- Mute
- Subscribe to RSS Feed
- Permalink
- Report Inappropriate Content
06-25-2021 07:24 AM - edited 06-25-2021 07:25 AM
Hi,
we have (at least I think so) the same scenario here in our network (the ctrlX CORE VIRTUAL is made available via <subdomain>.<domain>.tld) and for us it works.
We are currently improving the documentation on how to replace the web server certificate, because it is not intuitive. Let me describe how it works and how you can assign an individual certificate. Nevertheless, if you see (technical) issues with the way it is done please don't hesitate to say so - we are happy about feedback!
First of all - yes, the "Web Server" section under "Certificates & Keys" contains the certificates & keys for the device Web Server (to be precise: for the Reverse Proxy). There are two certificates (+ their corresponding keys) on the device:
- webserver_cert.pem / webserver_key.pem: Fallback certificate/key which ensures that you can always log in to the system by using the IP address. This prevents that you replace the certificate with an invalid / malformed one and lock your self out. You cannot delete or replace those files - both will be re-generated upon next boot and they will always contain the asterisk as a wildcard ("CN=*")
- webserver_custom_cert.pem / webserver_custom_key.pem: Those are the files that you want to replace when you issue a custom certificate. By default, those files use "CN=*" as well, but they can be replaced. Please note: They can be replaced, but they cannot be removed. They will be re-generated upon next start as well.
When you access the device via the URL, the Reverse Proxy checks whether the second certificate matches to the domain and uses the custom certificate.
Therefore, please try to to replace the *_custom* files with your individual key + certificate and restart the device. It should work.
As I said - we are currently working on improving the documentation and we are aware that it is not user-friendly (we are also working on that). But from a technical perspective, it should work. 🙂
Kind regards
- Mark as New
- Bookmark
- Subscribe
- Mute
- Subscribe to RSS Feed
- Permalink
- Report Inappropriate Content
06-25-2021 03:22 PM - edited 06-28-2021 12:01 PM
Hi,
so thanks for the explenation.
I understand:
The caddy reverse proxy has two tls directives in the config. Both point to the same backend services but with different certs/keys. One with a default_servername take all SNI (Server Name Identifier) and one with a server name which is extracted from the CN field in the webserver_custom_cert.pem (If that's the case I would recommend having a config option to set the server name for the reverse proxy, the hostname is/can be different to the server name)
- So i have to replace the webserver_custom_cert.pem with my own one
- Reach the reverse_proxy with the SNI which equals to the CN and then the "custom cert" ist used for ssl.
I've created a shell script to replace the cert. See below.
But it seems that the reverse proxy needs a "reload" to use the new custom cert. But after click "save config" and reboot my "custom" cert is gone and replaced by the default one.(?)
That's the state I will test this in a real ctrlX core to verify and exclude all possible effects which result from virtualization and post the results.
Deploy Script
#!/bin/sh
# Get a Token
TOKEN=$(curl -X POST -s \
-H "Content-Type: application/json" \
-d '{"name":"boschrexroth","password":"boschrexroth"}' \
https://$1/identity-manager/api/v1/auth/token | \
jq -r .access_token )
#echo $TOKEN

# Get the actual cert id
CERT=$(curl -X GET "https://$1/certificate-manager/api/v2/applications/webserver/certificates" \
    -H "accept: application/json" \
    -H "Authorization: Bearer $TOKEN" |\
    jq -r '.[]|select(.name | contains("webserver_custom_cert"))| .id')
# echo $CERT

# Get the actual key id
KEY=$(curl -X GET "https://$1/certificate-manager/api/v2/applications/webserver/keys" -H "accept: application/json" -H "Authorization: Bearer $TOKEN" | \
jq -r '.[]|select(.name | contains("webserver_custom_key"))| .id')
#echo $KEY

# Delete the cert and key because we want to replace it
curl -X DELETE "https://$1/certificate-manager/api/v2/applications/webserver/certificates/$CERT" -H "accept: */*" -H "Authorization: Bearer $TOKEN"
curl -X DELETE "https://$1/certificate-manager/api/v2/applications/webserver/keys/$KEY" -H "accept: */*" -H "Authorization: Bearer $TOKEN"

# NEW KEY
# Generate new key and new cert (selfsigned)
# openssl req -x509 -newkey rsa:4096 -keyout webserver_custom_key.pem -out webserver_custom_cert.pem -days 365
# Decrypt the key
#  openssl rsa -in webserver_custom_key.pem -out webserver_custom_key.pem
# curl -X POST "https://$1/certificate-manager/api/v2/applications/webserver/keys" \
#    -H "accept: application/json" \
#    -H "Content-Type: multipart/form-data" \
#    -H "Authorization: Bearer $TOKEN" \
#    -F "category=own" \
#    -F "file=@webserver_custom_key.pem"

# Upload the new cert
curl -X POST "https://$1/certificate-manager/api/v2/applications/webserver/certificates" \
    -H "accept: application/json" \
    -H "Content-Type: multipart/form-data" \
    -H "Authorization: Bearer $TOKEN" \
    -F "category=own" \
    -F "file=@webserver_custom_cert.pem"
- Mark as New
- Bookmark
- Subscribe
- Mute
- Subscribe to RSS Feed
- Permalink
- Report Inappropriate Content
06-28-2021 11:59 AM
Hi,
I've to correct my self. After testing it also with real ctrlX core I can confirm it works as described. Reboot is needed after upload a new cert/key.
Kind regards.