
- Subscribe to RSS Feed
- Mark as New
- Mark as Read
- Bookmark
- Subscribe
- Printer Friendly Page
- Report Inappropriate Content
In the following we show to you how to best use cogging compensation at ctrlX DRIVE.
Versions used
All the functions and screen shots are based on:
- ctrlX DRIVE Engineering version 01V16
- Runtime / Firmware version of drive AXS-V0308
Prerequisites
A connection to the ctrlX DRIVE has been successfully established, the device is correctly wired and 24 V are successfully put on. As well the engineering tool ctrlX DRIVE Engineering has been started.
1. What the function is good for
The cogging compensation diminishes the distortions of the ripple effects resulting from the tolerances of
- the mechanical design,
- the magnets or
- the stator/rotor slots in the laminated steel metal sheets
today´s motors consist of.
This allows a more accurate smooth run behavior and therefor allows more precise processes or machining, e.g. to improve
- the surface quality in freeform milling at machine tools
- the surface roughness and accuracy in grinding operations at
machine tools
- the printing quality and color brilliance in printing machines
- the dosing quality in medical appliances
- the moving comfort in simulators
2. Prerequisite for using the cogging compensation function
In order to activate the function the so-called productivity package must be present. It should normally already be ordered correctly or, if not ordered, be licensed afterwards by “Import license”.
The “Cogging torque compensation” function itself then need to be selected and activated by a “Reboot”.

Fig. 1.: Productivity package with activated function “Cogging torque compensation”
Mind that the overall performance of the drive is restricted to not allow more than eight performance points in total shown in the last column. In the example shown in Fig. 1 already eight performance point functions are selected in total. So no additional performance point costing function can be activated additionally.
3. Configure parameters
The cogging compensation may be either used
- in a limited position range (if the travel length is not too big)
--> compensation table is learned within this limits using 1024 compensation points, or
- over the entire travel range
--> if not a modulo rotatory axis the compensation table is learned only over one pole pair
(for rotatory motors) or one pole width (for linear motors) which is seen representative
for the entire travel length
--> if a modulo rotatory axis the compensation table is learned over one revolution of rota-
tory motor (usually 360°)

Fig. 2.: Configuration for “Limited position range”
4. Learn compensation table
The cogging compensation table is simplest learned by using the “Easy Startup Mode” inside the drive. Prerequisite is that the axis is already in reference. Start “Easy Startup Mode”, select “Drive-controlled positioning”, use “Reversing”, then press button “Drive On”!

Fig. 3.: Easy Startup Mode using “Drive-controlled positioning” with Reversing
Start movement by pressing the “Start” button!

Fig. 4.: Select “Determining of cogging torque compensation controlled by control unit” (even if in here the Easy Startup Mode is used
Start learning of compensation table by pressing the button “Determine cogging torque compensation table”!
After the required number of measured values is reached the radio button is signaling this in getting “green”. The command execution is signaled to be successfully finished.

Fig. 5.: Command execution successful
After the command execution is successful you may “Close” the popup window and the command is finished.

Fig. 6.: Close popup window
Then stop movement!

Fig. 7.: Stop movement
Switch Drive Off!

Fig. 8.: Switch Drive Off

Fig. 9.: Show learned compensation table
Then the learned, not corrected table values will be shown. As one can see there seems to be an offset in between the positive (blue) and negative (green) table values.

Fig. 10.: Current compensation values
5. Correct and activate compensation table
The compensation table may be corrected in using the “Correct tables” button.

Fig. 11.: Correct compensation table (1)
Enter the offset which seems to be visible, here +7,0% in positive, -7,0% in negative direction and press button “Recalculate cogging torque compensation table”!

Fig. 12.: Correct compensation table (2)
The corrected compensation table is then displayed.

Fig. 13.: Correct compensation table (3)
Then activate the cogging compensation and set the figures up to which speed the compensation should be fully active, at which speed switched off and if attenuated with which factor. Here no attenuation is used.

Fig. 14.: Activate cogging compensation function
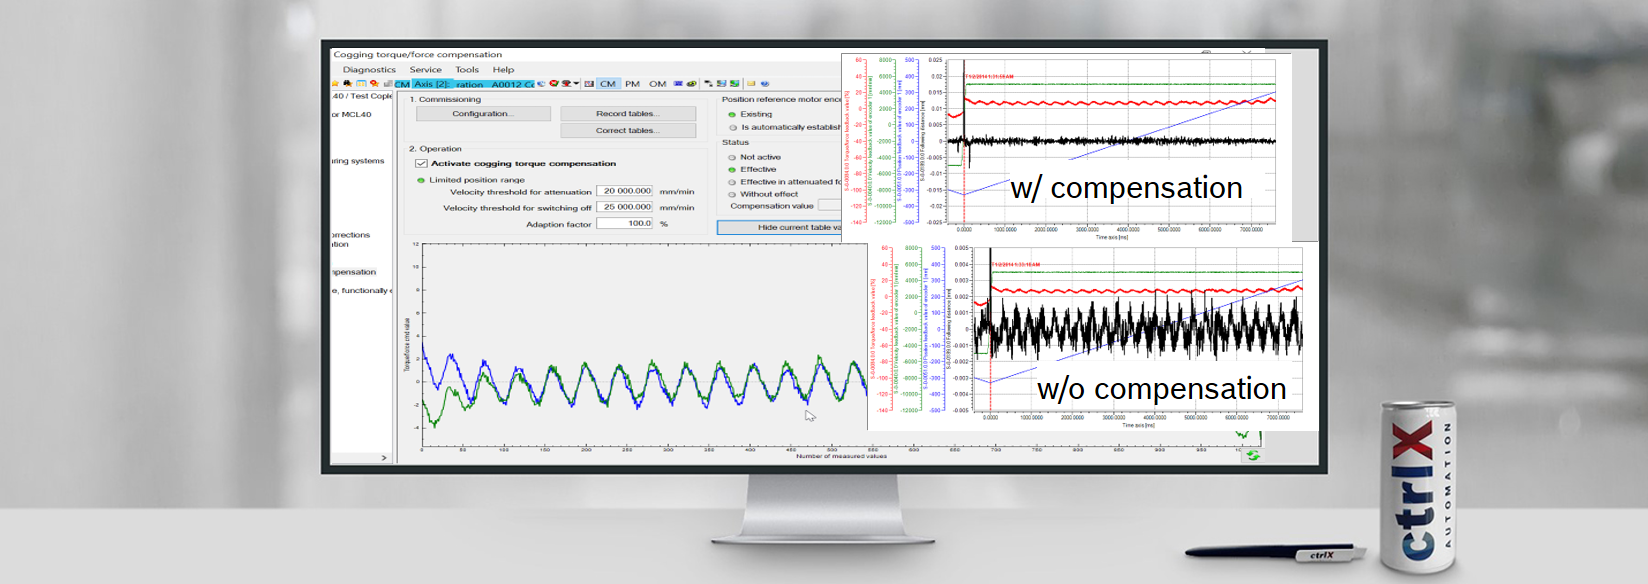
6. Difference if moving w/o or w/ cogging compensation
In order to see how well the compensation works appropriate scope readings should be taken. Compensation can be switched on or off by using the check box shown in Fig.14.

Fig. 15.: Behavior at 5 m/min w/o cogging compensation (compensation off)

Fig. 16.: Behavior at 5 m/min w/ cogging compensation (compensation on)

Fig. 17.: Behavior at 5 m/min w/o cogging compensation (compensation off) – Zoomed

Fig. 18.: Behavior at 5 m/min w/ cogging compensation (compensation on) – Zoomed

Fig. 19.: Behavior at 20 m/min w/o cogging compensation (compensation off)

Fig. 20.: Behavior at 20 m/min w/ cogging compensation (compensation on)

You must be a registered user to add a comment. If you've already registered, sign in. Otherwise, register and sign in.