
- Subscribe to RSS Feed
- Mark as New
- Mark as Read
- Bookmark
- Subscribe
- Printer Friendly Page
- Report Inappropriate Content
Disclaimer and Topology
The goal is to set up the Modbus TCP app from scratch and communicate with a device. Here we have an example with Wago 750-881 buscoupler equipped with 2 digital Inputs, 2 digital Outputs and 2 analog Outputs. Additionally the communication with a XM22 device will be shown.

IP addresses
- XM22: 192.168.1.25
- ctrlX CORE: 192.168.1.1
- WAGO buskoppler: 192.168.1.15
Requirements
- ctrlX CORE - x3 or x7 or a ctrlX OS installation
- Modbus TCP app installed>=1.20 + license
- Some Slave/Server device
1 - Setup the communication
With Wago
Open the app page and click on "Add Modbus TCP Device".

In the window we have to insert the Modbus TCP device infos and click over save:
- A name of choice
- The device IP address
- The device port
- The unit ID: Normally 255 (Remark to the unit ID, it depends on the device, normally default is 255. On Modbus TCP it has to match with the connected hardware, but can be present multiple times. In Modbus RTU it's the unique slave address)

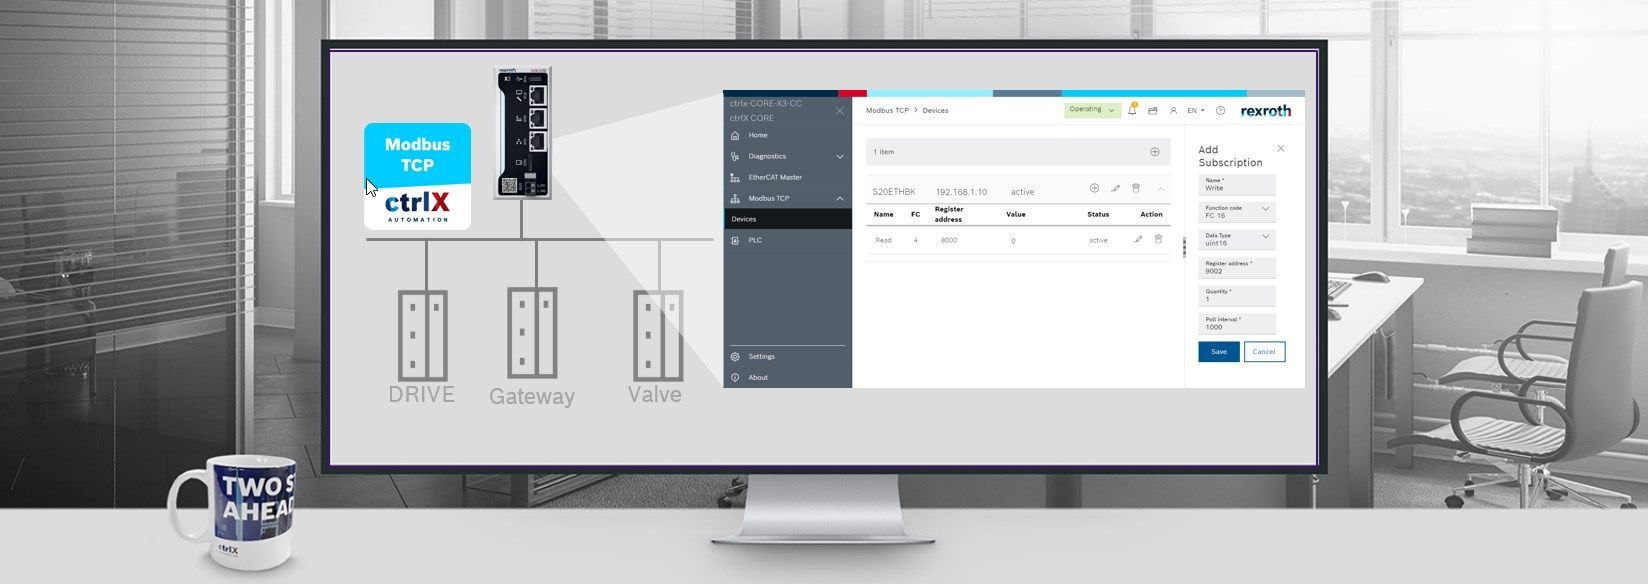
Click on "add subscription" button.

The subscription should be fulfilled with the right parameters:
- Name chosen
- Function Code: the function that the subscription should fulfill, it depends by what we need to do and can be found in the device description/datasheet:
- FC1: Read Multiple Coils
- FC3: Read Multiple Holding Registers
- FC4: Read Multiple Input Registers
- FC6: Write Single Holding Registers
- FC15: Write Multiple Coils
- FC16: Write Multiple Holding Registers
- FC23: Read/Write multiple Holding Registers
- The address that we want to read/write
- Sometimes (if needed) the datatype contained by the register
- The number of the addresses that we want to use
- The Polling interval

Once I have added all the subscriptions the overall setup looks like this:

All the data are then present in the datalayer for editing and reading and can be used by any app.

with XM22 device
Open the app page and click on "Add Modbus TCP Device" and add the device data.


We add the right configurations, since we want to keep updated all the 100 variables the register configuration will look like this:

The overall configuration will be the following:
 Global Configuration 2 - Import the data inside PLC Engineering
Login on time in the PLC with an empty project (or with your project) and then logout. Right click on the datalayer, select real time data and then selectively from ctrlX CORE.

To select the modbustcp_client entry, click on the import button and after this all the data will be in the Datalayer_Realtime tree.


Support
Related Links
Have Fun 😎

You must be a registered user to add a comment. If you've already registered, sign in. Otherwise, register and sign in.