
- Subscribe to RSS Feed
- Mark as New
- Mark as Read
- Bookmark
- Subscribe
- Printer Friendly Page
- Report Inappropriate Content
The Goal
ModbusRTU is of course an old protocol, but sometimes it's still necessary to use, in the case of simple machines or system upgrades. In this how to, we will see some methods of interacting with ModbusRTU devices.
Disclaimer
This guide takes into account that the people are already able to program the ctrlX CORE from PLC and EtherCAT points of view.
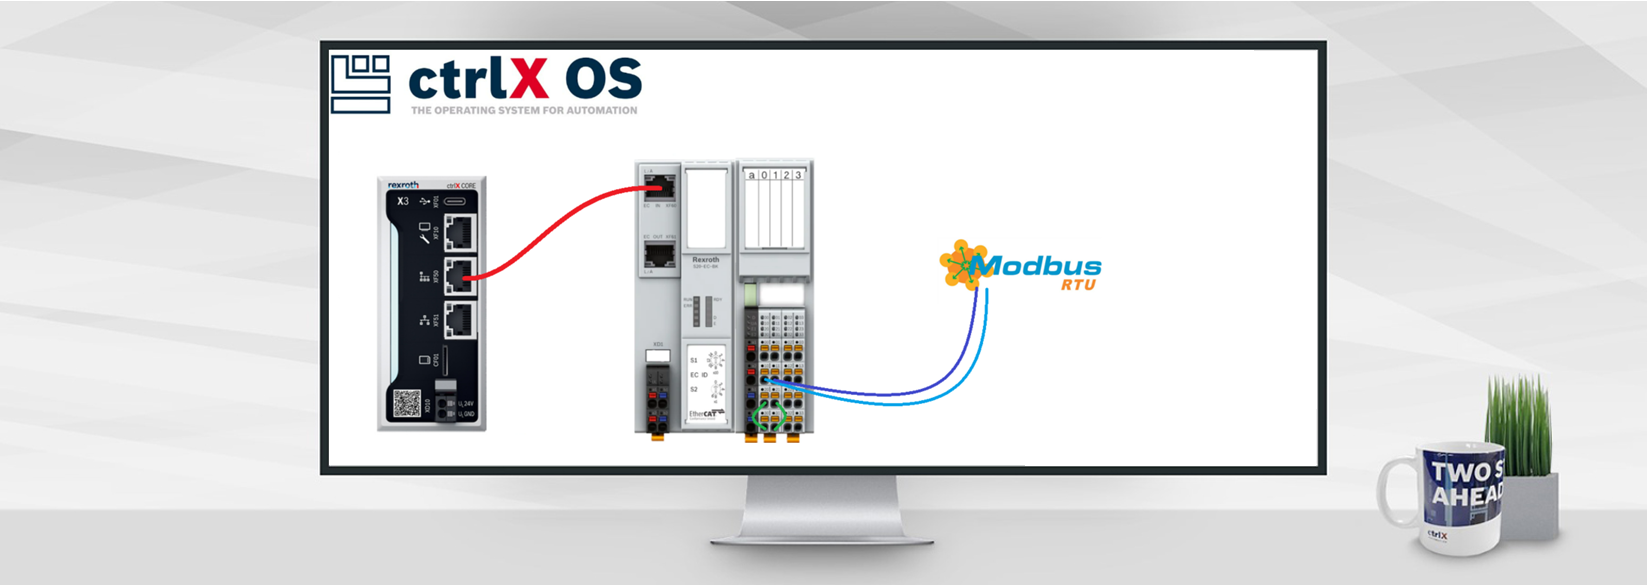
Way number 1: full industrial with S20-RS-UNI
Setup used

- ctrlX CORE
- EtherCAT Bus coupler with the "RS-UNI" module
- ModbusRTU device: an EFC5610
- Apps: EtherCAT Master + PLC app 1.20-2.2
The manuals can be found on the Bosch Rexroth website using the search button.
Step 1: Wiring
Looking inside the RS-UNI documentation we can see how the system should be configured:

In this configuration we are at the start then we go for the configuration number 1 expressed in figure 8.1
Step 2: Setup the EtherCAT configuration
The EtherCAT configuration setup is very easy, we need to create the "ethercatmaster" device and scan the network configuration or create it manually. In the end in this case it should look like this:

Step 3: Configure the PLC to run the example
Import the example
In the library manager we have to insert the CXA_MODBUSRTU library. I created POU in the configuration. This routine is then called inside the PLC task.


This examples explains how to use the library. Copying in the POU prg the variable section and the program section is enough.
Map the process variables
Now we have to import the S20_RS_UNI module in the program and map the variables. It is enough to right click and go trough the process:

We have to map correctly the variables we have in the POU with the ones that we have available from the S20_RS_UNI device.

Modify the example
Now we have to set the example with the settings from our device in order to setup the correct communication. What we have to set is:
- Communication baud rate and the other protocol entries. For example this configuration shows how to communicate with RS485, 9600 as baud rate, and 8 data bit with no parity (and 1 stop bit). Do not modify the protocol type otherwise the system will stop working. keep it transparent.

- Communication addresses: EtherCAT address and uiSlot address of the submodule.

Done, now we should be able to load the program and use some function to read and write coils and parameters. Using the EFC5610 the manual suggests 2 registers: one to read and one to write:

Way number 2: use a TCP-Modbus gateway
There are a lot of devices that can implement this feature online. Each of them is different, so it is not possible to create a unique guide. The idea anyway is to use an external device to convert the communication from and to serial to another protocol.

Way number 3: node-red + USB-SERIAL adapter (Use at your risk)
Some users may want to use a USB-serial adapter with node-red but it is not a full industrial solution and his limitations should be investigated by the user. This solution is not officially supported.
Technically using the Modbus nodes from node-red it is possible to:
- Use a driver free USB to serial adapter (it is not possible to install drivers so, it works or it doens't)
- Connect it to the core and wire it to the device
- Use node-red to interact with the adapter
I link down the configuration adopted. USB-Serial address my vary. Check on a desktop ubuntu first if it works out of the box.


Use it at your own risk.
Have fun 😎

You must be a registered user to add a comment. If you've already registered, sign in. Otherwise, register and sign in.